Droopy Orchid Leaves Solved: 8 Simple Tricks That Work Like Magic
Table of Contents 👈 Tap Here
Bringing home a beautiful new orchid, only to watch its leaves start to droop, can be disheartening. If you’re dealing with droopy or even wrinkled leaves on your moth orchid (Phalaenopsis), you’re not alone. Orchids can be picky, and when issues like this arise, it’s easy to feel frustrated. But don’t give up just yet! There are several common reasons for this problem, and with a little extra care, you can bring those leaves back to life. Keep reading to discover the causes and the one key step that will help your orchid thrive again.
Droopy Orchid Leaves: guide on how to fix
Is your Phalaenopsis orchid’s leaves droopy and possibly wrinkled, leaving you uncertain about the cause and unsure of how to resolve the problem? Don’t worry, as I will provide you with an explanation of the potential causes behind this issue and offer a single solution to rectify the situation!
The main culprit behind droopy and wrinkled orchid leaves can be attributed to a fundamental flaw in the watering routine.

Causes of Droopy Orchid Leaves
Droopy orchid leaves can have various causes, each indicating a specific issue with the plant’s care. One possible culprit is overwatering, where excessive moisture leads to root rot and subsequent leaf wilting. Underwatering, on the other hand, deprives the orchid of necessary hydration, causing the leaves to become limp. Insufficient light can also result in droopy leaves, as orchids require adequate light to sustain their growth.
Temperature extremes, such as excessively hot or cold conditions, can stress the plant and lead to leaf drooping. Finally, nutrient deficiencies or imbalances can manifest as droopy leaves, indicating the need for proper fertilization. Understanding the causes of droopy orchid leaves is essential in providing targeted care to restore the plant’s health and vigor.
Overwatering is a common cause of droopy orchid leaves, and addressing this issue is crucial for restoring the health of your plant. Here’s a step-by-step guide to help you fix overwatered orchids:
Assess the Damage: Examine the orchid closely to determine the extent of the damage caused by overwatering. Look for signs such as yellowing or brown mushy roots, a foul odour, and soft or droopy leaves.
Remove Excess Water: If the potting medium is excessively wet, carefully remove the orchid from its pot. Gently shake off any excess water or use a clean cloth to soak up the moisture from the leaves and crown. Allow the orchid to air dry for a few hours before repotting.
Check the roots: Carefully inspect the roots for signs of root rot. Healthy roots are firm, white or green, and have a slightly velvety texture. Trim away any mushy, brown, or rotten roots using sterile pruning shears. Ensure the remaining roots are healthy and intact.
Repotting: Choose a new pot that is only slightly larger than the root system, as orchids prefer snug spaces. Select a well-draining orchid potting mix, such as a combination of bark, sphagnum moss, and perlite. Place a layer of fresh mix at the bottom of the new pot.
Reposition the Orchid: Gently position the orchid in the new pot, ensuring the remaining healthy roots are spread out naturally. Add more potting mix around the roots, gently pressing it down to secure the plant. Leave enough space between the potting mix and the rim of the pot for watering.
Adjust Watering Routine: After repotting, adjust your watering routine to prevent overwatering in the future. Wait until the potting mix has mostly dried out before watering again. Remember to check the moisture level by sticking your finger into the medium and only adding water when it feels dry.
Provide Adequate Air Circulation: Orchids thrive in environments with good air circulation. Place your orchid in a location with proper ventilation to prevent moisture buildup and reduce the risk of root rot.
Observe and maintain: Keep a close eye on your orchid’s progress. Healthy new growth and firm, upright leaves indicate that your plant is recovering. Continue to provide appropriate lighting, temperature, and humidity conditions for optimal growth.

Underwatering
Underwatering can also lead to droopy orchid leaves, but with the right care, you can revive your orchid’s health. Here’s a step-by-step guide to address underwatering and restore your orchid’s vitality:
Assess the symptoms: Look for signs of underwatering, such as wilted, droopy leaves, shrivelled pseudobulbs, and dry potting medium. These symptoms indicate that your orchid is not receiving enough water.
Hydrate the Orchid: Place the orchid in a sink or container and thoroughly soak the potting medium with room-temperature water. Allow the water to flow through the pot, ensuring the roots are well hydrated. Let the excess water drain completely.
Monitor Moisture Levels: After watering, monitor the moisture levels of the potting medium. Orchids prefer a drying-out period between waterings, so allow the top layer of the potting medium to dry out before watering again. Use the finger test to check the moisture level by inserting your finger about an inch into the medium. If it feels dry, it’s time to water it.
Adjust Watering Frequency: Orchids typically need less frequent watering compared to other houseplants. The frequency of watering depends on various factors, including the type of orchid, potting medium, and environmental conditions. It’s essential to find the right balance between watering and allowing the roots to dry out slightly between waterings.
Humidity Management: Orchids prefer higher humidity levels. Increase the humidity around your orchid by placing a tray filled with water near the plant, using a humidifier, or grouping orchids together. Avoid misting the leaves directly, as it can lead to fungal or bacterial issues.
Maintain Suitable Lighting: Adequate light is crucial for orchid growth. Ensure your orchid is placed in an area with suitable lighting conditions. Orchids generally thrive in bright, indirect light. Adjust the position of your orchid to provide it with the optimal light levels it requires.
Temperature Considerations: Orchids have specific temperature preferences. Ensure that the temperature around your orchid falls within its ideal range. Most orchids prefer daytime temperatures between 60°F and 80°F (15°C and 27°C) and a slight drop in temperature during the night.
Observe and adjust: Continuously monitor your orchid’s progress. Healthy new growth and turgid, upright leaves are signs that your orchid is recovering from underwatering. Make adjustments to the watering routine, lighting, and humidity as needed based on your orchid’s response.
Improper Lighting:
Improper lighting can cause droopy orchid leaves, as orchids rely on light for photosynthesis and overall growth. Here’s a guide to understanding and addressing lighting issues with your orchid:
Assess Current Lighting Conditions: Evaluate the lighting situation for your orchid. Is it receiving enough light, or is it exposed to too much direct sunlight? Orchids generally prefer bright, indirect light rather than intense, direct sunlight.
Adequate Light Levels: Orchids need sufficient light to produce energy through photosynthesis. If your orchid is not getting enough light, it may exhibit droopy leaves and weak growth. Ensure that your orchid is placed in a location where it receives bright, indirect light for several hours a day.
Adjust light intensity: If your orchid is exposed to direct sunlight for extended periods, it can result in sunburn and droopy leaves. If this is the case, move your orchid to a spot with filtered or diffused light. Sheer curtains, blinds, or placing it near a window that receives bright but indirect light can help protect it from excessive sun exposure.
Light Duration: Orchids require a consistent light-dark cycle to mimic their natural environment. Provide your orchid with around 10–12 hours of light each day. Avoid exposing it to artificial light during the night, as orchids need a period of darkness for proper growth.
Consider Supplemental Lighting: If you don’t have access to a location with sufficient natural light, consider using artificial grow lights specifically designed for orchids. LED grow lights are a popular choice, as they provide the necessary spectrum and intensity for orchid growth. Position the lights at an appropriate distance above the orchid to avoid burning the leaves.
Monitor Leaf Colour: Pay attention to the colour of your orchid’s leaves. Healthy leaves should be vibrant green. If the leaves are turning pale or yellow, it may indicate insufficient light. If the leaves are becoming dark green and appear to be reaching towards the light, it may indicate too little light.
Observe and adjust: Keep a close eye on your orchid’s response to the lighting conditions. Over time, you should see improvements in leaf growth and turgidity. If you notice that the leaves are not responding positively or if the symptoms persist, adjust the lighting conditions accordingly.
Evaluate Lighting Conditions: Begin by assessing the current lighting conditions your orchid is experiencing. Orchids typically thrive in bright, indirect light. Insufficient light or excessive direct sunlight can both lead to droopy leaves.
Insufficient Light: If your orchid is not receiving enough light, it may have weak, elongated growth and droopy leaves. Consider moving it to a location where it can receive brighter, indirect light. North- or east-facing windows are often suitable for providing the required amount of light.
Intense direct sunlight: On the other hand, too much direct sunlight can cause sunburn and lead to droopy leaves. Orchids generally prefer filtered or diffused light. If your orchid is exposed to intense sunlight, you can place it near a sheer curtain or use sheer fabric to filter the light.
Consider light duration: orchids require a proper light-dark cycle to mimic their natural environment. Ensure your orchid receives around 10–12 hours of light per day, followed by a period of darkness. Avoid exposing your orchid to artificial light during the night, as it needs uninterrupted darkness for healthy growth.
Supplemental Lighting: If you’re unable to provide adequate natural light, you can consider using artificial grow lights. LED grow lights are energy-efficient and provide the necessary spectrum for orchid growth. Position the lights at an appropriate distance to ensure they cover the entire orchid, and adjust the duration based on the specific needs of your orchid species.
Monitor Leaf Colour: Pay attention to the colour of your orchid’s leaves. Healthy leaves should have a vibrant, rich green colour. Pale or yellowing leaves indicate insufficient light, while dark green leaves reaching towards the light may suggest too little light. Adjust the lighting conditions based on these visual cues.
Regularly Rotate the Orchid: To ensure even light distribution and prevent lopsided growth, rotate your orchid periodically. This will allow all sides of the plant to receive adequate light exposure and promote balanced leaf growth.
Observe and adjust: Continuously monitor your orchid’s response to the lighting conditions and make adjustments as needed. It may take some time for the plant to recover and show improvements in leaf health and vigour.
Temperature Extremes:
Temperature extremes can have a significant impact on the health and well-being of your orchids, leading to droopy leaves and overall stress. Orchids are sensitive to temperature fluctuations and require specific conditions to thrive. Here’s a guide to understanding and addressing temperature-related issues with your orchids:
Identify Temperature Extremes: Evaluate the temperature conditions your orchids are exposed to. Orchids generally prefer moderate temperatures and can suffer from both excessively high and low temperatures.
High Temperatures: Orchids can experience heat stress when subjected to prolonged periods of high temperatures. This can result in droopy leaves, wilting, and slowed growth. To mitigate this issue, avoid placing your orchids in direct sunlight or near heat sources such as radiators, heaters, or hot windows. Ensure adequate ventilation and airflow around the plants.
Cool Temperatures: Extremely low temperatures can also adversely affect orchids. Cold drafts and frosty conditions can cause droopy leaves and hinder growth. Protect your orchids from cold drafts by keeping them away from drafty windows or doors. If necessary, provide insulation by placing the orchids near other plants or using a plant cover or frost cloth during colder seasons.
Optimal Temperature Range: Different orchid species have specific temperature preferences, so it’s important to understand the ideal temperature range for your particular orchids. Most orchids thrive in temperatures between 60°F and 80°F (15°C – 27°C) during the day, with a slight drop in temperature at night. Research the specific temperature requirements for your orchid species and aim to provide conditions within that range.
Temperature Regulation: Maintain a consistent temperature environment for your orchids. Avoid sudden temperature fluctuations, as they can be stressful for the plants. Keep them away from areas with drastic temperature changes, such as drafty windows, air conditioning units, or heating vents. Maintain a stable temperature by placing them in a location with consistent room temperatures.
Protective Measures: During extreme weather conditions, take extra precautions to protect your orchids. For high temperatures, consider providing shade or moving them to a cooler area of your home. If you anticipate cold temperatures, bring your orchids indoors or use additional insulation to protect them from frost.
Monitor Leaf Health: Droopy leaves can be a sign of temperature stress. Regularly observe the color and turgidity of your orchid’s leaves. If they appear wilted, discolored, or droopy, it may indicate temperature-related issues. Adjust the temperature conditions accordingly and monitor the plant’s response.
Microclimate Management: Create a suitable microclimate for your orchids by maintaining appropriate humidity levels. Orchids generally appreciate higher humidity, so you can use a humidity tray, misting, or a humidifier to increase humidity levels around the plants. The consequences of temperature extremes may be lessened as a result.
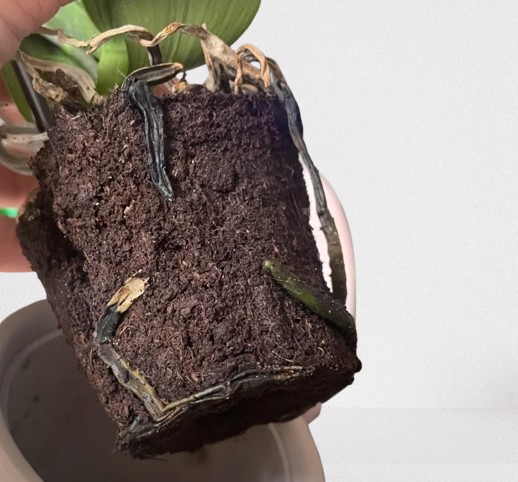
Potting Medium Issues:
Potting medium issues can contribute to droopy leaves in orchids. The type and condition of the potting medium play a crucial role in providing proper drainage and aeration for the roots. If the potting medium retains too much moisture or becomes compacted over time, it can lead to root rot and hinder the uptake of essential nutrients.
To address potting medium issues, ensure that your orchid is potted in a well-draining medium specifically formulated for orchids, such as a bark-based mix. Regularly check the moisture level of the potting medium and adjust your watering schedule accordingly.
If the potting medium has broken down or become compacted, consider repotting your orchid with fresh medium to provide optimal conditions for healthy root growth and prevent droopy leaves.
nutrient imbalance:
A nutrient imbalance can contribute to droopy leaves in orchids. Orchids require a balanced supply of nutrients for healthy growth and vibrant foliage. If there is an excess or deficiency of certain essential elements, it can affect the overall health of the plant. To address nutrient imbalances, it’s important to use a specifically formulated orchid fertiliser and follow the recommended dosage.
Avoid over-fertilising, as this can lead to salt buildup and root damage. Regularly monitor the condition of your orchid’s leaves and look for signs of nutrient deficiencies or excesses, such as yellowing or browning. Adjust your fertilisation schedule and type of fertiliser as needed to maintain a balanced nutrient supply and promote strong, upright leaves in your orchid.
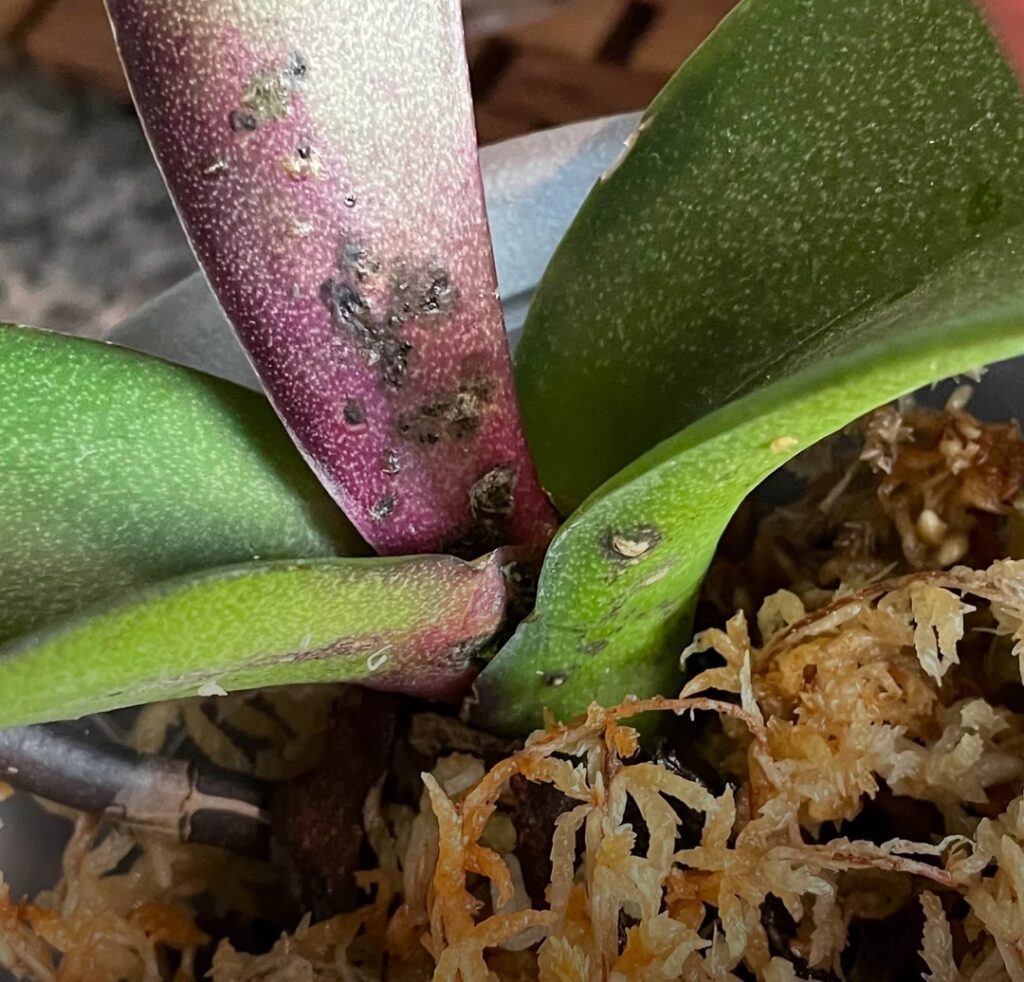
pest infestation:
Pest infestations can cause droopy leaves in orchids and pose a threat to their overall health. Common pests that can affect orchids include spider mites, aphids, mealybugs, and scale insects. These pests can sap the vitality of the plant, leading to wilting and droopy leaves. To address pest infestations, it’s important to regularly inspect your orchid for any signs of pests, such as webs, sticky residue, or visible insects.
If you identify a pest problem, isolate the affected orchid to prevent the infestation from spreading to other plants. Treat the infestation using appropriate methods, such as insecticidal soaps, neem oil, or horticultural oils, following the instructions carefully. Ensure thorough coverage of all plant surfaces, including the undersides of leaves. Regularly monitor your orchid and repeat the treatment as necessary until the pests are fully eradicated, helping to restore the health and vigour of your orchid’s leaves.
FAQ:
Why are my orchid leaves drooping?
Droopy orchid leaves can be a sign of various issues, such as overwatering, underwatering, or poor light conditions. It’s essential to identify the underlying cause to restore your orchid’s health.
How do I fix droopy orchid leaves?
To fix droopy orchid leaves, check the watering schedule, ensure the orchid is getting enough light, and avoid sudden temperature changes. Proper care can help revive your orchid’s leaves.
How can I prevent droopy orchid leaves?
To prevent droopy orchid leaves, ensure you’re providing adequate water, light, and humidity. Keep your orchid in a stable environment to avoid stressing the plant.
What should I do if my orchid’s leaves are still droopy after adjusting care?
If your orchid’s leaves remain droopy after adjusting care, it may be due to a disease or pest issue. Inspect the plant carefully for any signs of infection or mealybugs, which can cause further damage.
Do droopy orchid leaves indicate a pest problem?
While droopy orchid leaves are not always a sign of pests, they can sometimes be a symptom of an underlying issue. Inspect your orchid for pests like mealybugs or scale that may be causing stress.
Can I save an orchid with droopy leaves?
Yes, in many cases, you can save an orchid with droopy leaves. Evaluate the care conditions and make necessary adjustments, such as correcting watering or improving light exposure.
How long does it take for droopy orchid leaves to recover?
The recovery time for droopy orchid leaves can vary, but with proper care, you should start seeing improvement within a few weeks. Be patient and consistent with your orchid’s needs
Can fertilizing help with droopy orchid leaves?
Fertilizing can help improve the overall health of your orchid, but it won’t directly fix droopy orchid leaves if the issue is related to watering or lighting. Ensure the basic needs are met before adding fertilizer.
Should I prune droopy orchid leaves?
Pruning droopy orchid leaves should only be done if they are dead or severely damaged. Healthy but droopy leaves can often recover with proper care.
Hi, I’m Steve, an orchid grower with 30+ years of hands-on experience caring for indoor and outdoor plants. I share practical, tested tips and beginner-friendly guides to help plant enthusiasts nurture healthy, thriving plants.