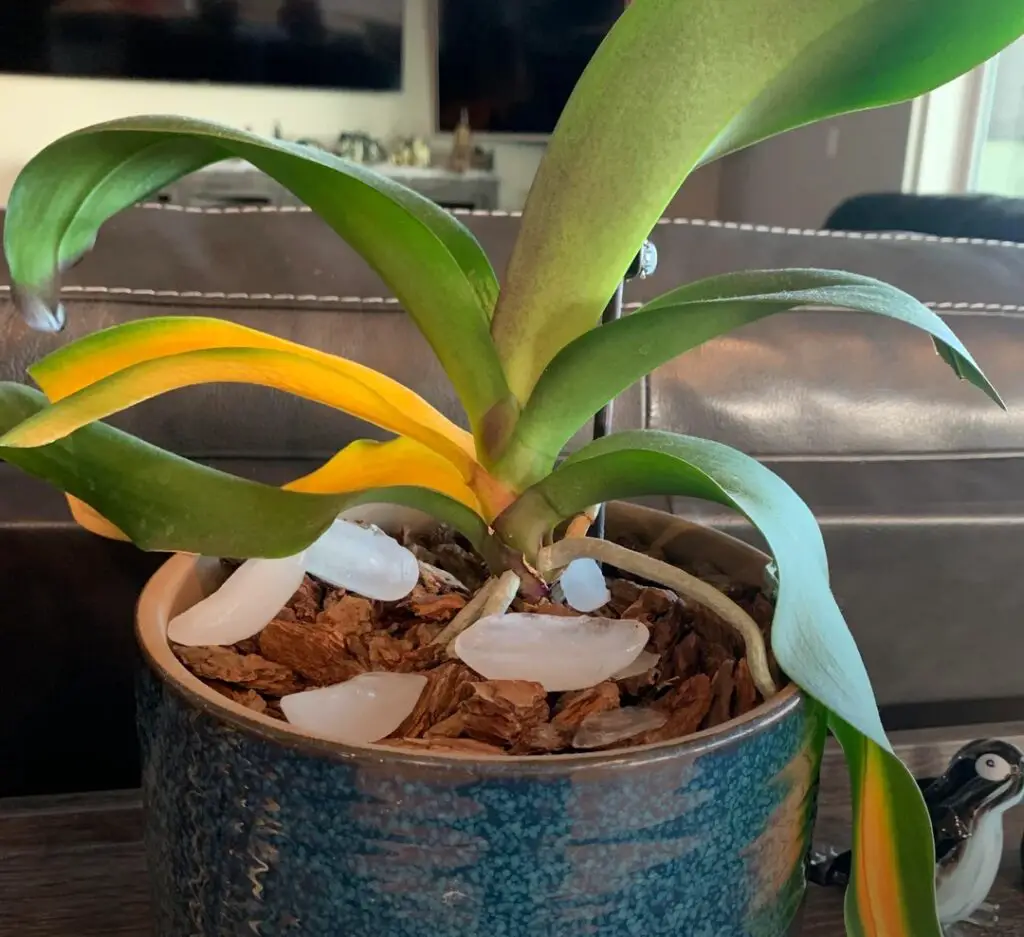
Orchids are among the most beautiful and delicate flowers in the world, and they can be a joy to grow and care for. However, even the most experienced orchid growers can face challenges with their plants, such as when the leaves start to turn yellow. This can be concerning for orchid owners, but is it normal. In this blog post, we will explore the reasons why orchid leaves turn yellow and what you can do to keep your orchids healthy and vibrant.
First of all, it is important to understand that orchids are not like regular houseplants.little bit of more care to thrive.
While yellowing leaves can be a sign of a problem, it is not necessarily abnormal for orchids to shed their lower leaves. This is a natural process that occurs as the plant grows, and it is nothing to worry about.
Identifying the Causes of Yellowing Orchid Leaves:

- 1 Sunburn caused by too much direct light
- 2 Hardness in Water
- 3 overwatering can cause (roots rot)
- 4 Underwatering
- 5 low temperature inside indoors
- 6 Diseases (spotted yellow leaves)
- 7 To much Fertiliser
- 8 not enough nutrients
- 9 Naturally yellowing and falling off leaves
- 10 Improper Lighting
- 11 FAQS
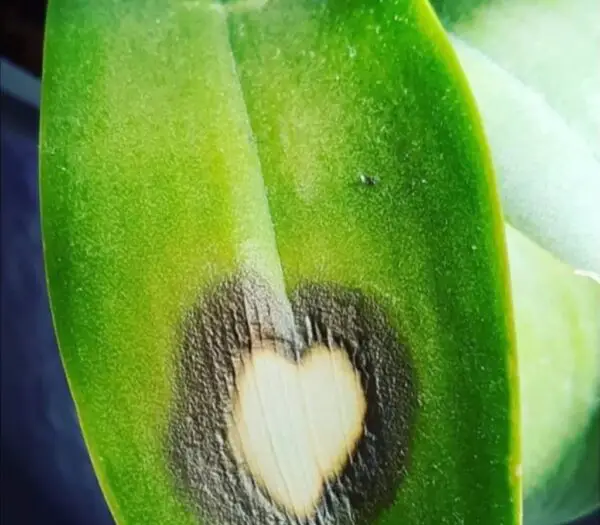
Sunburn caused by too much direct light
Sunburn from excessive exposure to direct sunlight is the most frequent cause of yellow leaves.
In general, orchids require light but not direct sunlight. Some people, though, are more light-tolerant than others. The right amount will depend on the genus and, occasionally, the precise species of your orchid.
To fix the problem:First, determine what kind of orchid you have. The amount of light it needs will depend on its environment. Some orchids are accustomed to being in a lot of shadow and naturally grow beneath dense tree cover. Others can tolerate more intense sunshine and thrive in the open.
If you think this is the issue, move your orchid to a location that offers a little more shade. Because they let in the most light, north-facing windows are generally best avoided.
Hardness in Water
You might not think about the sort of water you’re using when you’re watering your orchid. This, however, has a significant impact.
Many individuals reside in regions with hard water, which has significant concentrations of dissolved minerals, including calcium and magnesium. These may hinder your plant’s ability to absorb nutrients.
Your orchid may consequently develop yellow leaves.
To fix the problem:There are several solutions to this issue:
Because it is so pure, hydrate your orchid with distilled water.
Use bottled water instead of tap water because it is typically softer.
Invest in a water softener, which can make your tap water taste better by removing some of the minerals.
Although they might be rather pricey, water softeners are a terrific investment because they work so well. They also assist with tasks like dishwashing and laundry because less detergent is used.

overwatering can cause (roots rot)
Rotten roots in your orchid might result from overwatering or poor drainage. Your orchid’s leaves will turn yellow since it won’t be able to effectively absorb nutrients.
To fix the problem Water your orchid only when the top inch of the potting soil is dry and the roots are white.
The pot you’re using needs to be checked as well. Orchids should be cultivated in containers with many drainage holes to guarantee proper water drainage.
Verify whether overwatering is a problem by inspecting the roots of your orchid.
Your orchid may have root rot if you think that overwatering is the cause of the yellow leaves. If the plant still has some strong, green roots, look at the roots to confirm this.
If so, remove the decayed roots and repot your plant in new potting soil. For the first week following repotting, only softly spray the leaves rather than the soil to give the roots time .
Underwatering
It will become dehydrated if your orchid doesn’t get enough water. This may result in yellow leaves that look dried out or shrivelled.
Some varieties of orchid are more prone to this problem than others.
Large aerial root systems of orchids allow them to receive moisture from the air and often let them continue for extended periods of time without watering. Others will require more frequent hydration to avoid becoming dehydrated.
To fix the problem :examine the roots of your orchid.
A problem with under-watering may exist if the flowers are a healthy white colour but the leaves are yellow and wilted.
It is clear that the roots require additional water if they are beginning to become brown and dry.
Instead, overwatering is to blame when they turn black or decay. For a solution, see the section above.
If you’ve decided that your orchid requires extra water, consult our watering guide for the proper methods. It’s a good idea to wait until the top inch of your potting mix is completely dry before watering.

low temperature inside indoors
The metabolism of your orchid may slow down if the temperature in your room is too low. Yellowing leaves may arise from this interfering with its biological activities.
To fix the problem: Change the thermostat or relocate the orchid to a better location.
Orchids thrive best in environments that are generally between 65 and 80 °F during the day and a little colder at night. Therefore, your orchid will probably feel at ease if you do.
This is always based on the kind of orchid you have. Your plant will anticipate being in a setting like its native habitat.try to mimic Amazon jungle.if this problem better make a terrium a small cube of Amazon jungle.

Diseases (spotted yellow leaves)
If the leaves of your orchid are turning yellow with black dots, there may be a bacterial or fungal infection present.
High humidity or damp leaves are the main causes. The optimum habitat for disease growth is created by this extra moisture.
In order to stop it from spreading, you must act quickly.
To fix the problem: Remove the diseased foliage. Pruning is typically the best line of action because it might be challenging to differentiate between bacterial and fungal illnesses.
Cut off the infected tissue and roughly an inch of the clean, green region using a clean, sharp blade.
Apply a fungicide to the cut surface if you think it’s a fungal infection. This will stop the illness from spreading.
To much Fertiliser
A frequent error, especially for novices, is applying too much fertiliser. The temptation to apply it each time you water your plant arises from the fact that it is intended to promote the growth of your orchid.
There is a limit to everything good, though. Typically, orchids don’t require a lot of fertiliser, and too many nutrients can interfere with their ability to absorb water. This shares a cause with hard water.
To fix the problem: Ensure that you are adhering to the directions for the fertiliser you have selected. When in doubt, a suitable maxim is “weekly, weakly.” This will guarantee that you’re not using too much.
Additionally, you should refrain from fertilising your orchid while it is in bloom. Don’t feed it till it goes into dormancy once more.
not enough nutrients
The tips of your orchid’s leaves becoming yellow could be a sign of nutrient insufficiency. Around the leaf’s borders and tip, you’ll notice yellow flecks or patches.
Potassium, which maintains your plant’s metabolism and promotes root growth, is the most frequently absent nutrient. When your orchid is growing the fastest—in the spring and summer—this is very crucial.
To fix the problem:Make sure you’re using a balanced fertiliser when you apply it. Pick one that is designed for the particular variety of orchid you have.
You can ensure that your orchid is receiving the proper amount of nutrients by following the guidelines. Avoid using too much because doing so could hurt your orchid.
Naturally yellowing and falling off leaves
As they get older, the leaves of several well-known orchids, including Phalaenopsis, naturally turn yellow. You shouldn’t be concerned if your plant is older.
These leaves will eventually deteriorate and fall to the ground. Your orchid accomplishes this so it may recycle nutrients from the old leaves and make room for new leaves.
To fix the problem:It is preferable to just wait for the plant to drop these outdated leaves.
Once it appears that they are about to expire, you can choose to clip them off using a sharp blade. It’s not required to do this, and if you do it incorrectly, it could hurt your plant.
Therefore, we advise letting them naturally drop. Give your orchid room to grow!
Improper Lighting
Improper lighting can cause orchid leaves to turn yellow. Orchids require the right amount of light to thrive, and if they don’t get it, the leaves can suffer. Too much direct sunlight can scorch the leaves, while too little light can lead to slow growth and yellowing.
To fix the problem, move the orchid to a location that provides the right amount of light. Place it near a window with filtered light or use artificial lights to provide the necessary light spectrum. With proper lighting, your orchids can grow healthy and beautiful.
FAQS
How can I cure my orchid’s yellow leaves?
You can fix yellow leaves on your orchid by identifying the cause, which could be improper watering, lighting, pest infestation, or nutrient deficiency. Once you have identified the issue, take corrective action, such as adjusting the watering schedule, providing proper lighting, using insecticidal soap or neem oil, or feeding your orchid with a balanced fertilizer.
Why are my orchid leaves turning yellow and wilting?
Orchid leaves can turn yellow and wilt due to various reasons, such as overwatering, underwatering, improper lighting, pest infestation, or nutrient deficiency. Identifying the cause is essential to fix the issue, which may involve adjusting the watering schedule, providing proper lighting, using insecticidal soap or neem oil, or feeding your orchid with a balanced fertilizer.
What do overwatered orchids look like?
Overwatered orchids may have yellow or brown leaves, mushy or slimy roots, or a foul odor. The leaves may also appear wilted or droopy due to root rot, which occurs when the roots become waterlogged and suffocated
How do you fix an overwatered orchid?
To fix an overwatered orchid, you should stop watering it and allow the soil to dry out. Improve drainage by repotting the orchid in a container with proper drainage holes or adding drainage materials like pebbles or sand to the bottom of the pot. Remove excess water by tipping the pot to one side or using a clean cloth or paper towel. Adjust the watering schedule and monitor soil moisture levels to prevent overwatering in the future.


