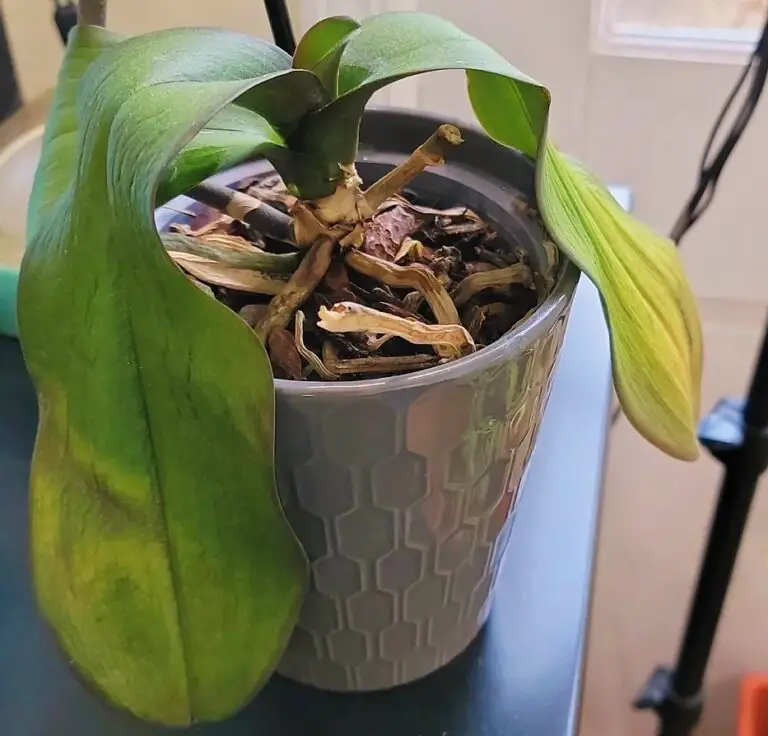
As you gaze upon the delicate beauty of your orchid, you may find yourself perplexed by the sight of its wrinkled leaves. Like ancient whispers encoded in nature’s tapestry, these subtle signs tell a tale of potential concerns. Within the folds of those once vibrant leaves lie clues that beck on your attention.
Is it a thirst unquenched or a drowning lament? Could it be the dance between light and shadow that cast its spell on the orchid’s countenance? Perhaps an orchestra of nutrients missed its cue, or a mischievous pest left its mark in secret. With a touch of curiosity and a quest for understanding, let us unravel the enigma of your orchid’s wrinkled leaves, revealing the hidden stories they long to share.
- 1 why my orchids leaves winkled
- 2 Underwatering
- 3 Overwatering
- 4 To address overwatering and help your orchid recover, consider the following steps:
- 5 Improper watering schedule:
- 6 Extreme temperature fluctuations:
- 7 Nutrient deficiencies:
- 8 Pest infestation:
- 9 Disease or infection:
- 10 damaged roots
why my orchids leaves winkled
Underwatering
Underwatering is indeed a common cause of wrinkled leaves in orchids. When orchids don’t receive enough water, their leaves can become dehydrated and wrinkle. Here’s some additional information on underwatering and how to address it:
Underwatering: Orchids require consistent and adequate watering to thrive. If you submerge your orchid, the potting medium can dry out, depriving the plant of essential moisture. This can lead to dehydration and result in wrinkled leaves.
To address underwatering and restore your orchid’s health, consider the following steps:
Watering routine: Evaluate your watering routine and ensure that you are providing enough water to the orchid. Most orchids benefit from a thorough watering when the potting medium feels slightly dry to the touch. Water the plant until the water drains out of the pot’s drainage holes, ensuring that the entire root system receives moisture.
Soaking or immersion: Some orchid growers prefer soaking or immersing the entire pot in water for a short period of time to thoroughly hydrate the potting medium. This allows the roots to absorb water fully. After soaking, let the excess water drain out completely before returning the orchid to its usual location.
Humidity: Orchids appreciate high humidity levels. Increasing the humidity around your orchid can help prevent dehydration. You can use a humidifier, place the orchid on a humidity tray with water and pebbles, or group it with other plants to create a more humid microclimate.
Potting medium: Ensure that your orchid is potted in a well-draining medium suitable for orchids, such as bark or sphagnum moss. This allows excess water to flow through the medium, preventing the roots from sitting in stagnant water.
Observation: Monitor your orchid closely after adjusting the watering routine. Over time, the leaves should regain their turgidity and become less wrinkled. However, avoid overcompensating by overwatering, as this can lead to other issues such as root rot.
By providing sufficient water and maintaining a suitable humidity level, you can help your orchid recover from underwatering and promote healthy leaf growth. Remember that different orchid species may have specific watering requirements, so it’s always a good idea to research and understand the needs of your specific orchid.

Overwatering
Overwatering is another common issue that can lead to wrinkled leaves in orchids. When orchids receive excessive water, it can cause the roots to become waterlogged, leading to root rot and other problems. Here’s some information on overwatering and how to address it:
Overwatering: Orchids are susceptible to overwatering because their roots need a balance of moisture and air. When the roots are constantly saturated, they can’t access the necessary oxygen, leading to root rot and poor nutrient uptake. As a result, the leaves can become wrinkled and show other signs of stress.
To address overwatering and help your orchid recover, consider the following steps:
Evaluate watering frequency: Review your watering schedule and make sure you’re not watering too frequently. Most orchids prefer a drying period between waterings. Allow the potting medium to partially dry out before watering again. Stick your finger about an inch into the medium to check its moisture level.
Adjust watering amount: Ensure that you’re not providing too much water during each watering session. Water the orchid thoroughly, allowing water to flow through the drainage holes, but avoid leaving the pot in standing water.
Improve drainage: Check if the potting medium and pot have adequate drainage. Orchids require a well-draining medium, such as bark or sphagnum moss. If the medium retains too much moisture, consider repotting the orchid in a fresh, appropriate medium in a pot with drainage holes.
Monitor root health. Inspect the roots for signs of root rot, such as a foul odour or black, mushy roots. If you notice root rot, trim away the affected parts and repot the orchid in fresh medium.
Enhance airflow: Adequate airflow is crucial for orchid root health. Ensure that your orchid is placed in a well-ventilated area, allowing air to circulate around the leaves and roots. Avoid overcrowding the plant or placing it in excessively humid or stagnant environments.
By adjusting your watering practises and providing proper drainage and airflow, you can help your orchid recover from overwatering. Remember to let the potting medium partially dry out between waterings to prevent waterlogged roots and subsequent leaf wrinkling. If you’re unsure about the watering needs of your specific orchid species, consult orchid care resources or seek advice from experienced growers.
Improper watering schedule:
Apologies for the oversight. Indeed, an improper watering schedule can contribute to wrinkled leaves in orchids. Maintaining a consistent and appropriate watering routine is crucial for their health. Here’s some information on the impact of an improper watering schedule and how to address it:
Improper watering schedule: Orchids have specific watering requirements that depend on factors such as the type of orchid, potting medium, and environmental conditions. Inconsistent or incorrect watering can result in stress and wrinkled leaves.
To address an improper watering schedule and promote healthier leaves, consider the following steps:
Research the specific orchid. Different orchid species have varying watering needs. Research the specific type of orchid you have to understand its preferences. Consult orchid care resources or seek advice from experienced growers to determine the appropriate watering routine for your orchid.
Consistency is key. Orchids generally benefit from a regular watering schedule rather than sporadic watering. Establish a consistent routine based on your orchid’s needs and environmental conditions. Consider factors such as the potting medium, humidity levels, and the rate of moisture evaporation in your orchid’s environment.
Monitor the potting medium: Check the moisture level of the potting medium regularly. Stick your finger about an inch into the medium to assess its dryness. Water the orchid when the medium feels slightly dry but not completely dry. Avoid allowing the medium to become bone dry or excessively wet.
Adjust for environmental conditions: Environmental factors such as temperature, humidity, and air circulation affect the rate at which orchids dry out. Adjust your watering schedule accordingly during different seasons or if the environment changes. For example, orchids may require more frequent watering in hot, dry conditions.
Consider the size of the orchid and pot: The size of the orchid and pot can impact the watering needs. Smaller pots with less potting medium will dry out faster, requiring more frequent watering, while larger pots may retain moisture for longer periods. Adjust your watering schedule based on the size of the orchid and pot.
Observe the plant’s response: Pay attention to how your orchid responds to watering. Healthy orchids typically have turgid leaves, while dehydrated orchids may exhibit wrinkling or limp leaves. Adjust your watering routine if you notice signs of underwatering or overwatering.
By understanding your orchid’s specific watering requirements and maintaining a consistent watering schedule, you can help prevent leaf wrinkling caused by an improper watering routine. Regular monitoring and adjustment based on the plant’s needs will promote healthier growth and overall orchid health.
Research the specific orchid: Different orchid species have varying watering requirements. Research the specific type of orchid you have to understand its preferences. Some orchids, like Phalaenopsis, prefer to dry out slightly between waterings, while others, like Oncidiums, prefer consistently moist conditions. Understanding your orchid’s needs will help you establish an appropriate watering routine.
Consistency and regularity: Orchids generally benefit from a consistent watering schedule. Determine the frequency of watering based on your orchid’s needs, environmental conditions, and the specific potting medium used. It’s important to avoid both extended periods of dryness and over-saturation.
Assess the potting medium: Check the moisture level of the potting medium regularly. Stick your finger about an inch into the medium to evaluate its dryness. Water the orchid when the medium feels slightly dry. Ensure that the potting medium provides adequate drainage to prevent waterlogging.
Water thoroughly but avoid water stagnation: When watering, ensure that you provide enough water to thoroughly moisten the potting medium. Water until it flows out of the drainage holes, allowing excess water to drain away. However, it’s crucial to avoid leaving the orchid sitting in standing water, as this can lead to root problems.
Observe the plant’s response: Pay attention to how your orchid reacts to your watering routine. Healthy orchids generally have turgid leaves and firm roots. If you notice wrinkled leaves, it could be a sign of underwatering, while mushy or discolored roots might indicate overwatering. Adjust your watering schedule accordingly based on the plant’s response.
Environmental factors: Environmental conditions such as temperature, humidity, and air circulation can impact the rate at which orchids dry out. Adjust your watering schedule as needed, taking into account these factors and any seasonal changes.
By understanding your specific orchid’s watering requirements and maintaining a consistent and appropriate watering schedule, you can help prevent leaf wrinkling caused by an improper watering routine. Regular monitoring, observation, and adjustment will contribute to the overall health and well-being of your orchids.
Insufficient humidity:
Insufficient humidity can indeed contribute to wrinkled leaves in orchids. Orchids are native to humid environments, and low humidity levels can lead to dehydration and stress. Here’s some information on the impact of insufficient humidity and how to address it:
Insufficient humidity: Orchids thrive in environments with high humidity levels. When the humidity is too low, the leaves can lose moisture faster than they can absorb it, resulting in wrinkled leaves.
To address insufficient humidity and promote healthier leaves, consider the following steps:
Increase ambient humidity: Increase the humidity around your orchids by utilizing various methods. Place a tray filled with water and pebbles beneath the orchid pot, ensuring that the water level is below the top of the pebbles. This creates a humid microclimate as the water evaporates. Alternatively, you can use a room humidifier or place the orchids near other houseplants to collectively increase humidity.
Grouping orchids: Grouping orchids together can create a localized humid environment. The collective transpiration from multiple plants can contribute to higher humidity levels around the orchids.
Humidity trays: You can use humidity trays or shallow dishes filled with water near the orchids. The evaporating water will increase humidity in the surrounding air. Ensure that the orchid pots are not directly in contact with the water to avoid waterlogging.
Mist the leaves: Mist the leaves of your orchids with water using a spray bottle. This provides a temporary increase in humidity and can benefit the orchids, especially in drier conditions. Mist the leaves in the morning to allow them to dry before evening.
Humidity tent: Create a humidity tent by placing a clear plastic bag or a specially designed humidity dome over your orchid. This helps trap moisture and increases humidity levels around the plant. However, ensure that the plant has adequate ventilation to prevent fungal or bacterial issues.
Consider a dedicated growing area: If you have multiple orchids or a collection, consider setting up a dedicated growing area, such as a greenhouse or terrarium, where you can control and maintain higher humidity levels consistently.
By increasing the humidity levels around your orchids, you can help prevent leaf dehydration and wrinkling. Be mindful of the specific requirements of your orchid species, as some may prefer slightly lower humidity levels. Regularly monitor the plant’s response and adjust humidity-boosting techniques as needed to provide an environment that promotes healthy growth.
Inadequate light:
Apologies for the interruption. Inadequate light can also contribute to wrinkled leaves in orchids. Orchids require proper light exposure to carry out photosynthesis and maintain healthy foliage. Insufficient light can lead to weakened plants and wrinkled leaves. Here’s some information on the impact of inadequate light and how to address it:
Inadequate light: Orchids have varying light requirements depending on their species. While some orchids thrive in bright, indirect light, others may require more shade. Insufficient light can hinder photosynthesis and affect the overall health of the plant, resulting in wrinkled leaves.
To address inadequate light and promote healthier leaves, consider the following steps:
Assess lighting conditions: Evaluate the lighting conditions in the area where your orchids are located. Determine if they are receiving enough light for their specific needs. Most orchids require bright, indirect light. This can be achieved by placing them near a north or east-facing window where they receive bright but filtered light. Avoid placing them in direct sunlight, especially during the hottest parts of the day, as it can lead to leaf burns.
Increase light exposure: If your orchids are not receiving adequate light, consider increasing their exposure to natural light. Move them to a brighter location or closer to a window that provides the right amount of light. If natural light is limited, you can supplement it with artificial grow lights designed specifically for plants. Position the lights at an appropriate distance from the orchids to ensure they receive adequate light intensity.
Monitor leaf color: Pay attention to the color of your orchid’s leaves. Healthy orchids typically have bright green leaves. If the leaves appear dark green or yellowish, it may be an indication of inadequate light. On the other hand, if the leaves are turning pale or reddish, it might be a sign of excessive light exposure.
Rotate the orchids: To ensure even light distribution and prevent one-sided growth, rotate your orchids regularly. This helps expose all sides of the plant to light and promotes balanced development.
Be aware of seasonal changes: Light availability can vary throughout the year due to seasonal changes in sunlight intensity and duration. Adjust the placement of your orchids accordingly to ensure they receive the appropriate amount of light as seasons change.
Species-specific requirements: Different orchid species have varying light preferences. Research the specific requirements of your orchid species to provide the optimal lighting conditions for their growth.
By ensuring your orchids receive adequate and appropriate light, you can help prevent leaf wrinkling caused by inadequate light exposure. Regularly monitor your orchids’ response to the light conditions and make adjustments as needed to maintain healthy foliage.
Extreme temperature fluctuations:
Extreme temperature fluctuations can have a negative impact on orchids and contribute to wrinkled leaves. Orchids generally prefer stable temperatures within their optimal range. Rapid or drastic temperature changes can stress the plants and lead to leaf problems. Here’s some information on the impact of extreme temperature fluctuations and how to address them:
Extreme temperature fluctuations: Orchids thrive in environments with relatively stable temperatures. Sudden or extreme temperature changes can disrupt their physiological processes, cause stress, and result in wrinkled leaves.
To address extreme temperature fluctuations and promote healthier leaves, consider the following steps:
Maintain consistent temperatures: Provide a stable temperature environment for your orchids. Avoid exposing them to sudden temperature shifts or extremes. Orchids generally prefer temperatures between 60°F (15°C) and 80°F (27°C), depending on the specific species. Research the temperature preferences of your orchid species and strive to maintain conditions within that range.
Avoid cold drafts and hot spots: Orchids are sensitive to cold drafts and direct exposure to heat sources. Place them away from drafts caused by open windows, air conditioning units, or heating vents. Similarly, avoid placing them near radiators, heaters, or other sources of direct heat.
Protect from temperature fluctuations: If your orchids are in an area with temperature fluctuations, consider providing insulation or buffering. This can be done by placing them away from windows during extreme weather conditions or using curtains or blinds to regulate temperature changes.
Consider temperature gradients: Some orchids benefit from slight temperature variations between day and night. Research the specific requirements of your orchid species to determine if they need a temperature drop at night to promote flowering or growth.
Monitor for signs of stress: Keep a close eye on your orchids for any signs of stress caused by temperature fluctuations. Wrinkled leaves can be a symptom of temperature-related issues. If you notice leaf wrinkling or other signs of stress, evaluate the temperature conditions and make adjustments as necessary.
Use temperature-regulating tools: In extreme climates, you can use tools to help regulate temperatures. For example, using a fan or air conditioner can help cool the area during hot periods, and employing a heater or heat lamp can provide warmth in colder environments.
Insulate during transport: When transporting orchids during extreme weather conditions, ensure they are adequately insulated and protected from temperature fluctuations. Use insulated containers or packaging materials to maintain stable temperatures during transit.
By providing a stable temperature environment and protecting your orchids from extreme fluctuations, you can help prevent leaf wrinkling caused by temperature stress. Regular monitoring and adjustment of environmental conditions will contribute to the overall health and well-being of your orchids.
Nutrient deficiencies:
Nutrient deficiencies can indeed contribute to wrinkled leaves in orchids. Orchids require a balanced supply of essential nutrients to support their growth and development. Insufficient or imbalanced nutrient levels can result in leaf problems and overall poor plant health. Here’s some information on the impact of nutrient deficiencies and how to address them:
Nutrient deficiencies: Orchids rely on various nutrients, including nitrogen (N), phosphorus (P), potassium (K), calcium (Ca), magnesium (Mg), and others, for healthy growth. When orchids lack essential nutrients, it can lead to stunted growth, leaf discoloration, and wrinkled leaves.
To address nutrient deficiencies and promote healthier leaves, consider the following steps:
Identify the deficiency symptoms: Each nutrient deficiency can manifest in different ways. For example, nitrogen deficiency may cause overall pale green leaves, while phosphorus deficiency may result in purplish or reddish leaves. Calcium deficiency can cause distorted growth and leaf tip dieback. Identify the specific symptoms of nutrient deficiencies to narrow down the problem.
Test the soil or growing medium: Conduct a soil or growing medium test to assess the nutrient levels and pH.By doing this, any shortages or imbalances will be made clear. Testing kits are available for home use, or you can send samples to a specialised laboratory for more detailed analysis.
Adjust the fertilisation routine: If nutrient deficiencies are identified, adjust your fertilisation routine to provide the necessary nutrients. Orchids generally benefit from a balanced, water-soluble fertiliser. Follow the instructions on the fertiliser package for the recommended dosage and frequency of application. Avoid over-fertilising, as it can lead to other problems.
Consider foliar feeding: In some cases, foliar feeding can help address nutrient deficiencies more directly. Dilute a water-soluble fertiliser in water and spray it onto the leaves, ensuring thorough coverage. This allows the leaves to absorb the nutrients directly.
Adjust pH levels: Nutrient availability can be affected by pH levels. Ensure that the pH of the growing medium is within the appropriate range for orchids, typically slightly acidic to neutral. Adjust the pH, if necessary, using specific pH-adjusting products or amendments.
Monitor the plant’s response: Regularly observe your orchid’s response to the adjusted fertilisation routine and nutrient levels. Monitor new growth and the condition of the leaves. Healthy, well-nourished orchids will exhibit vibrant foliage and firm, plump leaves.
Seek professional advice if needed. If you’re unsure about the specific nutrient needs of your orchid or how to address nutrient deficiencies, consult orchid care resources or seek advice from experienced growers. They can provide guidance tailored to your orchid species and growing conditions.
By addressing nutrient deficiencies and ensuring a balanced nutrient supply, you can help prevent leaf wrinkling caused by inadequate nutrition. Regular monitoring, adjustment, and fertilisation will contribute to the overall health and vitality of your orchids.
Pest infestation:
Pest infestations can also lead to wrinkled leaves in orchids. Insects and other pests can cause damage to the leaves, disrupt the plant’s nutrient uptake, and contribute to stress. Here’s some information on the impact of pest infestations and how to address them:
Pest infestation: Common pests that can affect orchids include aphids, mealybugs, spider mites, scale insects, and thrips. These pests feed on the sap of the leaves and stems, leading to leaf damage and potential wrinkling.
To address pest infestations and promote healthier leaves, consider the following steps:
Identification: Identify the specific pests that are affecting your orchids. Carefully inspect the leaves, stems, and other plant parts for signs of insects, webs, or sticky residues. Accurate identification will help determine the most appropriate treatment methods.
Isolate affected plants: If you identify a pest infestation, isolate the affected orchids to prevent the pests from spreading to other plants. Keep them away from healthy orchids until the infestation is resolved.
Manual removal: For larger pests like snails or slugs, manually remove them from the orchid and the surrounding area. Handpicking can also be effective for some insects. Use gloves or tweezers to carefully remove the pests from the plant.
Insecticidal soaps or oils: Insecticidal soaps or horticultural oils can be used to control many common orchid pests. These products suffocate the pests by coating their bodies. Follow the instructions on the product label and ensure thorough coverage of the affected areas. Be cautious when using oils on certain orchid species or during hot weather, as they can cause damage.
Systemic insecticides: In severe infestations, systemic insecticides can be used. These products are absorbed by the plant and ingested by the pests, effectively controlling them from within. However, exercise caution when using systemic insecticides, as they can also affect beneficial insects and require careful application.
Biological control: In some cases, beneficial insects or predatory mites can be introduced to control pest populations. These natural predators feed on the pests and help restore balance in the orchid’s environment. Consult with a knowledgeable source or professional for guidance on using biological controls.
Regular monitoring: regularly inspect your orchids for signs of pest activity, even after the infestation has been treated. Early detection can help prevent reinfestation and minimise damage. Keep an eye on new growth and the overall health of the plant.
Maintain cleanliness: Keep the growing area clean and free from debris, as pests can hide and reproduce in these conditions. Remove fallen leaves or other organic matter around the orchids to eliminate potential pest habitats.
Quarantine new additions: When adding new orchids to your collection, quarantine them for a period of time to ensure they are pest-free before introducing them to the rest of your plants.
By promptly addressing pest infestations and employing appropriate control methods, you can help prevent leaf damage and wrinkling caused by pests. Regular monitoring, early intervention, and good orchid hygiene practises will contribute to the overall health and well-being of your plants.
Disease or infection:
Diseases or infections can indeed cause wrinkled leaves in orchids. Fungal, bacterial, or viral infections can weaken the plant’s immune system, disrupt its physiological processes, and lead to various leaf problems. Here’s some information on the impact of diseases or infections and how to address them:
Disease or infection: Orchids can be susceptible to various diseases and infections, including fungal leaf spot, bacterial infections, and viral diseases. These can cause leaf discoloration, spotting, wilting, and ultimately wrinkled leaves.
To address diseases or infections and promote healthier leaves, consider the following steps:
Identification: Accurately identify the disease or infection affecting your orchid. Observe the symptoms on the leaves, such as discoloration, spots, lesions, or other abnormalities. Consulting orchid care resources, plant pathology guides, or seeking advice from experienced growers can help with proper identification.
Isolate affected plants: If you notice signs of a disease or infection, immediately isolate the affected orchid to prevent the spread of pathogens to other plants. Keep it away from healthy orchids until the issue is resolved.
Remove and destroy infected plant parts. Trim and remove any visibly infected or damaged leaves, stems, or other plant parts. Be sure to disinfect your pruning tools between cuts to avoid spreading the disease. Destroy the removed plant material to prevent the further spread of pathogens.
Improve air circulation: enhance air circulation around the orchids by providing adequate spacing between plants. Good airflow can help reduce humidity levels and minimise the conditions that favour disease development.
Manage humidity levels: Maintain appropriate humidity levels for your orchids to discourage fungal growth. While high humidity is generally beneficial for orchids, excessive moisture can contribute to disease development. Ensure proper ventilation, avoid overwatering, and implement humidity control measures if necessary.
Apply appropriate fungicides or treatments: For fungal or bacterial infections, apply suitable fungicides or bactericides following the instructions on the product label. Copper-based products, sulphur-based treatments, or systemic fungicides can be effective against certain diseases. It’s essential to use the appropriate treatment for the specific disease affecting your orchid.
Follow proper watering practises. Avoid overwatering, as it can create a favourable environment for disease development. Water your orchids at the appropriate intervals, allowing the growing medium to dry slightly between waterings. Use clean, sterilised pots and growing media to prevent introducing pathogens.
Maintain plant hygiene: Keep your growing area clean and free from fallen leaves, debris, or dead plant material. Regularly remove any decaying organic matter around the orchids, as it can harbour disease-causing organisms.
Quarantine new additions: When adding new orchids to your collection, quarantine them for a period of time to ensure they are disease-free before introducing them to the rest of your plants.
By promptly identifying and addressing diseases or infections, you can help prevent further damage to your orchids and promote healthier leaves. Regular monitoring, proper hygiene practises, and implementing appropriate disease management strategies are crucial for maintaining the overall health of your orchids.
damaged roots
Damaged roots can indeed contribute to wrinkled leaves in orchids. Here’s some additional information on how damaged roots can affect the plant:
Root damage: Orchids have delicate roots, and any damage to them can impact the plant’s ability to take up water and nutrients. Over time, damaged or decaying roots can lead to dehydration, causing the leaves to wrinkle. Common causes of root damage include rough handling, improper repotting, or root rot due to overwatering.
To address root damage, it’s important to carefully inspect the roots of your orchid. Healthy roots should be firm, white, and plump, while damaged or rotting roots may appear brown, mushy, or shrivelled. If you notice damaged roots, you can take the following steps:
Trim: Use sterilised scissors or pruning shears to remove any dead, rotting, or damaged roots. Make clean cuts, removing only the affected portions while preserving as much healthy root tissue as possible.
Repot: If the majority of the roots are damaged, consider repotting the orchid in a fresh, well-draining orchid potting mix. Gently remove the plant from its current pot, carefully detangle the roots, and place it in a new pot with fresh potting mix.
Adjust watering: After repotting, adjust your watering routine to promote root recovery. Be cautious not to overwater, as this can further damage the roots. Allow the potting mix to partially dry out between waterings while providing sufficient humidity.


