The Ultimate Guide to Cattleya Orchids: 7 Common Mistakes and How to Fix Them
Cattleya orchids are renowned for their stunning blooms and vibrant colors, making them a favorite among orchid enthusiasts. However, they can be tricky to care for, especially for beginners. In this guide, we’ll explore common mistakes made when growing Cattleya orchids and provide practical solutions to help you cultivate healthy, thriving plants.

Common Mistake 1: Overwatering
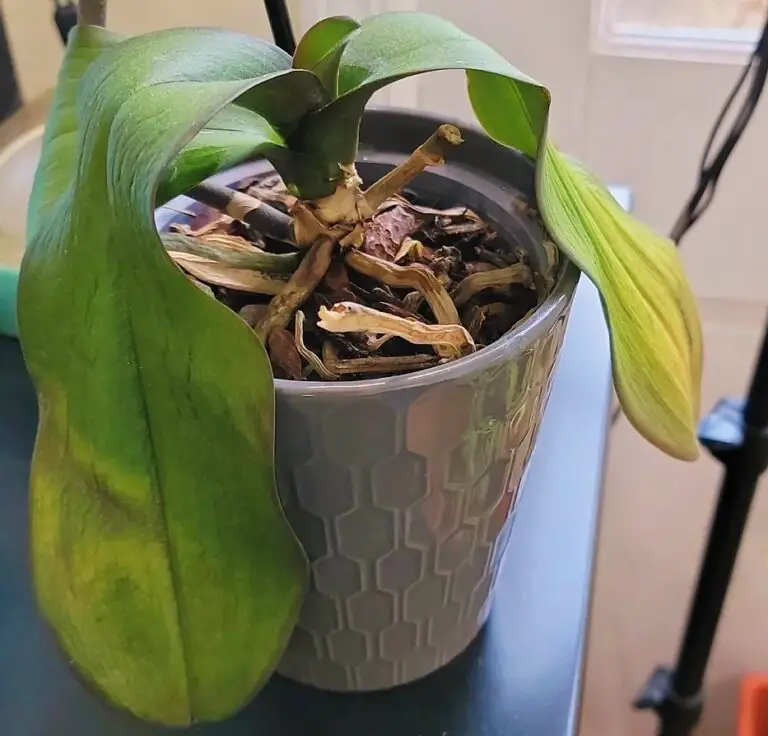
Symptoms: Yellowing leaves, root rot, and a soggy medium.
Solution:
Watering Schedule
Cattleya orchids do not require constant moisture.
In between waterings, let the potting medium almost fully dry out. A general rule of thumb is to water every 7-10 days, but this can vary depending on your environment.
Drainage
Proper drainage is crucial to prevent overwatering. Ensure your potting medium is well-draining. A recommended mix for Cattleya orchids includes bark, perlite, and charcoal, which provides good aeration and prevents water from sitting around the roots.
Pot Selection
Pick pots that have enough drainage holes to let extra water out. By doing this, water buildup at the bottom is avoided, which may cause root rot. Also useful for keeping an eye on the health of the roots and moisture content are clear plastic pots with slits on the edges.
Watering Technique
When watering, thoroughly soak the potting medium until water runs out of the drainage holes.The orchid should not be left to stand in still water.
Always water in the morning to ensure the leaves dry out by evening, reducing the risk of fungal infections.
By following these guidelines, you can avoid the common mistake of overwatering and help your Cattleya orchids thrive.
Common Mistake 2: Insufficient Light
Symptoms: Dark green leaves, lack of blooms, and slow growth.
Solution:
Light Requirements
Cattleya orchids require bright, indirect light to thrive. They generally need about 2000-3000 foot-candles of light.
Positioning
Place your Cattleya orchids near an east or west-facing window, where they can receive bright, indirect sunlight. South-facing windows may also work if the light is filtered with a sheer curtain to prevent direct sun exposure, which can scorch the leaves.
Artificial Lighting
Artificial lighting should be added if natural light is insufficient, particularly in the winter or in rooms that are darker.
Full-spectrum grow lights are ideal as they mimic natural sunlight. Position these lights about 12-18 inches above the plants and keep them on for 10-12 hours a day.
Monitoring Light Levels
Observe the color and condition of the leaves to gauge if your orchid is receiving the right amount of light:
Ideal Light: Leaves should be a light, grassy green.
Too Little Light: Leaves become dark green and the plant may not bloo
To Much Light: Leaves may turn yellowish or develop sunburn spots.
By ensuring your Cattleya orchids receive the proper amount of light, you can promote healthy growth and encourage blooming.
Common Mistake 3: Improper Temperature
Symptoms: Poor blooming, yellowing leaves, and stunted growth.
Solution:
Temperature Range
Cattleya orchids thrive within a specific temperature range:
Daytime: 70-85°F (21-29°C)
Nighttime: 55-60°F (13-16°C)
Maintaining this range helps support their natural growth and blooming cycles.
Seasonal Adjustments
Summer:Add artificial illumination to a room if natural light is inadequate, particularly during the winter or in darker spaces. During hot weather, increase air circulation and consider using fans to keep temperatures in check.
Winter: Protect your orchids from cold drafts. If necessary, use a space heater or move them to a warmer location at night to maintain the appropriate temperature.
Air Circulation
Good air circulation is essential for preventing temperature-related stress and reducing the risk of fungal infections. Place a small fan near your orchids to keep the air moving, but avoid direct airflow on the plants.
Temperature Monitoring
Use a thermometer to regularly check the temperature around your orchids. This helps you make adjustments as needed to maintain a consistent and suitable environment.
By keeping your Cattleya orchids within their preferred temperature range and ensuring good air circulation, you can promote healthy growth and successful blooming.
Common Mistake 4: Incorrect Humidity Levels
Symptoms: Wrinkled pseudobulbs, dry leaf tips, and slow growth.
Solution:
Humidity Levels
Cattleya orchids prefer humidity levels between 50-70%. Maintaining this range is crucial for their overall health and growth.
Humidity Tray
One effective way to increase humidity around your orchids is by using a humidity tray. Fill a shallow tray with pebbles and water, and place your orchid pots on top of the pebblesTo prevent root rot, make sure the pots are not submerged completely in the water. The surrounding humidity rises when the water vapour evaporates.
Room Humidifier
If you live in a particularly dry environment, consider using a room humidifier to maintain the desired humidity levels. This can be especially helpful during winter months when indoor air tends to be drier due to heating systems.
Misting
Lightly mist your Cattleya orchids in the morning, allowing the leaves to dry by evening to prevent fungal issues. Be cautious not to over-mist, as excess water on the leaves can lead to rot.
Grouping Plants
Grouping your orchids together can help create a microenvironment with higher humidity. The collective transpiration of the plants will naturally increase the humidity in the immediate area.
By maintaining proper humidity levels and employing these techniques, you can ensure your Cattleya orchids remain healthy and vibrant.
Common Mistake 5: Neglecting Fertilization
Symptoms :include pale leaves, weak growth, and a dearth of blossoms.
Solution:
Fertilization Schedule
Fertilize your Cattleya orchids regularly, especially during their active growing season in spring and summer.
The best orchid fertiliser is a balanced blend with a ratio of 20-20-20.
Growing Season: Fertilize every 2-4 weeks.
Dormant Season: Reduce fertilization frequency to once a month or suspend it, depending on the plant’s activity level.
Dilution
Always use a diluted solution to avoid fertilizer burn. A common practice is to dilute the fertilizer to half the strength recommended on the label. For instance, if the label suggests 1 teaspoon per gallon of water, use only 1/2 teaspoon.
Application Method
Watering Can: Mix the diluted fertilizer solution in a watering can and water the orchids as usual.
Sprayer: For foliar feeding, use a sprayer to mist the leaves lightly with the fertilizer solution.Make sure you coat the leaf’s upper and lower surfaces.
Flushing the Medium
Periodically flush the potting medium with plain water to remove any accumulated salts from the fertilizer. This helps prevent root damage and ensures that nutrients are available for absorption.
Monitoring Plant Response
Observe your orchid’s response to the fertilization. Healthy growth, vibrant leaves, and regular blooming are signs that your fertilization routine is effective. Adjust the frequency and concentration if you notice signs of over-fertilization, such as leaf burn or salt buildup on the medium’s surface.
By following a consistent and balanced fertilization routine, you can support the robust growth and blooming of your Cattleya orchids.
Common Mistake 6: Repotting Issues
Symptoms: Root damage, stunted growth, and instability.
Solution:
Repotting Frequency
Cattleya orchids typically need to be repotted every 2-3 years or when the potting medium starts to break down. Signs that it’s time to repot include the medium becoming compacted or the orchid outgrowing its pot.
Timing
The best time to repot Cattleya orchids is just after they finish blooming. Repotting during this period minimizes stress and allows the plant to recover and establish itself in the new medium before the next growth cycle.
Medium Selection
Choose a fresh orchid potting mix that provides good aeration and drainage. A common mix includes bark, perlite, and charcoal. Avoid using garden soil or other dense mediums, as these can retain too much moisture and lead to root rot.
Repotting Steps
Preparation:
Sterilize your tools and the new pot to prevent the spread of diseases.
Soak the new potting medium in water for a few hours to ensure it’s adequately moistened.
Removing the Orchid:
Be sure to cover the leaf surfaces on both the upper and lower sides.
Carefully shake off the old medium and trim any dead or rotting roots using sterilized scissors. Placing the Orchid: Position the orchid in the new pot, spreading the roots out evenly. Add the new potting medium around the roots, pressing gently to ensure it fills in the gaps without compacting too much. Securing the Plant: Ensure the orchid is stable in its new pot. You can use stakes or clips if needed to keep the plant upright until it establishes itself.
Post-Repotting Care
Watering: Avoid watering immediately after repotting to allow any root wounds to heal. Wait about a week before resuming normal watering.
Light and Humidity: Keep the orchid in a slightly shaded area with high humidity for the first few weeks to reduce stress and encourage new root growth.
By following these repotting guidelines, you can ensure your Cattleya orchids have a healthy environment to grow and flourish, avoiding common repotting issues.
Common Mistake 7: Pests and Diseases
Symptoms: Visible insects, discolored spots on leaves, and a sticky residue.
Solution:
Regular Inspection
Check your Cattleya orchids frequently for indications of illness or pest infestation. Minimising damage and preventing infestations depend heavily on early diagnosis.
Common Pests
Spider Mites: Look for tiny webs and stippling on leaves.
Aphids: These small, soft-bodied insects often cluster on new growth and buds.
Scale: Brown or black bumps on leaves and stems, often accompanied by a sticky residue (honeydew).
Mealybugs: White, cottony masses on leaves, stems, and roots.
Treatment Methods
Mechanical Removal:
Use a soft cloth or cotton swab dipped in rubbing alcohol to remove pests manually.
For small infestations, this can be an effective and immediate solution.
Insecticidal Soap:
Use insecticidal soap to treat soft-bodied pests like aphids, spider mites, and mealybugs.
Follow the instructions on the product label and ensure thorough coverage of the plant.
Neem Oil:
Neem oil is a natural pesticide that works well against a variety of pests.
Apply the mixture to the entire plant, including the undersides of the leaves, following the directions on the package.
Systemic Insecticides:
For severe infestations, consider using a systemic insecticide that is absorbed by the plant and targets pests feeding on it.
Always use as a last option and adhere to the manufacturer’s recommendations.
Common Diseases
Fungal Infections: Look for black or brown spots on leaves and pseudobulbs, often with a yellow halo.
Bacterial Infections: Water-soaked spots that quickly spread and may emit a foul odor.
Treatment Methods
Isolation:
Immediately isolate infected plants to prevent the spread of disease to healthy orchids.
Fungicides and Bactericides:
Use appropriate fungicides or bactericides to treat infected plants.
Make sure you choose a product that is appropriate for orchids and pay close attention to the directions.
Improving Air Circulation:
Ensure good air circulation around your orchids to reduce humidity levels and prevent fungal and bacterial growth.
If you need to keep the air circulating, use fans.
Sanitation
Eliminate and discard any contaminated plant matter.
Clean your tools with rubbing alcohol or a bleach solution after use to prevent the spread of pathogens.
Preventive Measures
Hygiene: Make sure the growing space is spotless and clear of trash.
Regularly sanitize pots and tools.
Quarantine: Quarantine new plants for a few weeks before introducing them to your collection to ensure they are pest and disease-free.
Proper Watering: Avoid overwatering and ensure good drainage to prevent fungal and bacterial infections.
By staying vigilant and taking prompt action, you can manage pests and diseases effectively, ensuring your Cattleya orchids remain healthy and vibrant.

