Pink Japonica Camellia: 20 Best Secrets for Stunning Blooms
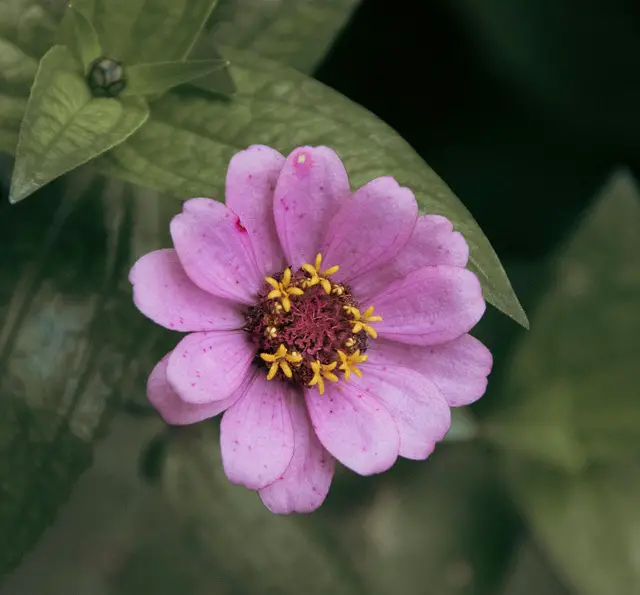
The Pink Japonica Camellia is a timeless treasure in the garden world, known for its lustrous evergreen foliage and enchanting pastel pink blooms. Often flowering in late winter through early spring—when everything else is dormant—it gives your garden a magical touch just when it’s needed most. But growing this beauty to its full potential takes more than good luck; it requires care, knowledge, and a few gardener secrets passed down through generations.
Table of Contents 👈 Tap Here
This comprehensive guide reveals the 20 best-kept secrets to make your Pink Japonica Camellia flourish with vibrant, healthy blooms. Let’s dive in and explore what it truly takes to turn your camellia shrub into a winter-spring showstopper.
Pink Japonica Camellia

🌿 1. Choose a Morning Sun Location
Camellias flourish best when they receive gentle morning sunlight and are shielded from the intense heat of the afternoon. The early rays help dry off dew and reduce the risk of fungal infections, while afternoon shade keeps delicate petals from wilting or burning. Choosing a spot with filtered or dappled light—especially under taller trees or on the east side of your home—is the perfect balance for healthy flowering.
Tip: East-facing areas with tree cover offer the ideal filtered light for healthy blooms.
🌿 2. Always Use Acidic Soil
As acid-loving plants, camellias will not thrive in neutral or alkaline soils. The plant weakens and the leaves turn yellow as the pH rises above 6.5 because nutrients like iron are less available. Aww, Add acidic organic matter to your garden soil, such peat moss, pine bark, or composted oak leaves, for optimal results. A basic kit can also be used to test the soil and make sure the pH stays within the ideal range of 5.5 to 6.5.
Tip: Use organic soil acidifiers like sulfur or cottonseed meal if your pH creeps too high.
🌿 3. Mulch Regularly
A generous layer of mulch not only suppresses weeds but also regulates soil temperature and moisture—two critical factors for camellia health. Organic mulches like pine needles, bark chips, and leaf mold gradually decompose, enriching the soil and maintaining a slightly acidic pH.To avoid rot, spread mulch around the base in the shape of a doughnut, leaving a few inches between the mulch and the trunk.
Tip: Replenish mulch every spring and fall to support healthy root function year-round.
🌿 4. Water Deeply—but Don’t Overdo It
Camellias need consistent moisture but suffer if waterlogged. Shallow watering encourages weak surface roots, making the plant vulnerable during dry spells. Instead, water deeply to help the roots grow downward and access more stable moisture levels. During hot or dry seasons, water about once a week—but always allow the top few inches of soil to dry between sessions to prevent fungal diseases.
Tip: Drip irrigation or soaker hoses are excellent tools for deep watering with minimal waste.
🌿 5. Avoid Disturbing the Roots
The roots of camellias are delicate and dislike interference. Once planted, try not to dig around the base, as root disturbance can lead to stress and reduced blooming. If you must transplant, do so in the cooler months of fall or early spring when the plant is not actively blooming, and make sure to keep as much as much of the initial dirt ball as is feasible.
Tip: Avoid planting shallow-rooted flowers too close to your camellia to prevent competition and disruption.
🌿 6. Apply Camellia-Specific Fertilizer
A slow-release, acid-forming fertilizer specifically designed for camellias is ideal. Fertilize right after the plant finishes blooming in late spring to promote healthy leaf growth and bud development for the following year. Avoid feeding during the flowering or late summer months, as this can interfere with bud set and cause soft, frost-tender growth.
Tip: Choose a balanced fertilizer with a ratio like 10-10-10 or 12-4-8, and apply according to package directions.
🌿 7. Prune After Blooming Ends
Pruning your camellia is essential for shaping and rejuvenation, but timing is everything. Always prune after blooming—usually in spring—so you don’t accidentally snip off the developing buds for next year. Start by removing deadwood, damaged stems, and any crossing branches. This not only opens up the plant for better airflow but also directs energy into stronger, flower-producing branches.
Tip: Keep pruning minimal if your camellia is already blooming heavily and shaped well.
🌿 8. Protect Buds from Frost
Even a light frost can damage tender buds and prevent your camellia from flowering. On chilly winter nights, especially when temperatures dip below freezing, cover the plant with breathable materials such as burlap or frost cloth. Never use plastic—it traps moisture and can do more harm than good. Container plants are especially vulnerable and can be brought under shelter temporarily.
Tip: Additionally, mulching shields roots from harsh winter temperature swings.
🌿 9. Prevent Petal Blight
Camellia blossoms with petal blight get ugly dark patches and become mushy, frequently overnight. It spreads through infected petals left on the ground or stuck in the canopy. Prevent outbreaks by removing spent flowers immediately and cleaning up fallen debris around the plant. During damp seasons, you can use a fungicide labeled for camellias to prevent recurrence.
Tip: Improve air circulation by pruning lightly and spacing plants well apart.
🌿 10. Encourage Air Circulation
Dense, compact foliage creates the perfect environment for pests and diseases to thrive. Camellias benefit greatly from good airflow between their branches. Regularly thin out the plant after blooming, and avoid overcrowding by keeping neighboring shrubs at a respectful distance. This reduces the chance of mold, mildew, and insect infestations.
Tip: Leave at least 3–4 feet between camellias and other large plants or structures.
🌿 11. Add Epsom Salt Occasionally
Epsom salt, rich in magnesium, supports lush green foliage and may even improve flower formation. Leaves that are deficient in magnesium may turn yellow, especially in the spaces between veins. To give your plant a boost, dissolve one tablespoon of Epsom salt in a gallon of water and apply it to the soil around the roots once a month during the growing season.
Tip: Don’t overuse—too much magnesium can unbalance other nutrients in the soil.
🌿 12. Check for Scale Insects
Scale insects are common camellia pests that attach themselves to leaves and stems, sucking sap and causing yellowing, stunted growth, and a sticky residue called honeydew. Left untreated, they can lead to black sooty mold. Inspect your plant regularly and treat infestations early using neem oil, insecticidal soap, or by physically removing the pests with a toothbrush.
Tip: Spray treatments in the morning or evening to avoid sunburning leaves.
🌿 13. Use Rainwater If You Can
Tap water often contains minerals or chlorine that can raise soil pH or damage roots over time. Rainwater, on the other hand, is naturally soft and slightly acidic—just what your camellia needs. Collect it in barrels during the rainy season and use it to water your camellias as needed. It’s free, sustainable, and gentle on acid-loving plants.
Tip: Avoid water from metal roofs if they are coated in zinc or other reactive materials.
🌿 14. Don’t Overcrowd Your Camellia
While it may be tempting to plant camellias close together for instant impact, overcrowding can suffocate your plant and prevent proper development. Dense plantings reduce airflow, increase humidity, and limit light penetration—all of which reduce blooming. Allow adequate space for each shrub to reach its full size without colliding with its neighbours.
Tip: Proper spacing also makes pruning, watering, and pest control much easier.
🌿 15. Provide Winter Wind Protection
Cold, dry winter winds can desiccate leaves and buds, leading to browning, curling, or drop-off. If you live in a windy region, plant your camellia near a wall, fence, or natural windbreak like a hedge. Alternatively, erect a temporary screen or use frost cloth when strong winds are predicted.
Tip: Even container plants benefit from being moved closer to shelter during harsh weather.
🌿 16. Deadhead Old Blooms
Deadheading is more than just a cosmetic task—it keeps your camellia healthier and encourages the plant to focus energy on new growth and future buds. Removing faded or browning flowers also prevents petal blight and mold buildup. Gently snap or snip the spent bloom right where it meets the stem without damaging the nearby buds.
Tip: Make deadheading part of your weekly garden check-in during peak bloom season.
🌿 17. Watch for Yellowing Leaves
Leaves turning yellow—especially with green veins—could indicate a nutrient imbalance or poor drainage. It’s often a sign that your soil pH is creeping too high, making iron and other key nutrients less available. Improve drainage by loosening the soil and ensure you’re not overwatering. If needed, amend with iron chelates and acidify the soil.
Tip: Mulching with pine needles or using an azalea/camellia mix can help rebalance the soil.
🌿 18. Repot Container Plants Every 2–3 Years
Camellias in containers are prone to root-bound stress, nutrient depletion, and poor drainage over time. Refresh the soil every few years and move your camellia to a slightly larger pot to accommodate growing roots. Always use a well-draining, acidic mix formulated for camellias or azaleas.
Tip: Repot just before the growing season begins—usually in early spring.
🌿 19. Layer for Propagation
If you’d like to multiply your camellia plants, try air layering—a simple, effective method that involves bending a low branch, nicking it, and burying the wounded area under soil or moss until roots form. After a few months, the rooted section can be cut and planted as a new shrub.
Tip: Choose a semi-woody branch from the current year’s growth for best results.
🌿 20. Patience Is the Ultimate Secret
Camellias are slow growers, and it may take a few years before a young plant begins to bloom profusely. But don’t lose hope—the payoff is well worth the wait. With the right care, these shrubs live for decades and become even more spectacular with age, producing more blooms and growing into impressive garden features.
Tip:To monitor your camellia’s development and recognise little victories, keep a photo journal of it every year.
Hi, I’m Steve, an orchid grower with 30+ years of hands-on experience caring for indoor and outdoor plants. I share practical, tested tips and beginner-friendly guides to help plant enthusiasts nurture healthy, thriving plants.