Pruning Orchid Air Roots: 5 Dos and Don’ts for Healthy Plants
Table of Contents 👈 Tap Here
Pruning Orchid Air Roots is an essential part of maintaining the beauty and vitality of your orchid plants. These fascinating roots grow above the soil, helping orchids absorb moisture and nutrients from the air. Understanding their purpose and how to manage them properly ensures your orchids remain healthy, vibrant, and capable of producing their signature breathtaking blooms.
Pruning Orchid Air Roots requires a careful and informed approach since improper handling can damage the plant or hinder its growth. With the right techniques, you can encourage new root development, improve airflow, and prevent potential rot or disease. This introduction will guide you through the importance, timing, and best practices for safely trimming these unique orchid roots.
Dos:
Inspect Regularly:
Inspecting your orchid’s air roots regularly is essential for maintaining its health and vitality.Regular inspections enable you to spot possible problems early and take the necessary action. Look for signs of damage, disease, or overgrowth. Healthy roots are firm, plump, and often light green or silver in colour. If you notice any roots that appear dry, discoloured, mushy, or show signs of rot, it’s a sign that they might need pruning. By staying vigilant and addressing any problems promptly, you can ensure that your orchid’s air roots remain in optimal condition.
Sterilise Tools:
Sterilising your pruning tools is a crucial step when caring for your orchids. Clean and sterilised tools help prevent the spread of diseases and infections to your plants.
Before using your scissors or pruning shears, make sure to disinfect them. For this, wipe the blades with rubbing alcohol or a weak solution of bleach.This prevents any potential pathogens from being transferred to the orchid’s delicate root system during pruning. Keeping your tools clean and sterilised is a simple yet effective way to promote the overall health of your orchids.
Focus on dead roots:
When pruning your orchid’s air roots, it’s important to focus on trimming only the dead roots. Dead roots are no longer functional and can potentially harbour diseases or pests that could spread to healthy parts of the plant.
Identifying dead roots is relatively straightforward: they are usually dry, shrivelled, discoloured, and brittle to the touch. Gently tug on the root; if it detaches easily from the plant, it’s likely dead. By selectively removing these non-functional roots, you encourage your orchid to allocate its energy and resources to healthy root development, contributing to the overall vitality of the plant.
Choose Healthy Roots: When pruning your orchid’s air roots, prioritise trimming unhealthy or damaged roots. Healthy roots are essential for the plant’s growth and overall well-being.
Look for roots that show signs of damage, discoloration, or rot. Healthy roots are usually firm, plump, and have a light green or silver colour. If you notice any roots that are mushy, discoloured, or appear to be decaying, these are the ones you should target for pruning.
By selectively choosing and trimming only the roots that are no longer functional, you ensure that your orchid can allocate its resources towards healthy growth and efficient nutrient absorption.
Choose healthy roots:
When pruning your orchid’s air roots, prioritise trimming unhealthy or damaged roots. Healthy roots are essential for the plant’s growth and overall well-being.
Look for roots that show signs of damage, discoloration, or rot. Healthy roots are usually firm, plump, and have a light green or silver colour. If you notice any roots that are mushy, discoloured, or appear to be decaying, these are the ones you should target for pruning.
By selectively choosing and trimming only the roots that are no longer functional, you ensure that your orchid can allocate its resources towards healthy growth and efficient nutrient absorption.
Use Disinfectant:
Using a disinfectant is a recommended practise when pruning your orchid’s air roots. After you’ve identified the roots that need pruning and have made clean cuts, applying a mild disinfectant can help prevent potential infections and promote healing.
A diluted hydrogen peroxide solution (1 part hydrogen peroxide to 3 parts water) is a common choice for disinfection. Gently apply the solution to the cut areas using a clean cotton swab or a soft cloth. This helps minimise the risk of pathogens entering the open cuts and causing harm to the plant.
Remember to be cautious not to saturate the plant with the disinfectant, and allow the roots to dry before placing the orchid back in its pot. This simple step contributes to maintaining your orchid’s overall health and preventing complications from pruning.
Don’ts:
Avoid Over-Pruning:
Indeed, avoiding overpruning is key when it comes to maintaining the health of your orchid. Over-pruning occurs when you remove too many roots, leaves, or other plant parts in a single session, which can lead to stress and harm the plant’s ability to thrive.
When pruning orchid air roots, stick to trimming only the roots that are dead, damaged, or dry. Removing too many healthy roots can hinder the plant’s ability to absorb water and nutrients, ultimately affecting its growth and flowering potential.
Remember, a balanced approach to pruning ensures that your orchid remains healthy and can recover from the pruning process without unnecessary strain.
Don’t Cut Live Roots:
It’s important to avoid cutting live roots when pruning your orchid. Live roots are the active and healthy parts of the plant that contribute to its growth and overall well-being. These roots play a crucial role in absorbing water and nutrients and supporting the plant’s physiological processes.
When you prune, focus on trimming only the dead, dry, or damaged roots. Live roots are typically firm to the touch and have a green or silver coloration. Cutting live roots can stress the plant and impede its ability to thrive. By preserving the live roots and targeting only those that are no longer functional, you’ll help your orchid maintain its health and vigour.
Don’t Cut Aerial Roots:
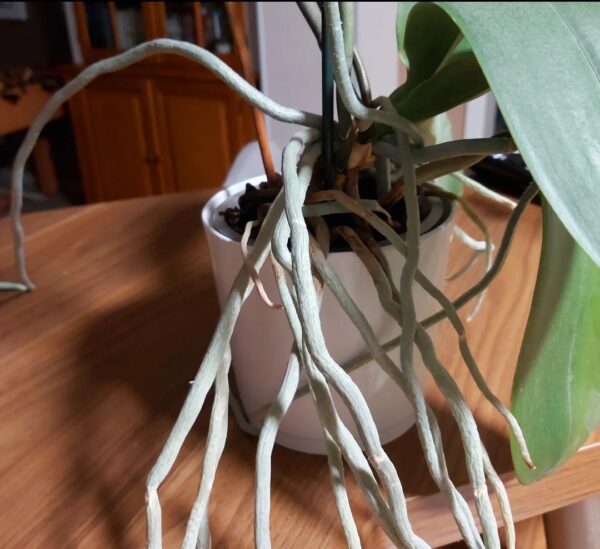
Absolutely. It’s essential to avoid cutting aerial roots when pruning your orchid. Aerial roots are the unique roots that grow above the soil surface and play a vital role in the orchid’s natural growth and nutrition.
These roots have adapted to absorb moisture and nutrients from the air, and they’re a natural part of the orchid’s structure. Trimming or cutting aerial roots can disrupt the plant’s ability to absorb what it needs to thrive.
If you encounter long or unruly aerial roots, you can gently guide them back into the potting mix or attach them to a support structure. This way, you encourage the orchid to maintain its natural functions while still maintaining an organised appearance.
Skip Chemicals:
When it comes to pruning orchid air roots, it’s best to avoid using harsh chemicals. Orchids are sensitive plants, and their roots are particularly delicate. Using chemicals can harm the root system and the overall health of the plant.
Instead of chemicals, focus on using natural methods and proper care practises to maintain your orchid’s well-being. Regularly inspecting the roots, using clean and sterilised tools, and providing the right environment (humidity, light, and water) are key factors in promoting healthy growth and preventing issues. If you’re concerned about infections, a diluted hydrogen peroxide solution can be applied to the cut area to help prevent potential infections without causing harm to the plant.
Don’t trim all at once.
It’s important to avoid trimming all the roots at once when pruning your orchid. Orchids have a sensitive root system that is crucial for their overall health and vitality. Pruning too many roots at once can cause stress for the plant and disrupt its ability to absorb water and nutrients.
Instead, take a gradual approach to pruning. Focus on trimming only the dead, dry, or damaged roots during each pruning session. By spacing out the pruning over multiple sessions, you give the orchid time to recover and adjust to the changes. This helps maintain a balance between root health and the plant’s overall well-being, promoting successful growth and blooming.
FAQ
Should you trim air roots on orchids?
Trim air roots on orchids only if they’re dry, dead, or damaged.
How do you take care of an orchid with air roots?
To care for an orchid with air roots, mist them regularly, provide high humidity, and avoid overwatering
What are the dos and don’ts for orchids?
Dos: Provide bright, indirect light; water when the top inch of soil is dry; repot every 1-2 years. Don’ts: Overwater, expose to direct sunlight, neglect humidity.
How do I make my orchid roots healthy?
Ensure healthy orchid roots by maintaining proper watering, using well-draining potting mix, and providing adequate humidity and air circulation.
Hi, I’m Steve, an orchid grower with 30+ years of hands-on experience caring for indoor and outdoor plants. I share practical, tested tips and beginner-friendly guides to help plant enthusiasts nurture healthy, thriving plants.