Silver Vase Bromeliad (Aechmea fasciata)Care Essentials: best 10-Step Guide
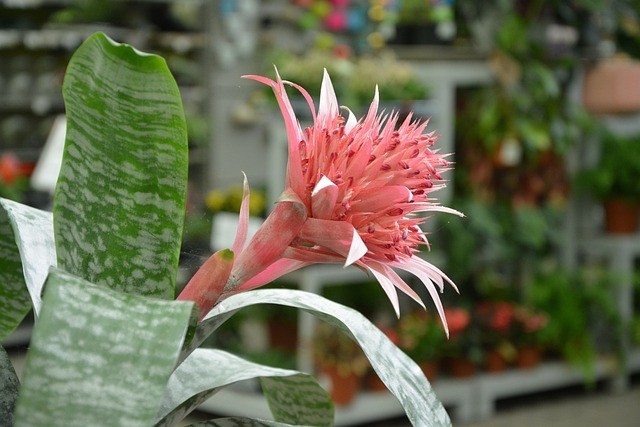
Bromeliads are a diverse and captivating family of tropical plants, and the Silver Vase Bromeliad (Aechmea fasciata) is no exception. Known for its striking silver-grey foliage and vibrant pink inflorescence, this bromeliad is a favourite among plant enthusiasts. However, to keep your Silver Vase Bromeliad thriving, it’s essential to provide the right care. In this guide, we’ll walk you through ten essential steps to ensure your Silver Vase Bromeliad remains a stunning addition to your indoor garden.
Step 1: Choosing the Right location
Your silver vase bromeliad’s general health and attractiveness depend on where you put it, so choose carefully. Here’s a closer look at Step 1: Choosing the right location
1. Bright, indirect sunlight: Silver Vase Bromeliads thrive in bright, indirect sunlight. Place them near a window with sheer curtains or in a spot where they receive filtered light. Avoid direct sunlight, as it can scorch their delicate leaves.
2. Indoor or outdoor: These bromeliads are primarily indoor plants but can also be placed in a shaded outdoor area. Ensure they are protected from harsh sunlight and cold temperatures if you choose to keep them outside.
3. Consider Temperature: Maintain a comfortable temperature between 60 and 80°F (15 and 27°C). Avoid areas with drafts, such as near air conditioning vents or heaters, as extreme temperature fluctuations can stress the plant.
4. Evaluate Humidity: Bromeliads appreciate higher humidity levels. If your home is dry, consider using a humidifier or placing a humidity tray nearby to create the ideal environment.

5. Room Placement: Place your Silver Vase Bromeliad in a room where you can enjoy its beauty. They make fantastic centrepieces, additions to shelves, or even as part of a tropical-themed display.
By carefully choosing the right location, you set the stage for your Silver Vase Bromeliad to flourish and become a striking focal point in your indoor garden. Remember that adjusting its placement as the seasons change can help maintain optimal conditions for this captivating plant.
Step 2: Proper potting
The choice of pot and potting mix is crucial when it comes to caring for your Silver Vase Bromeliad. In this step, we’ll delve into the details of potting to ensure your bromeliad gets the best start.
1. Container Selection: Opt for a shallow container with good drainage. Bromeliads are epiphytic by nature, meaning they typically grow on trees and rocks rather than in the ground. Their root systems are relatively shallow, so a shallow pot works well.
2. Well-Draining Potting Mix: Use a bromeliad-specific mix or create your own by combining materials like orchid bark, perlite, and sphagnum moss. This mix provides the necessary aeration and drainage that bromeliads require.
3. Planting Depth: When potting your Silver Vase Bromeliad, make sure to position it so the base of the plant rests slightly above the potting mix. This mimics its natural growth habit and helps prevent rotting at the base.
4. Central Cup Care: Ensure the central cup, or rosette, of the bromeliad is kept free of soil and debris. This cup collects water and nutrients for the plant, so keeping it clean is vital for its health.
5. Avoid overpotting: Silver Vase Bromeliads don’t need a large pot. Choose a pot that is just slightly larger than the root ball to prevent waterlogged soil and encourage faster drying between waterings.
6. Repotting: Repot your bromeliad when it becomes root-bound or outgrows its container. This is typically done by gently separating pups (offshoots) from the parent plant and repotting them.
Proper potting ensures that your Silver Vase Bromeliad has a stable and healthy environment in which to grow and thrive. Remember that the right potting mix and container will contribute to good drainage, which is essential for preventing root rot and other issues.
Step 3: Watering Wisely
Proper watering is key to the health and vitality of your Silver Vase Bromeliad. In this step, we’ll explore how to water your bromeliad wisely to ensure it thrives.
1. Central Cup Hydration: The central cup (rosette) of the bromeliad collects and holds water. Keep this cup filled with water, but don’t let it become stagnant. Change the water regularly to prevent bacterial growth and mosquito breeding.
2. Soil Moisture: While the central cup provides hydration to the plant, it’s also essential to water the soil. The soil should be consistently moist but not soggy. Water sparingly, allowing the top inch or so of the soil to dry out before the next watering.
3. Water Quality: Use distilled or rainwater if possible, as bromeliads are sensitive to chemicals commonly found in tap water. If you must use tap water, allow it to sit in an open container for at least 24 hours to let chlorine and other chemicals evaporate.
4. Avoid overwatering: One of the most common mistakes is overwatering. Bromeliads are susceptible to root rot if their roots remain constantly soaked. Ensure that the pot has good drainage, and never let your bromeliad sit in standing water.
5. Watering Frequency: The frequency of watering can vary depending on factors like temperature, humidity, and pot size. Generally speaking, it’s safer to submerge yourself than to surface. Adjust your watering schedule according to the specific conditions of your environment.
6. Drying Periods: Allow the soil to have short drying periods between waterings. This mimics the natural conditions of bromeliads, which often grow in the canopy of tropical forests, where they receive periodic rain showers followed by drying periods.
7. Observe Your Plant: Pay attention to your Silver Vase Bromeliad. If it starts showing signs of stress, such as drooping leaves or browning at the base, it might be getting too much or too little water. Adjust your watering accordingly.
Watering wisely is a balancing act for Silver Vase Bromeliads. By providing moisture both through the central cup and the soil while avoiding overwatering, you can help your plant thrive and maintain its stunning appearance.
Step 4: Humidity Matters
Maintaining the right humidity levels is crucial for the well-being of your Silver Vase Bromeliad. In this step, we’ll explore why humidity matters and how to ensure your bromeliad enjoys the proper moisture in the air.
1. Native Habitat: Silver Vase Bromeliads originate from tropical rainforests, where humidity levels are typically high. Replicating these conditions to some extent is important for their overall health.
3. Grouping Plants: Grouping your bromeliad with other indoor plants can create a microenvironment with higher humidity levels as plants release moisture through transpiration.
4. Avoid drafts: Keep your bromeliad away from drafts, which can dry out the air and harm the plant. Ensure a stable, draft-free location.
5. Observe Your Bromeliad: Pay attention to your plant’s leaves. If they start to curl or show signs of browning, it could be an indication that the humidity levels are too low.
6. Seasonal Adjustments: Be aware that humidity levels can vary throughout the year. You might need to adjust your humidity-enhancing methods during different seasons.
Maintaining adequate humidity for your Silver Vase Bromeliad is a vital aspect of its care. By recreating the tropical conditions it’s accustomed to, you’ll help your bromeliad thrive and display its stunning silver foliage and vibrant pink inflorescence to its full potential.
Step 5: Temperature Range
The temperature plays a significant role in the well-being of your Silver Vase Bromeliad. In this step, we’ll explore the ideal temperature range and considerations to ensure your bromeliad stays healthy and vibrant.
1. Optimal Temperature Range: Silver Vase Bromeliads thrive in a temperature range of 60–80 °F (15–27 °C). This range mimics the conditions of their native tropical habitat.
2. Avoid Extreme Temperatures: Protect your bromeliad from extreme temperature fluctuations. Avoid placing it near heaters, air conditioning vents, radiators, or draughty windows, as sudden temperature changes can stress the plant.
3. Cold Tolerance: While these bromeliads prefer warmth, they can tolerate brief periods of slightly cooler temperatures, but they are not frost-tolerant. If you move your bromeliad outdoors during warm months, ensure it is brought back inside before the onset of cold weather.
4. Seasonal Considerations: Be mindful of seasonal changes. When interior heating is used during the winter months, the air is prone to being dryer. You may need to increase humidity and monitor the temperature more closely to ensure the plant’s well-being.
5. Protect from drafts: Even within the optimal temperature range, drafts can be detrimental. Make sure your bromeliad is shielded from cold drafts, which can lead to stress and damage.
6. Monitoring: Regularly check your plant for signs of temperature stress. These may include wilting, browning of leaves, or slowed growth. Adjust its location accordingly to maintain a comfortable temperature.
7. Indoor vs. Outdoor: If you choose to place your bromeliad outdoors during warmer months, ensure it’s positioned in a shaded area to protect it from direct sunlight, and monitor the temperature to prevent exposure to cold nights.
Maintaining the right temperature range is essential for the health and growth of your Silver Vase Bromeliad. By providing a stable and suitable environment, you’ll enable the plant to display its unique silver-grey foliage and vibrant pink inflorescence at their best.
Step 6: Fertilise sparingly.
Fertilising your Silver Vase Bromeliad is important to support its growth and vitality, but it’s essential to do so sparingly and with the right approach. Here’s how to ensure your bromeliad receives the nutrients it needs without overdoing it.
1. Choice of Fertiliser: Select a balanced, water-soluble fertiliser with a formula such as 10-10-10 or 20-20-20. Alternatively, you can use a specialised bromeliad fertilizer. Avoid slow-release or granular fertilisers, as these can release nutrients too slowly for your bromeliad’s needs.
2. Dilute the fertiliser: Always dilute the fertiliser to half or even a quarter of the recommended strength. Bromeliads are not heavy feeders, and too much fertiliser can harm the plant.
3. Frequency: Fertilise your Silver Vase Bromeliad once a month during the growing season, which typically spans from spring to early autumn. Reduce or stop fertilising during the dormant winter months, when the plant’s growth slows down.
4. Application Method: Apply the diluted fertiliser to the soil, avoiding contact with the central cup (rosette) of the bromeliad. You can also apply fertiliser to the soil during regular watering.
5. Flush with Water: After fertilising, flush the soil with plain water to prevent salt buildup, which can be harmful to your bromeliad.
6. Observe for Signs of Overfertilisation: Watch for any signs of excessive fertilisation, such as browning leaf tips or a buildup of salts on the soil surface. If you notice these signs, reduce the frequency and strength of fertilisation.
7. Remember Pups: If you have mature pups (offshoots) from your Silver Vase Bromeliad, they can benefit from light fertilisation as well. Dilute the fertiliser and apply it to the soil around the pups.
Fertilising sparingly and with care ensures that your Silver Vase Bromeliad receives the necessary nutrients without the risk of overfeeding, which can lead to nutrient imbalances and damage to the plant. A balanced approach to fertilisation will help your bromeliad maintain its vibrant appearance and overall health.
Step 7: Pruning and deadheading
Pruning and deadheading are important aspects of Silver Vase Bromeliad care that can help maintain the plant’s health and appearance. In this step, we’ll explore how to effectively prune and deadhead your bromeliad.
1. Deadheading: Deadheading refers to the removal of spent or faded flower spikes. Silver Vase Bromeliads typically produce a single colourful flower spike, which is a stunning focal point. However, once the flowers start to wilt and lose their vibrancy, it’s time to deadhead.
Why Deadhead: Removing the spent flower spike not only improves the plant’s appearance but also encourages energy conservation. The bromeliad will redirect its energy away from seed production, allowing it to focus on pup development or overall growth.
How to deadhead: Use clean, sharp scissors or pruning shears to snip the spent flower spike as close to the base as possible without damaging the central rosette. Be gentle to avoid harming the main plant.
2. Pruning Dead or Fading Leaves: Regularly inspect your Silver Vase Bromeliad for dead or fading leaves, especially those at the base of the plant. These leaves not only detract from the plant’s appearance but can also create hiding spots for pests.
Why prune leaves: Removing dead or fading leaves helps improve air circulation around the plant, reducing the risk of fungal diseases. It also enhances the overall aesthetic of the bromeliad.
How to Prune Leaves: Use sharp, clean scissors or pruning shears to snip off individual leaves at their base. To avoid damaging the plant’s healthy tissue, use caution. Ensure that the central rosette remains free of debris and dead leaves.
3. Pup Pruning: As your Silver Vase Bromeliad matures, it may produce pups or offshoots. These can be separated from the parent plant when they are a reasonable size and potted individually to grow new bromeliads.
Why prune pups: Pruning and replanting pups is essential to avoid overcrowding, which can lead to competition for resources and reduce the overall health of the plants.
How to Prune Pups: Gently separate the pup from the parent plant using a clean, sharp knife or scissors. Ensure that the pup has its own roots and plant it in a separate container with suitable potting mix.
Regular pruning and deadheading help keep your Silver Vase Bromeliad looking its best and contribute to its overall health and vitality. It’s a simple but essential part of bromeliad care that ensures your plant remains a striking addition to your indoor garden.
Step 8: Propagation
Propagation is an exciting aspect of Silver Vase Bromeliad care that allows you to create new plants from the parent plant. In this step, we’ll explore how to propagate your bromeliad through the separation of pups or offshoots.
1. Understanding Pups: Silver Vase Bromeliads typically produce pups or offshoots after flowering. These pups are smaller versions of the parent plant that grow at the base. Propagating through pups is the most common and successful method for growing new bromeliads.
2. Wait for the Right Time: Pups should be separated from the parent plant when they are at least one-third to one-half the size of the mature plant. Waiting until they reach this size ensures they have their own root system and are more likely to thrive on their own.
3. Prepare for Separation:
Make sure you have tidy, cutting-edge scissors or pruning shears.
Prepare new pots with a well-draining potting mix.
Have a small container of water for rinsing and cleaning.
4. Separation Process:
Gently remove the pup from the parent plant by cutting it away at the base. Be careful not to damage the pup’s roots during this process.
Rinse the pup’s roots in the container of water to remove any debris or residual soil.
Allow the pup to air dry for a few hours to minimise the risk of rot.
5. Potting the Pup:
Plant the pup in its own pot filled with the appropriate potting mix, ensuring that the base of the pup is level with the surface of the soil.
Water the newly potted pup sparingly to settle the soil around the roots.
6. Care for the New Plant:
Place the newly potted pup in a location with bright, indirect light and maintain appropriate humidity levels.
Follow the general care guidelines for mature Silver Vase Bromeliads as outlined in the previous steps.
7. Monitor Growth: Pups may take some time to establish themselves and grow into mature plants. Be patient and monitor their progress, adjusting care as needed.
Propagation through pups allows you to expand your collection of Silver Vase Bromeliads and share the beauty of these unique plants with others. With proper care, the separated pups will develop into healthy, mature bromeliads, each with its own striking silver-grey foliage and vibrant pink inflorescence.
Step 9: Pests and Diseases
Just like any other plant, silver vase bromeliads can be vulnerable to pests and diseases. In this step, we’ll explore how to identify, prevent, and address common issues that may affect your bromeliad.
1. Common Pests:
Mealybugs: These small, white, cottony insects can infest the central cup or hide in leaf crevices.
Scale Insects: Tiny, oval-shaped insects that often appear as brown or tan bumps on leaves.
Aphids are small, soft-bodied insects that can cluster on young shoots and leaves.
2. Identifying Pest Infestations:
Regularly inspect your Silver Vase Bromeliad for any signs of pests. Look for discoloured or distorted leaves, sticky residue (honeydew), or the presence of insects themselves.
3. Preventive Measures:
Isolate new plants for a few weeks to ensure they are pest-free before placing them near existing plants.
Keep a clean growing environment by removing dead leaves and debris, which can attract pests.
Maintain proper humidity levels to deter some pests, as dry conditions can make your bromeliad less appealing to them.
4. Treatment of Pest Infestations:
Separate the afflicted plant from others to stop the infestation from spreading.
To get rid of mealybugs, scale, and aphids, use insecticidal soap or neem oil. Pay close attention to the product’s instructions.
Pruning significantly impacted areas may be an option for severe infestations.
5. Common Diseases:
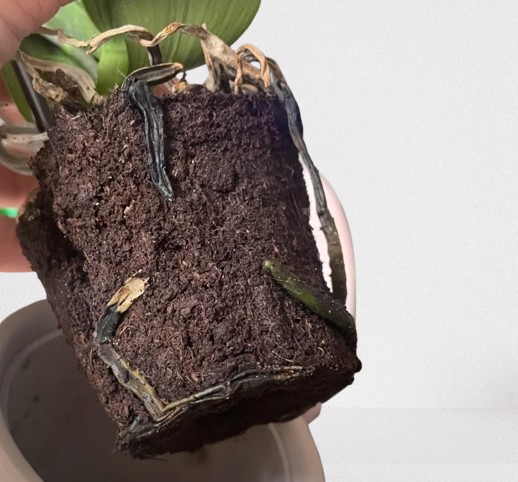
Root Rot: This fungal disease can occur if the soil remains consistently waterlogged. Yellowing and wilting leaves are warning signs, as is a bad soil odour.
Leaf Spot: A fungal or bacterial leaf spot can manifest as brown or black spots on the leaves.
6. Preventive Measures for Diseases:
Ensure proper watering practices to prevent root rot. Before watering again, allow the top inch of soil to dry.
Avoid getting water on the foliage, as this can promote leaf spot diseases. Water the soil directly instead.
7. Treatment of Diseases
If you suspect root rot, remove the plant from its pot, trim away the affected roots, and repot in fresh, well-draining soil.
Prune and remove leaves with severe leaf spot issues. Apply a fungicide if necessary, following product instructions.
8. Regular Monitoring:
Consistent monitoring is crucial to catching and addressing pests and diseases early. Regularly inspect your Silver Vase Bromeliad and take action promptly if you notice any issues.
By staying vigilant and following these guidelines, you can help keep your Silver Vase Bromeliad healthy and free from the common pests and diseases that can affect it. This proactive approach will ensure that your bromeliad continues to thrive and display its unique beauty.
Step 10: Blooming
The blooming phase of your Silver Vase Bromeliad is a spectacular event that showcases the plant’s vibrant colours and unique beauty. In this step, we’ll explore what to expect during the blooming period and how to care for your bromeliad during this time.
1. Blooming Timeline:
Silver Vase Bromeliads typically bloom once in their lifetime. This phase can last several weeks to a few months, depending on environmental conditions and the specific variety of your bromeliad.
The bloom usually emerges from the central rosette of the plant, showcasing bright pink or red bracts with small blue or purple flowers.
2. Bright, indirect light:
During the blooming phase, provide your bromeliad with consistent, bright, indirect sunlight. Adequate light is essential for the development and longevity of the colourful bracts and flowers.
3. Maintain Humidity:
Continue to monitor and maintain humidity levels around your bromeliad. Adequate humidity helps ensure the vibrant display of the bracts.
4. Central Cup Care:
Be mindful of the water level in the central cup during the blooming period. Ensure it’s consistently filled but not overfilled to prevent stagnation.
5. Avoid Disturbance:
Avoid moving or disturbing the plant during the blooming phase, as this can stress it and potentially damage the developing flowers.
6. Blooming’s End:
Once the blooming period is over, the bracts will eventually fade and wither. At this point, you can follow the deadheading instructions (Step 7) to trim away the spent flower spike and maintain the plant’s appearance.
7. Pup Production:
After blooming, your Silver Vase Bromeliad may start producing pups or offshoots at the base. These pups can be separated and potted individually to grow new bromeliads, as discussed in Step 8.
8. Patience and Care:
While the blooming phase is a highlight of owning a Silver Vase Bromeliad, remember that the plant may undergo some changes afterward. The main plant may slowly decline, but the pups it produces will continue the cycle, eventually blooming in their own time.
The blooming phase of a Silver Vase Bromeliad is a rewarding experience for any plant enthusiast. By providing the right conditions and care during this period, you can enjoy the stunning display of vibrant colours that these bromeliads are known for.
FAQ
How do you care for a silver vase bromeliad?
Provide bright, indirect light and water in the central cup regularly.
How do you care for a bromeliad Aechmea fasciata?
Ensure bright, indirect light and maintain the central cup filled with water.
How do you take care of a vase plant?
Vase plants benefit from bright, indirect light and regular watering when the soil becomes dry.
How often do you water Aechmea fasciata?
Water Aechmea fasciata when the soil in the pot starts to dry out, typically every 1-2 weeks, and keep the central cup filled with water to maintain humidity.
