Orchid Care: 15 Best Unknown Facts on Treating Mould and Fungus
Table of Contents 👈 Tap Here
Orchid Care: 15 Best Unknown Facts on Treating Mould and Fungus
Orchids, with their delicate blooms and intricate structures, are a fascinating addition to any plant enthusiast’s collection. However, to ensure their vibrancy and health, understanding the nuances of basic orchid care is crucial. In this comprehensive guide, we delve into a specific aspect that often troubles orchid enthusiasts: the prevention and treatment of mould and fungus.
Types of Orchid Mould and Fungus
Powdery Mildew (Oidium spp.): A common fungal threat, powdery mildew appears as a white powdery substance on leaves and flowers, inhibiting photosynthesis.
Black Rot (Pythium spp. and Phytophthora spp.): a destructive fungus causing black, water-soaked lesions on leaves and pseudobulbs, often leading to plant decay.
Root rot (Rhizoctonia spp.) targets the roots, causing dark, mushy areas. It disrupts the plant’s ability to absorb nutrients and water, leading to an overall decline.
Botrytis Blight (Botrytis cinerea): Known as grey mould, it manifests as fuzzy grey-brown lesions on flowers and leaves, thriving in humid conditions.
Fusarium wilt (Fusarium spp.): causes the wilting, yellowing, and collapse of leaves. It spreads rapidly, affecting the vascular system of the plant.
Anthracnose (Colletotrichum spp.): Identified by dark, sunken lesions on leaves and stems, anthracnose can lead to tissue death and compromise overall plant health.
Phyllosticta Leaf Spot (Phyllosticta spp.): Characterized by small, dark spots on leaves, this fungus can weaken the plant over time.
Understanding these types of orchid mould and fungus is crucial for early detection and targeted treatment to maintain the health of your orchids.
Several Types of Fungi That Attack Orchids
Rhizoctonia spp. Causes root rot by attacking the orchid’s root system, leading to decay and nutrient absorption issues.
Pythium spp. is a water mould responsible for black rot, particularly damaging to pseudobulbs and causing rapid tissue breakdown.
Phytophthora spp.: Similar to Pythium, Phytophthora contributes to black rot and can affect both the aerial parts and roots of the orchid.
Botrytis cinerea causes botrytis blight, targeting flowers and leaves with grey-brown lesions, especially in humid conditions.
Fusarium spp. Leads to fusarium wilt, a vascular disease that hampers water and nutrient transport, resulting in wilting and decline.
Oidium spp. is responsible for powdery mildew, appearing as a white powdery substance on various plant parts and inhibiting photosynthesis.
Colletotrichum spp. Causes anthracnose, forming dark, sunken lesions on leaves and stems, potentially leading to tissue death.
Phyllosticta spp. triggers the phyllosticta leaf spot, characterised by small, dark spots on orchid leaves, weakening the plant over time.
Each of these fungi poses unique challenges to orchid health, emphasising the importance of early identification and targeted treatments to preserve the beauty and vitality of your orchid collection.
Treatment Options for Mould and Fungus
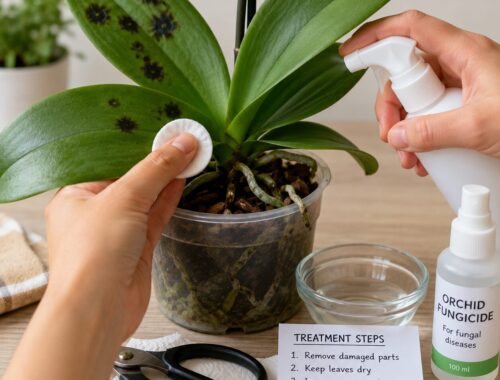
Isopropyl Alcohol Solution: Wipe affected areas with a cotton ball soaked in a diluted solution (1 part isopropyl alcohol to 3 parts water) to control and prevent fungal growth.
Neem Oil: An organic option, neem oil has antifungal properties. Dilute it with water and apply it to affected areas to combat mould and fungus.
Cinnamon Powder: Sprinkle ground cinnamon on affected surfaces; its antifungal properties can help inhibit the spread of mould and fungus.
Hydrogen Peroxide: A diluted hydrogen peroxide solution (1 part hydrogen peroxide to 4 parts water) can be sprayed on affected areas to combat fungal infections.
Sulphur-Based Fungicides: Sulphur is effective against powdery mildew. Apply sulphur-based fungicides according to product instructions for targeted treatment.
Copper-Based Fungicides: Copper-based fungicides can be used to control various fungal diseases. Follow the recommended application rates for your orchid type.
Baking Soda Solution: Mix baking soda with water (1 teaspoon baking soda to 1 quart of water) and apply to affected areas to suppress fungal growth.
Biological Control Agents: Beneficial microorganisms like Trichoderma species can be introduced to outcompete harmful fungi and promote a healthy orchid environment.
Always test any treatment on a small portion of the orchid first to ensure it doesn’t cause harm, and follow product instructions diligently for the best results. Regular monitoring and early intervention are key components of effective mould and fungus management.
Natural Fungicides
Garlic Spray: Create a natural fungicide by blending garlic cloves with water, straining the mixture, and spraying it on affected areas. Garlic has antifungal properties.
Apple Cider Vinegar Solution: Mix apple cider vinegar with water (1 tablespoon vinegar to 1 quart of water) to create a fungicidal spray. Apply to the affected orchid parts.
Cinnamon Extract: Utilise cinnamon’s natural antifungal properties by making an extract. Apply the diluted extract to orchids to inhibit fungal growth.
Chamomile Tea: Brew chamomile tea, let it cool, and use it as a spray. Chamomile has natural antifungal properties that can help control mould on orchids.
Aloe Vera Gel: Apply pure aloe vera gel to affected areas. Aloe vera has antifungal and healing properties, promoting recovery.
Citrus Oil Extracts: Extracts from citrus fruits like orange or lemon contain natural fungicidal properties. Dilute with water and apply as a spray.
Copper Solutions: While copper is a metal, it occurs naturally and can be used as a fungicide. Copper sulphate or copper hydroxide solutions can be applied in moderation.
Milk: Mix milk with water (1 part milk to 9 parts water) and spray it on orchids. The lactoferrin in milk has antifungal properties.
When using natural fungicides, ensure proper dilution, test on a small area first, and monitor the orchid’s response. Consistent application and early intervention contribute to effective natural fungus control.
What Not to Use
Bleach: Avoid using bleach on orchids, as it can be too harsh and may damage the plant’s delicate tissues, leading to more harm than good.
Undiluted Essential Oils: While essential oils like tea tree oil or eucalyptus have antifungal properties, using them undiluted can harm orchids. Always dilute with a suitable carrier oil or water.
Commercial Disinfectants: Household disinfectants often contain chemicals that can be too strong for orchids. These chemicals may damage the plant and its soil.
Dishwashing Detergents: Harsh detergents can strip away the natural protective waxes on orchid leaves, making them more susceptible to fungal infections.
Household Cleaners with Ammonia: Ammonia-based cleaners can be harmful to orchids. They may disrupt the balance of nutrients in the soil and damage the plant.
Petroleum-Based Products: Avoid using petroleum-based products like petroleum jelly or oils on orchids, as they can clog plant stomata and interfere with respiration.
Excessive Chemical Fertilisers: While fertilisers are essential, excessive use can lead to a buildup of salts, creating an environment conducive to fungal growth.
Follow the recommended fertilising guidelines.
Overwatering: Although not a substance, overwatering is a common mistake. Excess moisture creates a favourable environment for mould and fungus. Ensure proper drainage and allow the orchid’s growing medium to dry out between waterings.
In orchid care, it’s crucial to prioritise gentle and orchid-friendly solutions, avoiding substances that can harm these delicate plants. Always research and test any treatment on a small portion of the orchid before widespread application.
Natural Home Remedy for Orchid Fungus and Mould on Orchids
Create a natural home remedy to combat orchid fungus and mould by preparing a simple solution:
Ingredients:
Neem Oil: Known for its antifungal properties, neem oil helps control mould and fungus.Baking soda acts as a mild fungicide and helps prevent further fungal growth.Liquid Castile Soap: Provides a gentle cleansing effect without harming the orchid.
Instructions:
In a spray bottle, combine 1 tablespoon of neem oil, 1 teaspoon of baking soda, and a few drops of liquid castile soap.One quart of warm water should be added to the mixture.Gently shake the spray bottle to ensure thorough mixing.
Application:
Carefully inspect your orchid for areas affected by fungus and mould.Shake the spray bottle again before applying the solution to the affected areas, ensuring even coverage.Use the solution as a preventive measure by applying it to unaffected areas of the orchid.
Precautions:
Test the solution on a small part of the orchid first to ensure it doesn’t cause adverse reactions.Apply the remedy in the morning or early evening to allow the orchid to dry before nightfall.Repeat the treatment every 7–10 days, or as needed, until the fungus is under control.
This natural home remedy provides an effective and gentle way to address orchid fungus and mould, promoting a healthier environment for your prized plants.
How to Treat Orchid Fungus
Identification:
Carefully examine your orchid to identify the type of fungus affecting it. Different fungi may require specific treatment approaches.
Isolation:
Isolate the infected orchid to prevent the spread of the fungus to other plants.
Pruning:
Trim away affected leaves, pseudobulbs, or parts of the orchid using sterile pruning tools. Dispose of the removed parts to prevent further contamination.
Natural Fungicides:
Use a natural fungicide like neem oil or a baking soda solution. Apply the chosen remedy according to the instructions, ensuring thorough coverage of the affected areas.
Improve air circulation:
Enhance ventilation around the orchid by placing it in an area with good air circulation. This helps reduce humidity, creating a less favourable environment for fungal growth.
Adjust watering practices:
Ensure proper watering by allowing the orchid’s growing medium to dry out between waterings. Overwatering can contribute to fungal issues.
Neem Oil Soak:
For severe cases, consider a neem oil soak. Mix neem oil with water (following package instructions) and soak the orchid’s roots. This can help combat root fungal infections.
Repotting:
If the orchid is severely affected, consider repotting it using a fresh, sterile orchid mix. Remove any contaminated medium and inspect the roots for signs of rot.
Quarantine:
Keep the treated orchid in quarantine for a few weeks to monitor its recovery and prevent its potential spread to other plants.
Environmental Management:Maintain optimal growing conditions for orchids, including appropriate humidity levels and avoiding drastic temperature fluctuations, to discourage fungal development.
Regular Monitoring:Continuously monitor the orchid for signs of recurring fungus. Promptly address any new growth of mould or fungus with the appropriate treatment.
By combining these steps, you can effectively treat orchid fungus and create conditions that promote the orchid’s recovery and overall well-being. Regular care and preventive measures are crucial to maintaining a fungus-free environment for your orchids.
How to Treat Black Rot on Orchids
Prompt identification:
Quickly identify and confirm the presence of black rot on your orchid. Treatment effectiveness depends on early detection.
Isolation:
Immediately isolate the infected orchid to prevent the spread of black rot to other plants.
Pruning:
Using sterile pruning tools, carefully trim away all affected areas. Remove any blackened, mushy tissue, ensuring clean cuts to healthy tissue.
Antifungal Treatment:
Apply a suitable antifungal treatment specifically designed for black rot. Copper-based fungicides or systemic fungicides can be effective. Follow the product instructions for application.
Dry Environment:
Provide a dry environment for the orchid. Black rot thrives in moisture, so reducing humidity and improving ventilation can inhibit its progression.
Adjust watering practices:
Ensure proper watering by allowing the orchid’s growing medium to dry out between waterings. Overwatering can contribute to the development of black rot.
Remove the infected medium.
If the black rot has affected the potting medium, carefully remove the orchid from its pot and replace the contaminated medium with fresh, sterile orchid mix.
Repotting:
Consider repotting the orchid if the roots are severely affected. Trim away rotted roots and repot the orchid in a clean container with fresh orchid mix.
Quarantine:
Keep the treated orchid in quarantine for a period to monitor its recovery and ensure that the black rot does not reoccur.
Environmental Management:Maintain optimal growing conditions, such as appropriate humidity levels and avoiding sudden temperature changes, to discourage the return of black rot.
Regular Monitoring:Continuously monitor the orchid for any signs of recurring black rot. Take prompt action if you observe new symptoms.
By following these steps, you can effectively treat black rot on orchids, increasing the chances of the plant’s recovery. Regular monitoring and preventive measures are essential for maintaining a healthy orchid environment.
How to Treat Fungus on Orchid Roots
Remove the orchid from the pot.
Being cautious not to further harm the roots, carefully remove the orchid from its pot.
Rinse Roots:
Gently rinse the orchid roots under lukewarm running water to remove any debris and visible fungus. Cleanse the roots with a gentle brush.
Trim Affected Roots:
Trim away any soft, brown, or black roots with sterile scissors or pruning shears. Make cuts until hard, healthy tissue is reached.
Antifungal Treatment:
Apply an appropriate antifungal medication to the roots that are still healthy. Consider using a fungicide recommended for orchids. Follow the product instructions carefully.
Repotting:
Repot the orchid in a fresh, sterile orchid mix. Ensure good drainage and avoid compacting the medium to promote airflow around the roots.
Adjust watering practices:
Adjust your watering routine to prevent overwatering. Allow the orchid’s growing medium to dry out between waterings to discourage fungal growth.
Humidity Control:
Maintain an environment with proper humidity levels. High humidity can contribute to fungal issues, so ensure good air circulation around the orchid.
Use rooting hormones:
Consider applying rooting hormones to stimulate new root growth. Follow the product instructions and use them sparingly.
Quarantine:
Keep the treated orchid in quarantine for a period to monitor its recovery and prevent the potential spread of the fungus to other plants.
Environmental Management:Ensure that the orchid is kept in optimal growing conditions with appropriate light, temperature, and airflow to support its overall health and root recovery.
Regular Monitoring:Continuously monitor the orchid for any signs of recurring fungus on the roots. If new symptoms appear, take prompt action to address them.
By following these steps, you can effectively treat fungus on orchid roots, giving your orchid the best chance for recovery and future growth. Regular care and preventive measures are essential to maintaining healthy orchid roots.
How to Treat Black Rot on Orchids
Prompt identification:
Swiftly identify and confirm the presence of black rot on your orchid. For treatment to be successful, early detection is essential.
Isolation:
Immediately isolate the infected orchid to prevent the spread of black rot to other plants.
Pruning:
Use sterile pruning tools to carefully trim away all affected areas. Remove any blackened, mushy tissue, ensuring clean cuts to healthy tissue.
Antifungal Treatment:
Apply a suitable antifungal treatment designed for black rot. Copper-based fungicides or systemic fungicides can be effective. Follow the product instructions for application.
Dry Environment:
Provide a dry environment for the orchid. Black rot thrives in moisture, so reducing humidity and improving ventilation can inhibit its progression.
Adjust watering practices:
Ensure proper watering by allowing the orchid’s growing medium to dry out between waterings. Overwatering can contribute to the development of black rot.
Remove the infected medium.
If the black rot has affected the potting medium, carefully remove the orchid from its pot and replace the contaminated medium with fresh, sterile orchid mix.
Repotting:
Consider repotting the orchid if the roots are severely affected. Trim away rotted roots and repot the orchid in a clean container with fresh orchid mix.
Quarantine:
Keep the treated orchid in quarantine for a period to monitor its recovery and ensure that the black rot does not reoccur.
Environmental Management:Maintain optimal growing conditions, such as appropriate humidity levels and avoiding sudden temperature changes, to discourage the return of black rot.
Regular Monitoring:Continuously monitor the orchid for any signs of recurring black rot. Take prompt action if you observe new symptoms.
By diligently following these steps, you can effectively treat black rot on orchids, increasing the chances of the plant’s recovery. Regular monitoring and preventive measures are essential for maintaining a healthy orchid environment.
How to Treat Fungus on Orchid Roots
Remove the orchid from the pot.
Carefully take the orchid out of its pot, ensuring minimal damage to the roots.
Rinse Roots:
Gently rinse the orchid roots under lukewarm running water to remove debris and visible fungus. To clean the roots, use a gentle brush.
Trim Affected Roots:
Trim away any soft, discoloured, or mushy roots using sterile scissors or pruning shears. Make cuts until hard, healthy tissue is reached.
Antifungal Treatment:
Apply a suitable antifungal treatment directly to the affected roots. Consider using a fungicide formulated for orchids. Follow the product instructions carefully.
Repotting:
Repot the orchid in a fresh, sterile orchid mix. Ensure good drainage and avoid compacting the medium to promote airflow around the roots.
Adjust watering practices:
Review and adjust your watering routine to prevent overwatering. Allow the orchid’s growing medium to dry out between waterings to discourage fungal growth.
Humidity Control:
Maintain an environment with proper humidity levels. Good air circulation around the orchid can help prevent the recurrence of fungal issues.
Root stimulants:
Consider applying root stimulants or growth enhancers to encourage healthy root development. For optimal application, adhere to the product’s instructions.
Quarantine:
Keep the treated orchid in quarantine for a period to monitor its recovery and prevent the potential spread of the fungus to other plants.
Environmental Management:Ensure the orchid is kept in optimal growing conditions, including appropriate light, temperature, and airflow, to support overall health and root recovery.
Regular Monitoring:Continuously monitor the orchid for any signs of recurring fungus on the roots. If new symptoms appear, take prompt action to address them.
By following these steps, you can effectively treat fungus on orchid roots, giving your orchid the best chance for recovery and future growth. Consistent care and preventive measures are crucial to maintaining healthy orchid roots.
How to Prevent Mould and Fungus on Orchids
Optimal Watering Practices:
Water orchids in the morning to allow adequate time for the growing medium to dry before evening, reducing the risk of fungal growth.
Well-Draining Potting Medium:
Use a well-draining orchid potting mix to prevent water retention and create an environment less conducive to mould and fungus.
Adequate air circulation:
Ensure good air circulation around orchids by placing them in well-ventilated areas. Avoid crowding plants, allowing ample space between them.
Humidity Management:
Maintain moderate humidity levels, as excessive humidity can promote fungal growth. Use a humidity tray or employ a dehumidifier if needed.
Avoid overwatering.
Overwatering creates a favourable environment for mould and fungus. Water orchids only when the growing medium is slightly dry, and avoid waterlogging.
Proper Potting:
Pot orchids in containers with drainage holes to prevent water from accumulating at the bottom, reducing the risk of root rot and fungal issues.
Sanitise Tools and Containers:
Sterilise pruning tools and reuse containers before repotting to prevent the introduction of pathogens that can lead to mould and fungus.
Regular Inspections:
Conduct regular inspections of your orchids, including the leaves, pseudobulbs, and roots, to detect any signs of mould or fungus early on.
Use natural preventatives:
Apply natural antifungal substances like neem oil or diluted hydrogen peroxide as preventive measures. These can help suppress fungal growth.
Quarantine New Additions:Before adding additional orchids to your collection, quarantine them for a few weeks. This helps prevent the spread of potential infections.
Monitor environmental conditions:Be mindful of environmental conditions such as temperature and light, as these can impact the overall health of orchids and influence their susceptibility to mould and fungus.
Proper fertilisation:Avoid excessive fertilisation, as this can lead to salt buildup in the growing medium, creating conditions favourable for fungal growth.
By integrating these preventive measures into your orchid care routine, you can create an environment that minimises the risk of mould and fungus, ensuring the health and vitality of your orchid collection.
What Type of Potting Medium Should You Use for Your Orchids?
Selecting the right potting medium is crucial for orchid health. Here are a few popular and useful choices:
Orchid Bark Mix:Comprised of large chunks of bark, this mix provides excellent drainage and aeration. It mimics the natural epiphytic conditions that many orchids thrive in.
Sphagnum Moss:Sphagnum moss retains moisture well and is suitable for orchids that prefer consistently moist conditions. It is often used for epiphytic orchids.
Coconut Husk Chips (Coir):Coir is an eco-friendly alternative to traditional orchid bark. It retains moisture and provides good aeration, promoting healthy root growth.
Perlite or vermiculite:Adding perlite or vermiculite to the potting mix enhances aeration and drainage. These materials are often combined with other mediums to create a well-balanced mix.
Charcoal:Charcoal helps prevent soil compaction and absorbs impurities. It is often included in orchid mixes to improve the overall medium structure.
Cypress Mulch:Cypress mulch is another option for orchids that prefer moisture. It retains water well and decomposes slowly.
LECA (Lightweight Expanded Clay Aggregate):LECA is a lightweight, porous material that promotes good drainage and aeration. It’s suitable for various types of orchids.
Pine Bark Nuggets:Pine bark provides a well-draining medium for orchids. Choose medium- to large-sized bark pieces for optimal aeration.
Considerations:
Orchid Species: Different orchid species have varying preferences for moisture, aeration, and drainage. Tailor your choice to the specific needs of your orchids.
Container Size: Use a pot that allows for sufficient airflow around the roots and accommodates growth without excess moisture retention.
Repotting Frequency: Orchids typically benefit from repotting every 1-2 years. Choose a medium that maintains its structure and provides adequate nutrients over this period.
Watering Habits: Consider your watering habits and the moisture requirements of your orchids. Some mediums retain water longer, while others drain quickly.
Epiphytic vs. Terrestrial Orchids: Know whether your orchid is epiphytic (grows on other surfaces) or terrestrial (grows in soil). Choose a medium that suits its natural habitat.
Ultimately, the best potting medium depends on the specific needs of your orchids and your cultivation environment. Regularly monitor your orchids’ health to ensure they thrive in their chosen medium.
What Are the Best Potting Mediums to Buy?
Choosing a pre-made potting mix for orchids can save time and ensure a well-balanced growing medium. Here are some popular and effective orchid potting mixes available for purchase:
Orchid Bark Mix:Brands like Better-Gro and Sun Bulb offer orchid bark mixes with various-sized bark pieces, providing excellent aeration and drainage.
Sphagnum Moss Mix:Brands like Besgrow and Mosser Lee offer sphagnum moss mixes that retain moisture well. These are suitable for orchids that prefer consistently moist conditions.
Coconut Husk Chips (Coir):Brands such as Besgrow and Repotme offer coconut husk chip mixes. Coir offers excellent aeration and moisture retention.
LECA (Lightweight Expanded Clay Aggregate):Brands like Mother Earth and Hydroton offer LECA, a lightweight and porous material suitable for orchids. It provides excellent drainage.
Orchid Potting Mix with
Perlite/Vermiculite:Many commercial orchid mixes, such as those by Miracle-Gro or Espoma, include perlite or vermiculite to enhance aeration and drainage.
Orchid Bark with Charcoal Mix:Some mixes, like those from rePotme, combine orchid bark with charcoal for improved structure and absorption of impurities.
All-Purpose Orchid Mix:Brands like Schultz and Miracle-Gro offer all-purpose orchid mixes designed for a variety of orchid types.
Considerations:
Orchid Species: Choose a mix tailored to the specific needs of your orchid species.
Moisture Preferences: Consider the moisture requirements of your orchids and select a mix accordingly.
Container Size: Ensure the mix is suitable for the size of the orchid container and promotes good airflow around the roots.
Repotting Frequency: Check the recommended repotting frequency and nutrient content of the mix.
Brand Reputation: Consider reputable brands with positive reviews for quality and consistency.
Always follow the specific guidelines provided by the manufacturer for the selected potting mix. Regularly assess your orchids’ health to determine if adjustments to the growing medium are needed.
Why not just use regular potting soil?
Using regular potting soil for orchids is not recommended for several reasons:
Poor Aeration and Drainage:Orchids have unique root structures that are adapted for good aeration. Regular potting soil tends to compact, reducing airflow to the roots and leading to poor drainage.
This can result in root rot and other fungal issues.
Retains too much moisture.Orchids, especially epiphytic varieties, are accustomed to growing in environments with quick-drying conditions. Regular potting soil retains moisture for longer periods, increasing the risk of overwatering and creating an environment conducive to fungal growth.
Lack of Support:Orchid roots often need support without being buried in heavy soil. Regular potting soil can be too dense, making it difficult for delicate orchid roots to anchor and grow properly.
Alkaline pH Levels:Many orchid species prefer slightly acidic growing conditions. Regular potting soil may have a higher pH, which could lead to nutrient deficiencies and impact the overall health of the orchid.
Nutrient Imbalance:Orchids have specific nutrient requirements, and regular potting soil may not provide the necessary balance. Specialised orchid mixes are formulated to meet the nutritional needs of these plants.
Breakdown over time:Regular potting soil can break down and compact over time, losing its structure and negatively impacting root health. Orchids benefit from a more stable growing medium.
Incompatibility with Epiphytic
Orchids:Epiphytic orchids, which grow on other surfaces in nature, do not naturally thrive in regular potting soil. Providing a suitable growing medium that mimics their natural habitat is crucial for their well-being.
In summary, using regular potting soil is not conducive to the unique requirements of orchids. To ensure the health and vitality of your orchids, it’s best to opt for specialised orchid potting mixes that provide the necessary aeration, drainage, and support while meeting their specific nutritional needs.
Hi, I’m Steve, an orchid grower with 30+ years of hands-on experience caring for indoor and outdoor plants. I share practical, tested tips and beginner-friendly guides to help plant enthusiasts nurture healthy, thriving plants.