Black Spots on Phalaenopsis Leaves: 17 Best Prevention & Treatment Tips
Black spots on Phalaenopsis orchid leaves can be alarming because they often appear suddenly and may spread quickly if the underlying problem is not addressed. While some spots are caused by minor environmental stress, others can signal fungal diseases, bacterial infections, pest damage, or improper watering practices that threaten the long-term health of the plant. Understanding why these spots develop is the first step toward saving your orchid and preventing future outbreaks. By identifying the symptoms early and applying the right care techniques, you can stop the damage from spreading, encourage healthy new growth, and keep your Phalaenopsis thriving for years.
Table of Contents 👈 Tap Here
Black Spots on Phalaenopsis Leaves

1. Understand What Black Spots Are Telling You
Black spots are not a disease themselves but rather a symptom of an underlying problem affecting the orchid. The size, shape, color, and texture of the spots often provide valuable clues about the cause. Small dry spots may result from sunburn or minor physical damage, while soft, water-soaked lesions frequently indicate bacterial infections. Learning to read these warning signs allows growers to respond quickly and choose the most effective treatment before the condition becomes severe enough to threaten the entire plant.
2. Avoid Overwatering Your Phalaenopsis Orchid
One of the most frequent causes of black spots on orchid leaves is overwatering, as persistently moist roots foster the growth of bacteria and fungi. Excessive wetness can cause root rot, which frequently manifests as symptoms on the foliage, and damage the plant’s natural defenses. Make sure any extra water drains out of the container and water only when the growing medium starts to dry. A balanced watering schedule greatly lowers the chance of leaf spot issues and strengthens the general health of the plant.
3. Keep Water Away from the Leaves and Crown
Many orchid diseases begin when water remains trapped on leaves or inside the crown for extended periods. Moisture sitting on the foliage creates an ideal environment for harmful pathogens to multiply and spread. Watering early in the day gives the plant enough time to dry before evening temperatures drop. If water accidentally collects in the crown or between leaves, gently remove it with a paper towel to prevent rot and reduce the likelihood of black spot development.
4. Improve Air Circulation Around the Plant
Good airflow is one of the simplest yet most effective ways to prevent black spots on Phalaenopsis orchids. Stagnant air allows moisture to linger on leaves and creates favorable conditions for fungal spores and bacteria. Position orchids where fresh air can move freely around the plant without exposing them to harsh drafts. Proper ventilation helps leaves dry faster after watering, reduces disease pressure, and creates a healthier growing environment that supports vigorous growth and blooming.
5. Identify Fungal Leaf Spot Early
Fungal infections often begin as small dark specks that gradually enlarge and develop defined edges. If left untreated, these spots can merge into larger damaged areas and weaken the plant. Early detection is essential because fungal diseases are much easier to control during their initial stages. Removing affected tissue, improving growing conditions, and applying an appropriate fungicide when necessary can prevent the infection from spreading to healthy leaves and nearby orchids.
6. Treat Bacterial Infections Immediately
Bacterial leaf spot is usually more aggressive than fungal disease and often appears as soft, wet-looking black patches surrounded by yellow tissue. These infections can spread rapidly, especially in warm and humid conditions. Removing infected areas with sterilized tools and isolating the orchid from other plants can help limit the damage. Quick action is critical because untreated bacterial infections may destroy multiple leaves and significantly reduce the plant’s chances of recovery.
7. Protect Orchids from Crown Rot
Crown rot is one of the most dangerous conditions affecting Phalaenopsis orchids because it attacks the plant’s central growing point. Blackening tissue near the crown should never be ignored since severe infections can kill the orchid entirely. Prevention focuses on keeping water out of the crown and ensuring excellent airflow around the plant. Early intervention can sometimes stop the progression of the disease and allow the orchid to continue producing healthy growth.
8. Provide the Right Amount of Light
Although orchids need bright light to grow and flower, excessive direct sunlight can scorch leaves and create dark spots that resemble disease symptoms. Sunburn damage usually appears on areas directly exposed to intense light and often becomes permanent. Positioning the plant near a bright window with filtered sunlight helps maintain healthy foliage while reducing stress. Consistent lighting conditions also strengthen the orchid and improve its ability to resist infections.
9. Maintain Proper Humidity Levels
Phalaenopsis orchids appreciate moderate humidity, but excessively damp conditions can encourage the growth of fungi and bacteria responsible for black spots. The goal is to provide enough humidity for healthy growth while ensuring air circulation remains strong. Using humidity trays, grouping plants carefully, and monitoring indoor conditions can help maintain the ideal balance. Proper humidity management reduces stress on the plant and minimizes disease-related leaf problems.
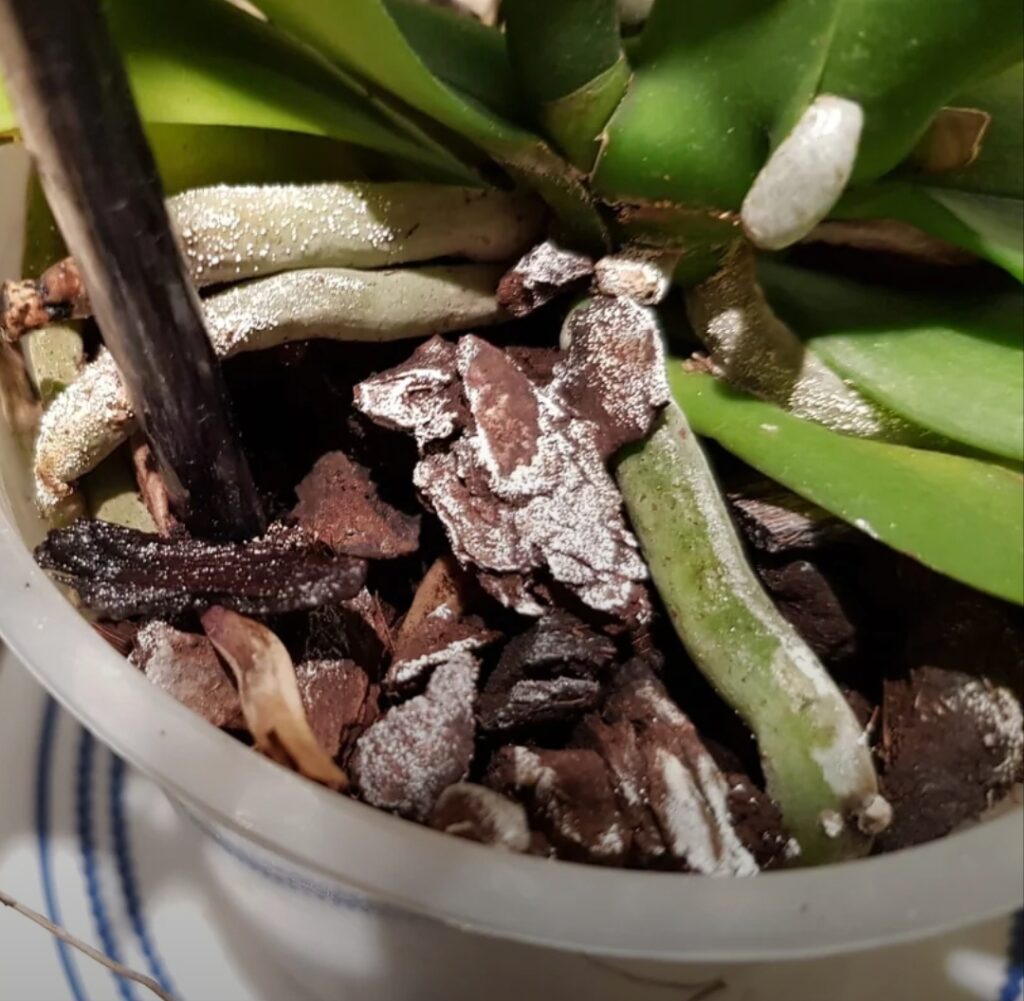
10. Repot When the Growing Medium Breaks Down
Old orchid bark and decomposed potting materials retain more water than fresh media, increasing the risk of root problems and leaf diseases. As the growing medium ages, airflow around the roots decreases and moisture remains trapped for longer periods. Repotting every few years into fresh orchid mix restores healthy drainage and encourages stronger root development. Healthy roots support healthier leaves, making the plant less vulnerable to black spot issues.
11. Check for Hidden Pest Damage
Certain pests, including spider mites, scale insects, and thrips, can damage leaf tissue and create wounds that become infected by pathogens. Regular inspection helps identify pest problems before they cause significant harm. Examine both sides of the leaves and look for signs such as discoloration, stippling, sticky residue, or unusual spotting. Prompt pest control not only protects the foliage but also prevents secondary infections that often lead to black spots.
12. Prevent Cold Damage to the Leaves
Exposure to cold temperatures can injure orchid tissue and create dark patches that resemble disease symptoms. Sudden temperature drops, cold drafts, or contact with chilly window glass may damage sensitive leaves. Keeping orchids within their preferred temperature range reduces stress and protects delicate foliage. Stable environmental conditions support healthy growth and lower the likelihood of developing blackened areas caused by temperature injury.
13. Avoid Excessive Heat Stress
In the same way that cold can harm orchids, too much heat can weaken plants and make them more vulnerable to illness. Poor airflow and high temperatures frequently hasten the growth of dangerous germs and cause spotting issues. Maintaining moderate indoor temperatures and shielding orchids from harsh afternoon sunlight are two ways to maintain leaf quality. An orchid under less stress is inherently better equipped to fend off diseases and bounce back from small wounds.
14. Quarantine New Orchids Before Mixing Them
Many diseases and pests enter a collection through newly purchased plants that appear healthy at first glance. Isolating new orchids for several weeks allows time to observe potential problems before they spread. During this period, monitor leaves closely for spots, discoloration, or unusual symptoms. Quarantine is a simple preventive measure that can save growers from widespread outbreaks and protect valuable orchids from unnecessary exposure.
15. Practice Excellent Orchid Hygiene
Good sanitation plays a major role in preventing black spots and other orchid diseases. Dead leaves, old flowers, and plant debris can harbor pathogens that later infect healthy tissue. Sterilizing cutting tools before and after use further reduces the risk of spreading disease between plants. Consistent cleanliness throughout the growing area creates a healthier environment and significantly lowers the chances of recurring leaf spot problems. _
16. Monitor Leaf Spots for Changes
Not every black spot requires aggressive treatment, but every spot deserves careful observation. Tracking whether spots remain stable, enlarge, soften, or develop yellow halos provides important clues about the seriousness of the problem. Regular monitoring helps determine whether existing care measures are working or if additional intervention is needed. Early recognition of worsening symptoms greatly improves the chances of successful treatment and recovery.
17. Know When Severe Damage Requires Action
In rare cases, black spot infections become so extensive that saving affected leaves is no longer practical. Severely damaged tissue can act as a source of infection for the rest of the plant and nearby orchids. Removing badly infected leaves or, in extreme situations, discarding a heavily diseased plant may be necessary to protect the collection. Making timely decisions prevents larger problems and improves the health of surrounding orchids.
Conclusion
Most black spots on Phalaenopsis leaves can be prevented or controlled when the underlying cause is identified early and addressed correctly. Proper watering, strong air circulation, balanced humidity, good sanitation, and routine plant inspections remain the most effective long-term defenses against disease. By combining prevention with prompt treatment, orchid growers can protect their plants from serious damage, encourage healthy foliage, and enjoy beautiful blooms throughout the year.
FAQS
1. What causes Black Spots on Phalaenopsis Leaves?
Black Spots on Phalaenopsis Leaves can develop due to fungal infections, bacterial diseases, excessive moisture, poor air circulation, sunburn, or physical damage. When water remains on leaves for long periods, pathogens can spread quickly. Identifying the exact cause is important because treatment methods differ depending on whether the problem is environmental, fungal, or bacterial.
2. Are Black Spots on Phalaenopsis Leaves a sign of disease?
Yes, Black Spots on Phalaenopsis Leaves may indicate a fungal or bacterial infection, especially if the spots continue to expand or become soft and watery. However, not every spot is disease-related. Sunburn, cold damage, and aging foliage can also create dark marks that resemble disease symptoms, making proper diagnosis essential.
3. How can I prevent Black Spots on Phalaenopsis Leaves?
The best way to prevent Black Spots on Phalaenopsis Leaves is to provide good airflow, avoid overhead watering, and keep leaves dry whenever possible. Water early in the day so moisture evaporates quickly. Regular inspection of your orchid helps catch problems before they become severe and affect the entire plant.
4. Can overwatering cause Black Spots on Phalaenopsis Leaves?
Overwatering is a common contributor to Black Spots on Phalaenopsis Leaves because constantly wet conditions encourage fungal and bacterial growth. Excess moisture also weakens roots, making the orchid more vulnerable to disease. Allow the potting medium to dry slightly between waterings and ensure proper drainage to reduce risks.
5. Should I remove leaves with Black Spots on Phalaenopsis Leaves?
If Black Spots on Phalaenopsis Leaves are spreading rapidly or showing signs of infection, removing severely affected leaves may help prevent the problem from spreading further. Always sterilize cutting tools before and after use. Minor spots that remain stable often do not require removal and can simply be monitored.
6. Can sunlight cause Black Spots on Phalaenopsis Leaves?
Direct sunlight can lead to Black Spots on Phalaenopsis Leaves when the tissue becomes scorched by intense heat. Sunburned areas often appear dark, dry, and irregularly shaped. Phalaenopsis orchids prefer bright indirect light, so placing them away from harsh afternoon sun helps protect their sensitive foliage.
7. Are Black Spots on Phalaenopsis Leaves contagious?
Black Spots on Phalaenopsis Leaves can be contagious if caused by fungal or bacterial pathogens. These organisms may spread through water splashes, contaminated tools, or close contact with infected plants. Isolating affected orchids and maintaining good hygiene practices can significantly reduce the chance of disease transmission.
8. Can cold temperatures cause Black Spots on Phalaenopsis Leaves?
Exposure to cold drafts or low temperatures may result in Black Spots on Phalaenopsis Leaves because orchid tissue is sensitive to chilling injury. Damaged cells often turn dark after exposure to cold conditions. Keeping temperatures stable and protecting plants from sudden temperature drops can prevent this problem.
9. What fungicide works for Black Spots on Phalaenopsis Leaves?
A suitable fungicide may help treat Black Spots on Phalaenopsis Leaves when fungal pathogens are responsible for the damage. Copper-based fungicides and orchid-safe treatments are commonly used. Before applying any product, confirm that the issue is fungal rather than bacterial, since different pathogens require different management approaches.
10. Do Black Spots on Phalaenopsis Leaves mean my orchid is dying?
Not necessarily. Black Spots on Phalaenopsis Leaves can often be treated successfully when detected early. Many orchids recover fully once the underlying issue is corrected. Monitoring plant health, improving growing conditions, and taking prompt action against disease can help preserve both the foliage and overall vitality.
11. Can poor air circulation cause Black Spots on Phalaenopsis Leaves?
Poor airflow is a major factor behind Black Spots on Phalaenopsis Leaves because stagnant air allows moisture to remain on foliage for extended periods. Damp conditions create an ideal environment for fungal and bacterial growth. Increasing ventilation around orchids can greatly reduce the likelihood of developing leaf spot issues.
12. Are Black Spots on Phalaenopsis Leaves harmful to blooms?
Black Spots on Phalaenopsis Leaves primarily affect foliage, but severe infections can weaken the plant and reduce flowering performance. When the orchid spends energy fighting disease, bloom production may decline. Addressing the problem early helps maintain healthy leaves that support future flower spikes and long-lasting blooms.
13. Can tap water contribute to Black Spots on Phalaenopsis Leaves?
In some situations, mineral deposits or water left sitting on foliage may contribute to Black Spots on Phalaenopsis Leaves. While tap water itself is not always the cause, wet leaves combined with poor airflow can encourage disease development. Using clean water and avoiding leaf wetness are beneficial practices.
14. How fast do Black Spots on Phalaenopsis Leaves spread?
The speed at which Black Spots on Phalaenopsis Leaves spread depends on the underlying cause. Fungal and bacterial infections may expand quickly in warm, humid environments, while sunburn or physical damage usually remains localized. Frequent monitoring allows growers to detect changes and respond before significant damage occurs.
15. Can I save an orchid with Black Spots on Phalaenopsis Leaves?
Most orchids can recover from Black Spots on Phalaenopsis Leaves when the cause is identified and treated promptly. Improving environmental conditions, removing severely damaged tissue, and applying appropriate treatments often lead to successful recovery. Healthy roots and strong overall plant condition greatly improve the chances of restoration.
16. Do Black Spots on Phalaenopsis Leaves affect root health?
Black Spots on Phalaenopsis Leaves do not always affect roots directly, but diseases that attack leaves can sometimes spread throughout the plant. Additionally, root problems caused by excess moisture may indirectly contribute to leaf spotting. Examining both roots and foliage provides a more complete understanding of orchid health.
17. Can humidity lead to Black Spots on Phalaenopsis Leaves?
High humidity alone does not usually cause Black Spots on Phalaenopsis Leaves, but excessive humidity combined with poor ventilation creates favorable conditions for pathogens. Maintaining balanced humidity levels and ensuring adequate airflow helps orchids stay healthy while reducing opportunities for fungal and bacterial growth.
18. Are Black Spots on Phalaenopsis Leaves common in indoor orchids?
Yes, Black Spots on Phalaenopsis Leaves are relatively common among indoor orchids because household conditions sometimes include limited airflow and inconsistent watering practices. Indoor growers can reduce risks by monitoring moisture levels, maintaining cleanliness, and providing appropriate light, temperature, and humidity for orchid growth.
19. When should I worry about Black Spots on Phalaenopsis Leaves?
You should be concerned about Black Spots on Phalaenopsis Leaves if the spots enlarge rapidly, become soft or water-soaked, produce unpleasant odors, or appear on multiple leaves. These symptoms may indicate an active infection that requires immediate attention to prevent further spread and plant decline.
20. Can healthy orchids develop Black Spots on Phalaenopsis Leaves?
Even healthy orchids can occasionally develop Black Spots on Phalaenopsis Leaves due to accidental injury, environmental stress, or temporary cultural issues. A few isolated spots are not always serious. Regular observation and proper care help ensure that minor problems do not develop into significant health concerns.
Hi, I’m Steve, an orchid grower with 30+ years of hands-on experience caring for indoor and outdoor plants. I share practical, tested tips and beginner-friendly guides to help plant enthusiasts nurture healthy, thriving plants.