Thai Orchid Care: 10 Best Expert Tips for an Evergreen Guide
Table of Contents 👈 Tap Here
Thai orchids are among the world’s most unusual and exquisite flowers. With over 1,000 species found in Thailand, these orchids thrive in the country’s warm, humid climate, making them a staple in gardens, homes, and floral decorations. Whether you’re a beginner or an experienced gardener, understanding the proper care techniques for Thai orchids can help you grow these stunning plants successfully.
Orchids are more than just decorative plants; they are deeply embedded in Thai culture, often used in religious ceremonies, spa treatments, and even traditional medicine. While they naturally grow in forests, many people cultivate them at home, either in pots, hanging baskets, or attached to trees. Learning how to care for Thai orchids ensures that you can enjoy their breathtaking blooms year-round, bringing a touch of tropical beauty to your living space.

Choosing the Right Thai Orchid
Before diving into care tips, it’s essential to choose the right type of Thai orchid for your environment. Different orchids have varying care needs, and selecting the right one can make your orchid-growing journey much smoother. Among the most well-liked types are:
Dendrobium Orchids
Dendrobiums are among the easiest to grow and bloom profusely, making them ideal for beginners. These orchids require moderate care and adapt well to different environments. Their vibrant flowers can last for weeks, and they thrive in both indoor and outdoor settings, as long as they receive sufficient light and humidity.
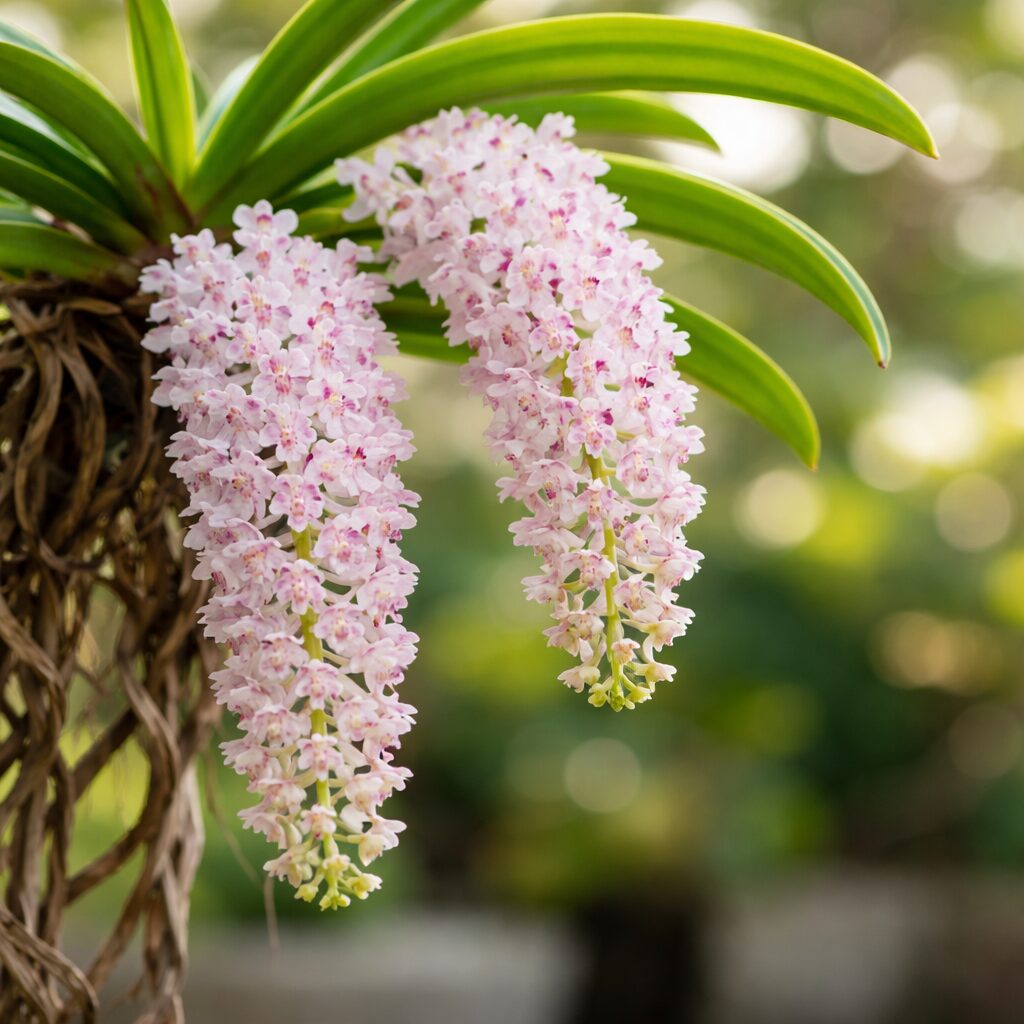
Vanda Orchids
Known for their striking colours and aerial roots, Vandas require high humidity and bright light to flourish. These orchids are best grown in hanging baskets, allowing their roots to breathe freely. Their large, long-lasting flowers make them a favourite among orchid enthusiasts, though they do require more attention than some other varieties.
Cattleya Orchids
Cattleyas are famous for their fragrant and showy flowers. These orchids need proper air circulation and bright, indirect light to grow well. Often used in floral arrangements, their bold blooms make a stunning statement in any collection. Regular watering and occasional misting help maintain their health and encourage blooming.
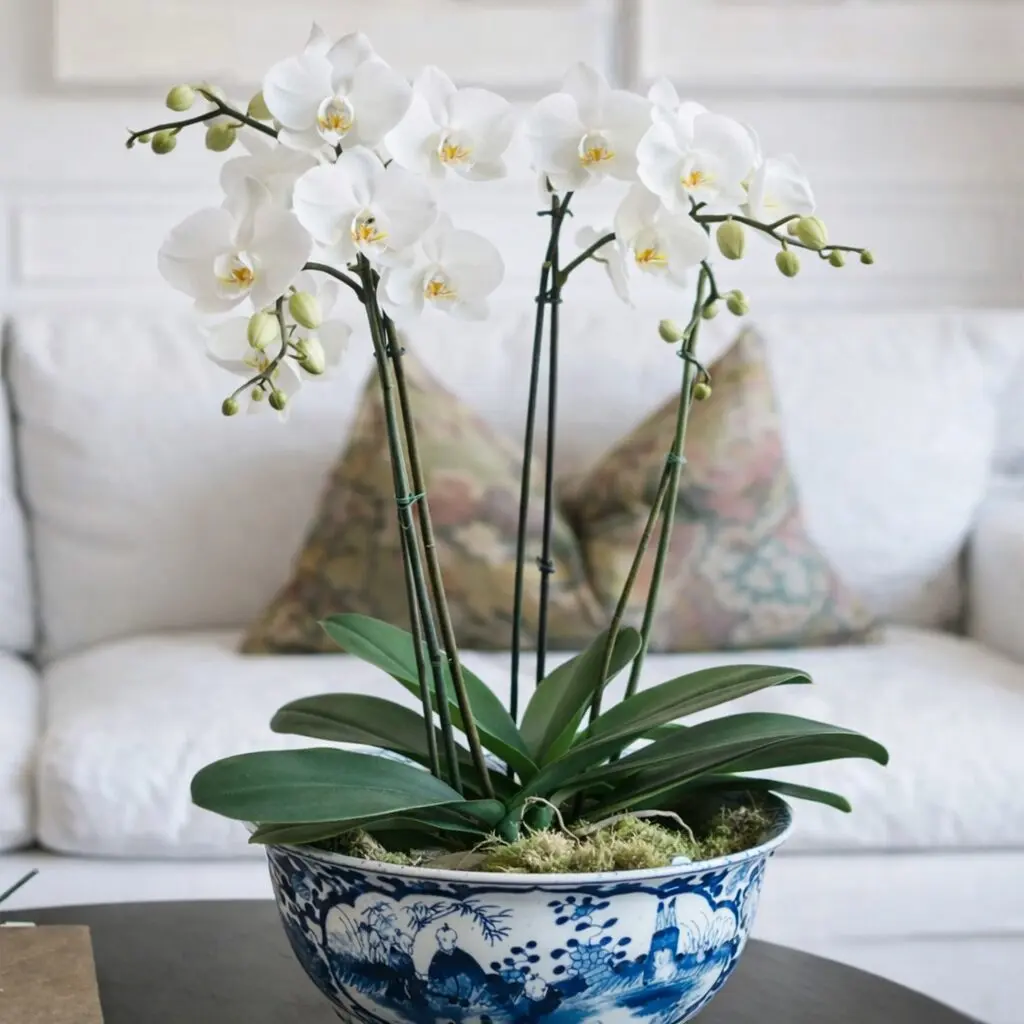
Phalaenopsis (Moth Orchid)
One of the most common orchids, Phalaenopsis is well-suited for indoor growth and requires minimal maintenance. Their long-lasting flowers and ability to adapt to household conditions make them a favourite among home gardeners. With proper care, these orchids can bloom multiple times per year, providing beauty for months at a time.
Optimal Growing Conditions for Thai Orchids
Light Requirements
Thai orchids typically require bright, indirect light. Their leaves may be burnt by direct sunshine, and they may not blossom if there is insufficient light.
– Dendrobiums and Vandas – Prefer bright, filtered sunlight. Place them near a sunny window or under artificial grow lights if growing indoors.
– Phalaenopsis and Cattleyas—Thrive in medium light conditions, making them suitable for indoor settings where natural light is available but not too intense.
If your orchid’s leaves turn dark green, it may not be getting enough light. On the other hand, yellowing leaves may be a sign of excessive direct sunshine. Adjusting the placement of your orchid can make a significant difference in its health and blooming cycle.
Temperature and Humidity
Since Thai orchids are tropical plants, they thrive in warm temperatures between 65°F and 85°F (18°C and 29°C). They do not tolerate sudden temperature drops well, so keeping them in a stable environment is essential.
Humidity is another crucial factor. Most Thai orchids require humidity levels between 50% and 80% to grow well. If you live in a dry climate, consider using a humidity tray filled with pebbles and water, misting the orchids daily, or placing them in a bathroom where natural humidity is higher. Proper humidity levels will ensure your orchid remains hydrated and healthy.
Watering and Fertilisation
Watering is essential, but overwatering can lead to root rot, one of the most common mistakes orchid growers make.
– Water 2–3 times per week in hot seasons and once per week in cooler months. Orchids prefer a wet-dry cycle rather than constantly moist conditions.
– Use room-temperature water and avoid letting the roots sit in standing water, as this can cause fungal infections.
– Ensure your orchid’s potting medium (bark, moss, or coconut husk) dries slightly between waterings to prevent root rot.
For fertilisation:
– Use a balanced orchid fertiliser (**20-20-20**) every two weeks during the growing season to promote healthy growth and blooming.
– Reduce feeding to once a month in colder months when growth slows down. Over-fertilising can cause salt buildup, which can harm the roots.
Potting and Repotting
Thai orchids grow best in well-draining containers with a suitable potting medium like bark, charcoal, or moss. Repotting is necessary when:
– The potting medium breaks down and retains too much moisture, leading to potential root rot.
– The orchid outgrows its current pot and needs more space to continue thriving.
Repotting every 1–2 years helps maintain healthy roots and prevents fungal infections. When repotting, always use fresh potting mix and remove any dead or decaying roots to keep your plant in optimal condition.
Pest and Disease Control
Like any plant, Thai orchids can be affected by pests and diseases. Common issues include:
– Aphids and Spider Mites—These tiny pests feed on leaves, causing damage. Use neem oil or insecticidal soap to eliminate them before they spread.
– Root Rot—Caused by overwatering. Ensure proper drainage and let the roots dry between watering to prevent this common issue.
– Fungal Infections—Yellow spots or black patches on leaves indicate fungal diseases. Treat with a fungicide and improve air circulation around the plant to prevent further spread.
You can prevent major damage and guarantee ongoing, healthy growth by routinely checking your orchids and taking care of issues early.
Encouraging Your Orchid to Bloom
If your Thai orchid is not blooming, consider these tips:
– Increase Light Exposure—A lack of sufficient light is one of the main reasons orchids fail to flower. Move your orchid to a brighter spot if necessary.
– Adjust Temperature Fluctuations—Some orchids, like Phalaenopsis, require a slight drop in nighttime temperatures to initiate blooming.
– Use a Bloom Booster Fertiliser—Fertilisers with a higher phosphorus content (such as 10-30-10) can stimulate flower production and encourage vibrant blooms.
Orchids bloom at different times of the year, but with the right care, they can reward you with stunning flowers multiple times annually, adding natural beauty to your home or garden.
Thai orchids are a beautiful and rewarding addition to any home or garden. With proper care—ensuring optimal light, humidity, watering, and pest control—you can cultivate these exotic plants successfully. Whether you are a beginner or an expert, following these guidelines will help your orchids flourish and bloom year after year.
FAQs on Thai Orchid Care
1. What is the best way to start Thai Orchid Care at home?
Thai Orchid Care begins with providing the right environment similar to tropical conditions where these orchids naturally grow. Keep the plant in bright indirect sunlight, maintain good airflow, and water only when the potting medium becomes slightly dry. Using bark-based orchid mix helps prevent root rot. Consistent temperature and humidity are also very important for successful Thai orchid care.
2. How often should I water plants for proper Thai orchid care?
For proper Thai orchid care, watering usually depends on climate, potting mix, and pot size. In warm conditions, Thai orchids may need watering two to three times per week, while cooler conditions require less frequent watering. Always check the roots and growing medium before watering. Proper drainage and avoiding standing water are essential practices in Thai Orchid Care.
3. What type of sunlight is ideal for Thai Orchid Care?
For healthy Thai orchid care, orchids should receive bright but indirect sunlight. Direct harsh sun can burn the leaves, while too little light can stop blooming. Placing the plant near an east-facing window or under filtered sunlight works well. Proper lighting helps maintain strong growth and encourages beautiful flowers, which is an important part of successful Thai orchid care.
4. What temperature is best for proper Thai orchid care?
Thai Orchid Care requires warm temperatures similar to tropical climates. Most Thai orchids grow well in temperatures between 18°C and 30°C. Sudden temperature drops or cold drafts can stress the plant and affect flowering. Maintaining stable warmth during the day and slightly cooler nights helps support healthy growth and is an essential part of good Thai orchid care.
5. Why is humidity important in Thai orchid care?
Humidity plays a major role in Thai orchid care because these orchids naturally grow in humid environments. Ideally, humidity should stay between 50% and 70%. If the air is too dry, leaves may wrinkle and roots may stop growing. Using a humidity tray, misting lightly, or placing plants near other plants can help maintain the moisture levels needed for proper Thai orchid care.
6. What potting mix works best for Thai Orchid Care?
A well-draining potting mix is essential for Thai orchid care. Most growers use orchid bark, coconut husk chips, or charcoal-based mixes that allow air to reach the roots. Regular garden soil should never be used because it holds too much water. A loose and airy medium keeps the roots healthy and is one of the most important foundations of proper Thai orchid care.
7. How often should fertiliser be used in Thai orchid care?
Fertilising regularly helps support growth and blooming in Thai orchid care. A balanced orchid fertiliser can be applied every two weeks during the growing season. It is important to dilute the fertiliser to avoid burning the roots. Flushing the pot with plain water occasionally helps remove salt buildup, which keeps Thai Orchid Care safe and effective.
8. When should you repot plants during Thai orchid care?
Repotting is an important part of Thai Orchid Care and is usually needed every one to two years. Orchids should be repotted when the potting mix breaks down or when roots grow out of the container. The best time to repot is after the flowering period when new roots begin to grow. Fresh potting media support healthy root development in Thai orchid care.
9. How do you encourage blooming in Thai orchid care?
In Thai orchid care, orchids need stable temperatures, adequate light, and good nutrition to produce blossoms. Sometimes blooming is triggered by a little dip in the temperature at night. Producing flowers also requires healthy roots and leaves. In Thai orchid care, patience and consistent attention are essential for producing stunning flowers.
10. What are common watering mistakes in Thai Orchid Care?
One of the biggest mistakes in Thai Orchid Care is overwatering. Orchids prefer slightly dry conditions between watering sessions. When the potting mix stays constantly wet, roots may rot, and the plant becomes weak. Always ensure good drainage and check the moisture level before watering. Balanced watering is a crucial skill in successful Thai orchid care.
11. Can beginners succeed with Thai Orchid Care?
Yes, beginners can successfully practise Thai orchid care with a few basic guidelines. Start with a healthy plant, provide indirect sunlight, maintain proper watering, and use the correct potting mix. Observing the plant regularly helps identify problems early. With patience and consistency, even beginners can grow beautiful orchids through proper Thai orchid care.
12. How do you prevent root rot in Thai orchid care?
In Thai orchid care, root rot prevention is crucial. Always use pots with good drainage holes and an orchid mix that drains properly. Keep the water from building up at the bottom of the pot. In between waterings, let the potting media dry a little. Since robust plants are built on healthy roots, root care is a crucial component of Thai orchid maintenance.
13. What pests should you watch for in Thai Orchid Care?
Mealybugs, spider mites, and aphids are frequent pests during Thai orchid care. By consuming the leaves and stems of the plant, these insects might weaken it. Early pest detection is aided by routine leaf and root inspection. Healthy Thai orchid care practices can be maintained by cleaning the leaves and, if needed, applying a moderate insecticidal soap.
14. Why are the leaves turning yellow in Thai orchid care?
Yellow leaves during Thai orchid care can happen for several reasons, such as overwatering, poor lighting, or natural ageing. If many leaves turn yellow at once, it may indicate stress or root problems. Checking the roots, adjusting watering, and improving light conditions usually helps restore plant health and keeps Thai Orchid Care on the right track.
15. How important is airflow in Thai Orchid Care?
Air circulation is an important part of Thai orchid care because orchids naturally grow in open environments with constant airflow. Good ventilation helps prevent fungal diseases and keeps the roots healthy. Placing orchids in a well-ventilated space or near a window improves plant health and supports successful Thai orchid care over the long term.
16. Can Thai orchids grow outdoors with proper Thai orchid care?
Yes, in warm climates Thai orchids can grow outdoors with proper Thai orchid care. They should be placed in shaded areas where they receive filtered sunlight and protection from strong winds or heavy rain. Outdoor conditions often provide natural humidity and airflow, which can greatly benefit orchids when managed carefully in Thai orchid care.
17. What type of pots are best for Thai Orchid Care?
Choosing the right container is important in Thai Orchid Care. Orchid pots with multiple drainage holes or slotted sides are ideal because they allow airflow around the roots. Clay or plastic pots both work well as long as drainage is excellent. Proper containers help prevent water buildup and support healthy root development in Thai Orchid Care.
18. How do you propagate plants in Thai orchid care?
Propagation in Thai orchid care can be done by dividing mature plants when repotting. Each division should have healthy roots and at least a few growths to ensure survival. Carefully separating the plant and replanting it in fresh orchid mix encourages new growth. This method allows gardeners to expand their orchid collection through proper Thai orchid care.
19. Why are flowers dropping early in Thai orchid care?
Flower drop during Thai orchid care may happen due to sudden temperature changes, low humidity, or watering stress. Orchids are sensitive plants that react quickly to environmental shifts. Maintaining stable conditions and avoiding drastic changes in location helps prevent bud drop and keeps flowers lasting longer during Thai orchid care.
20. What is the most important rule in Thai orchid care?
Balance is the most crucial guideline in Thai orchid care. The proper balance of light, water, humidity, and airflow is essential for orchids. Plant health can be impacted by an excess or deficiency of any component. Long-term success and gorgeous blooms in Thai orchid care are ensured by routinely monitoring the plant and modifying care as necessary.
What are the best Thai orchids for beginners?
Some of the easiest Thai orchids to grow include Dendrobium, Vanda, and Phalaenopsis. These varieties are more forgiving and adapt well to indoor conditions.
How much sunlight do Thai orchids need?
Thai orchids thrive in bright, indirect sunlight. Vanda orchids require full sun for a few hours, while Dendrobiums and Phalaenopsis prefer filtered light or morning sun.
What is the ideal temperature for Thai orchids?
Most Thai orchids prefer warm temperatures between 65°F to 85°F (18°C to 29°C). They need a slight drop in temperature at night to encourage blooming.
How often should I water my Thai orchids?
Watering depends on the type of orchid:
Vandas: Daily watering in hot climates; every 2-3 days in cooler areas.
Dendrobiums & Phalaenopsis: Once or twice a week, allowing the roots to dry between waterings.
What type of potting mix should I use?
Thai orchids typically grow best in bark, coconut husk, sphagnum moss, or charcoal. Vandas are often grown bare-root in hanging baskets
How do I fertilize Thai orchids?
Feed your orchids weekly with a balanced orchid fertilizer (20-20-20). Reduce feeding during dormancy and increase when new growth appears
Why are my Thai orchid’s leaves turning yellow?
Yellowing leaves can result from:
Overwatering or underwatering
Too much direct sunlight
Nutrient deficiency or old age of the leaf
How do I get my Thai orchid to bloom?
To encourage blooming:
Provide bright light
Maintain a temperature drop at night
Use a high-phosphorus fertilizer (e.g., 10-30-20) before blooming season
How do I prevent pests and diseases in Thai orchids?
Keep your orchid healthy by:
Checking for spider mites, scale, or aphids
Using neem oil or insecticidal soap for infestations
Ensuring good air circulation to prevent fungal infections
Hi, I’m Steve, an orchid grower with 30+ years of hands-on experience caring for indoor and outdoor plants. I share practical, tested tips and beginner-friendly guides to help plant enthusiasts nurture healthy, thriving plants.