Imagine receiving a beautiful orchid as a gift from your girlfriend, a relative, or even a thoughtful neighbor on your birthday. You’ve cherished it, but suddenly, you notice long roots growing out of the pot. You’re worried—did you do something wrong? You’ve searched everywhere for answers but found nothing helpful. But worry not, because in this blog post, you’ll finally discover the answers you’ve been looking for.
Orchids are a captivating addition to any plant collection, known for their stunning blooms and unique growth patterns. However, one common issue that many orchid enthusiasts encounter is unruly roots. If your orchid’s roots seem to be growing out of control, there’s no need to panic. With the right approach and a bit of care, you can manage and fix this issue effectively. Here are ten essential tips to help you bring those wayward roots back in line and ensure your orchid remains healthy and vibrant.”
- 1 1. Understand Orchid Root Growth
- 2 2. Use the Right Potting Medium
- 3 Why I see more aerial roots what is the reason ?
- 4 3. Repot When Necessary
- 5 4. Trim overgrown roots
- 6 5. Provide Proper Watering
- 7 6. Improve Air Circulation
- 8 7. Check for root rot
- 9 8. Adjust light conditions
- 10 9. Monitor humidity levels
- 11 10. Regular Maintenance
- 12 Prepare Your Materials
- 13 Take the Orchid Out of Its Present Pot
- 14 Inspect and clean the roots.
- 15 Post-Repotting Care
- 16 What to Do with Orchid Air Roots
- 17 Repotting a orchid water
- 18 Repotting an Orchid with a Large Number of Air Roots
- 19 Repotting an Orchid Without Roots
- 20 FAQs
1. Understand Orchid Root Growth
Orchids possess a distinctive root system designed for both air circulation and moisture absorption. Unlike many plants, orchid roots are adapted to grow above the potting medium to access additional oxygen and moisture from the air. This growth pattern can sometimes result in what appears to be uncontrolled root development. Understanding this natural behaviour is crucial, as it helps you manage the roots effectively and appreciate the plant’s unique adaptations.

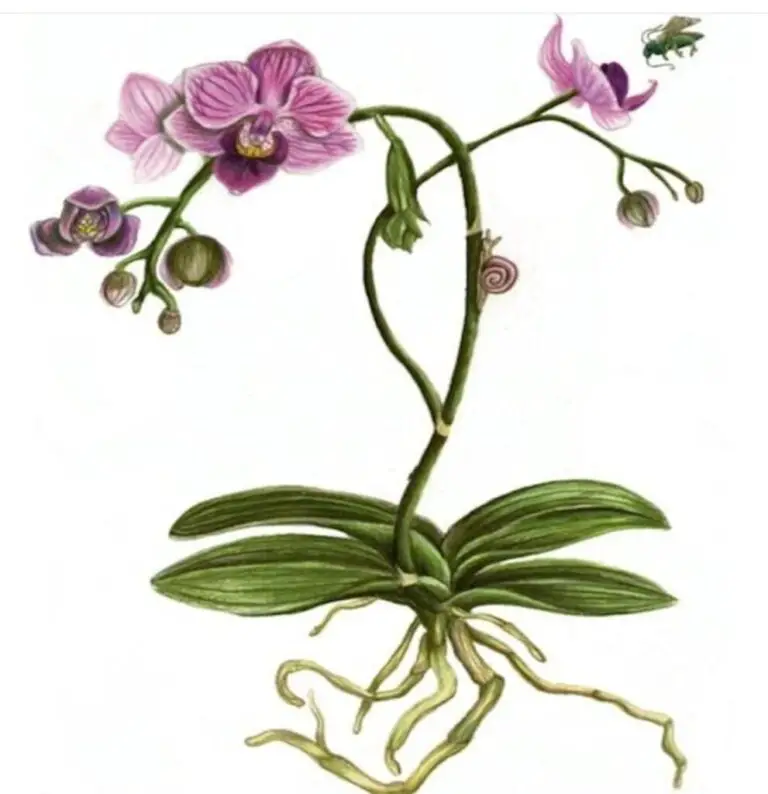
Orchids have two main types of roots:
Aerial Roots: These roots grow above the ground or out of the potting medium. They are often thick and covered in a spongy tissue called velamen, which helps absorb moisture and nutrients from the air. Aerial roots are common in epiphytic orchids, which grow on trees in their natural habitat.
Terrestrial Roots: These roots grow underground or within a potting medium like soil or bark. They are typically thinner and less covered in velamen compared to aerial roots. Terrestrial orchids, which grow in the ground, have this type of root.
2. Use the Right Potting Medium
Selecting the appropriate potting medium is essential for controlling orchid root growth.
A well-draining potting mix that supplies both moisture and air is ideal for orchid growth.
Common choices include bark, sphagnum moss, or a specialised orchid mix designed to prevent waterlogging. Using the right medium not only supports healthy root development but also reduces the likelihood of roots growing excessively outside the pot.
Why I see more aerial roots what is the reason ?
Seeing more aerial roots on your orchid usually means the plant is trying to adapt to its environment. Common reasons include:
Searching for Moisture: Aerial roots absorb moisture from the air, so if the air is dry, the orchid may grow more roots to increase its water intake.
Needing Better Drainage: If the potting medium is too compact or retains too much water, the orchid might develop aerial roots to avoid waterlogged conditions.
Healthy Growth: More aerial roots can simply be a sign of a healthy, growing orchid that’s thriving and looking for additional nutrients.
Light Levels: Orchids may produce more aerial roots in response to receiving adequate or increased light, as this encourages overall growth.
3. Repot When Necessary
Repotting your orchid is a vital step in managing root growth. Over time, orchid roots can outgrow their pot or become tangled, necessitating repotting. When repotting, choose a pot that is slightly larger than the current one to accommodate growing roots. Refreshing the potting medium during this process ensures that the roots have ample space and a healthy environment to thrive.
4. Trim overgrown roots
To address excessively long or unhealthy roots, trimming is often necessary. Use sterilised scissors to carefully cut away dead or damaged roots. This practice helps to encourage the growth of new, healthy roots and prevents the plant from becoming root-bound, which can lead to other growth issues.
5. Provide Proper Watering
Watering is a crucial aspect of orchid care and can significantly impact root health.
While underwatering might stress the plant, overwatering can cause root rot. Wait to water your orchid until the potting medium is completely dry. In order to avoid water buildup at the pot’s bottom, which can exacerbate root issues, proper drainage is crucial.
6. Improve Air Circulation
Good air circulation around the roots is important to prevent mould and rot. Orchids benefit from being in well-ventilated areas where air can move freely around them. Consider placing a small fan nearby to ensure continuous air movement, which helps maintain a healthy root environment and reduces the risk of fungal issues.
7. Check for root rot
Root rot is a serious issue that can cause roots to become mushy and discolored. If you notice signs of rot, such as a foul smell or discoloured roots, take immediate action. Remove the affected roots with sterilised scissors and treat the plant with an appropriate fungicide. Ensuring that your potting medium and pot have adequate drainage will help prevent root rot from recurring.
8. Adjust light conditions
Proper light is essential for orchid health and balanced root growth. Orchids require bright, indirect light to thrive. Inadequate light can lead to weak, sprawling roots as the plant struggles to reach for more light. Ensure that your orchid is positioned in a location that provides the right amount of light for its specific type to promote healthy root development.also read orchid roots health
9. Monitor humidity levels
Orchids thrive in environments with moderate to high humidity levels. However, excessive humidity can lead to problems such as mould or rot. Aim to maintain humidity levels between 40 and 60% and use a humidity tray or a humidifier if needed. Be cautious about placing your orchid in overly humid conditions that could exacerbate root issues.
10. Regular Maintenance
The secret to stopping the escalation of underlying issues is routine maintenance. Examine your orchid frequently for indications of illness, rot, or excessive root growth. Your plant’s general health and the avoidance of future root problems can be achieved by maintaining an environment that is stable and appropriate for its needs. To keep an orchid healthy and attractive, regular care and prompt action are necessary.
How to Use Air Roots to Repot an Orchid
Assess the Need for Repotting
Signs to Look For: roots growing out of the pot, deteriorated potting medium, or tangled/unhealthy roots.
Prepare Your Materials
Supplies Needed: New pot with drainage holes (slightly larger than the current pot), fresh orchid potting mix (bark, sphagnum moss, or specialised mix), sterilised scissors or pruning shears.
Take the Orchid Out of Its Present Pot
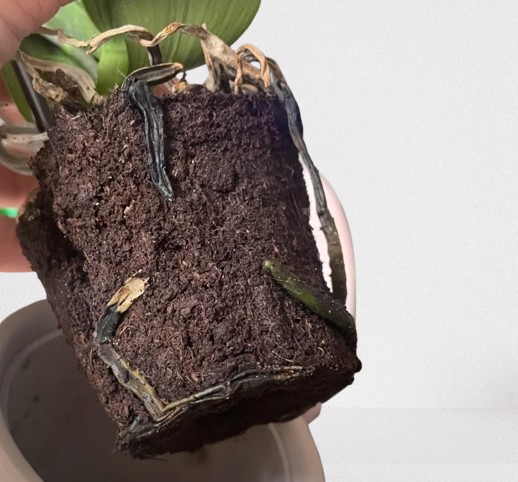
Steps: Gently remove the orchid from its pot. If stuck, tap the sides or use a blunt tool to loosen it, avoiding damage to the roots.
Inspect and clean the roots.
Examine: Remove dead, mushy, or rotting roots with sterilised scissors.
White or green, solid roots are indicative of good health.
Address Air Roots
Handling: Do not bury air roots in the potting medium. Position them around the sides of the new pot, draping them gently over the mix but not forcing them into the soil.
Repot the Orchid
Steps: Add a layer of fresh potting mix to the bottom of the new pot. Place the orchid in the centre, keeping the base level with the pot’s top. Add potting mix around the roots without packing it too tightly.
Water and settle the orchid.
Post-Repotting: Lightly water the orchid to help settle the potting mix. Ensure excess water drains completely to avoid rot.
Post-Repotting Care
Placement: Position the orchid in bright, indirect light and avoid direct sunlight. Monitor humidity and air circulation to support root health.
What to Do with Orchid Air Roots
Leave Them Exposed: Air roots should remain exposed to air as they absorb moisture and oxygen.
Arrange Neatly: During repotting, position air roots around the pot’s sides to keep them functional.
Trim if necessary: Trim excessively long or damaged air roots with sterilised scissors, ensuring that healthy roots are firm and green or white.
Repotting a orchid water
Setup: Use a suitable container and hydroponic growing medium.
Clean the Roots: Rinse the roots to remove old potting medium.
Arrange the Roots: Position the orchid so air roots are well-distributed and exposed.
Add Water: Pour enough water into the container to cover the plant’s roots, leaving the base uncovered.
Repotting an Orchid with a Large Number of Air Roots
Handle with Care: Gently separate and arrange the air roots around the new pot.
Use a Larger Pot: A larger pot accommodates extra roots and prevents overcrowding.
Ensure Good Drainage: Proper drainage is crucial to avoid waterlogging.
Repotting an Orchid Without Roots
Prepare a Rooting Medium: Use sphagnum moss or rooting hormone.
Container: Place the orchid in a small container with good drainage.
Maintain Moisture: Keep the medium slightly moist and in a warm, humid environment.
Monitor for Growth: New roots should develop in a few weeks.
By following these steps, you can effectively manage and repot your orchid, ensuring it remains healthy and vibrant. Regular care will help maintain its beauty and overall health.
FAQs
Why are my orchid’s roots growing out of the pot?
Orchid roots, especially aerial roots, often grow out of the pot because they are naturally adapted to absorb moisture and nutrients from the air. This is common in epiphytic orchids, which grow on trees in their native habitats.
Are aerial roots a sign of a healthy orchid?
Yes, aerial roots are typically a sign of a healthy orchid. They indicate that your orchid is thriving and attempting to reach out for more moisture and nutrients. However, if the roots are excessively dry or shriveled, it might indicate a problem with humidity or watering.
Should I cut the aerial roots on my orchid?
Cutting healthy aerial roots is generally discouraged. Through their ability to collect moisture and nutrients from the air, they are vital to the health of your orchid. But you can carefully clip them if the roots are shrivelled, dry, or broken.
How do I manage overgrown roots without cutting them?
You can manage overgrown roots by providing proper support, such as a larger pot or a stake. You can also increase humidity around the plant to ensure the roots are getting enough moisture.
What should I do if the roots are overcrowding the pot?
If the roots are overcrowding the pot, it might be time to repot your orchid. Choose a pot that’s slightly larger and provides ample drainage. Repotting every 1-2 years can help manage root growth and keep your orchid healthy.
What potting medium is best for orchids with large root systems?
A well-draining potting mix, such as a blend of bark, perlite, and sphagnum moss, is ideal for orchids with large root systems. This mix provides the necessary air circulation and moisture balance for healthy root growth.
Can I train aerial roots to grow back into the pot?
Yes, you can gently guide aerial roots back into the potting medium. Be careful not to force them, as this can damage the roots. If the roots are too rigid or resistant, it’s best to leave them be.
How can I prevent orchid roots from getting out of control in the future?
Proper watering, humidity control, and regular repotting can help prevent orchid roots from getting out of control. Ensuring your orchid has enough space in its pot and good air circulation around the roots is also important.
Are there any signs that indicate it’s time to repot my orchid?
When the orchid becomes top-heavy, the potting medium breaks down, and roots start to come out of the pot, it’s time to repot it. It’s typically enough to repot every one to two years.
Can trimming roots harm my orchid?
Trimming healthy roots can stress your orchid and affect its growth. Only trim roots that are dead, shriveled, or diseased, and always use sterilized tools to prevent infection.


