
Feel free to share!
Orchid leaf deformation is a common problem that many plant lovers face, often showing up as twisted, wrinkled, or uneven leaves. These signs can indicate issues like watering mistakes, pest attacks, or nutrient imbalances that affect the plant’s ability to stay healthy and absorb sunlight efficiently.
Table of Contents 👈 Tap Here
With the right care and techniques, you can easily fix orchid leaf deformation and restore your plant’s natural beauty. By identifying the causes early and applying simple adjustments in light, humidity, and nutrition, your orchids can regain their vibrant color, strong structure, and graceful growth.
Understanding Orchid Leaf Deformation
Orchid leaf deformation happens when environmental or care-related stress interferes with normal leaf growth. Poor watering habits, light imbalance, nutrient deficiency, or pests often cause the problem. Once you understand the reason behind these deformities, you can take the right corrective steps to restore your orchid’s leaf health and vibrant appearance.
Common Causes of Orchid Leaf Deformation
Overwatering, insufficient nutrients, and low humidity are leading causes of orchid leaf deformation. Sudden temperature changes or direct sunlight can also stress the plant. At times, pest infestations or poor air circulation make new leaves curl or twist. Recognizing the early signs and fixing them helps your orchid recover and thrive again.
🌿 29 Best Tips to Fix Orchid Leaf Deformation
💧 Watering Tips
1. Perform the Pencil Test Before Watering
Always check soil moisture before watering by using the pencil test. Insert a clean pencil into the soil; if it comes out dry, water your orchid. This method prevents overwatering, which is a major cause of orchid leaf deformation and root rot. Consistent checking helps maintain proper moisture balance for healthier leaves.
2. Avoid Stagnant Water Around Roots
Never let your orchid sit in stagnant water as it suffocates the roots and leads to deformation. Ensure proper drainage holes at the bottom of the pot so excess water can escape freely. Standing water encourages fungal infections, which damage the leaves and reduce their ability to grow evenly.
3. Water Only When the Top Layer Feels Dry
Overwatering is one of the quickest ways to cause orchid leaf deformation. Always let the top layer of the potting mix dry before watering again. This practice allows air to circulate through the roots, preventing fungal growth and ensuring that the plant receives just the right amount of hydration.
4. Use Clean, Soft Water for Orchids
Hard tap water can leave salt deposits that block nutrient absorption, causing leaf twisting and yellowing. Using rainwater, filtered, or distilled water helps orchids absorb nutrients efficiently. Consistent use of clean water will improve root health and promote smoother, evenly shaped leaves over time.
☀️ Light & Temperature Tips
5. Place Orchids in Bright, Indirect Sunlight
Orchids love light but cannot handle harsh, direct sun. Place them near an east-facing window where they receive filtered sunlight. This encourages proper leaf development without burning delicate tissue. Indirect light helps prevent orchid leaf deformation and supports the production of healthy, glossy green leaves.
6. Protect Orchids from Harsh Afternoon Sunlight
Direct afternoon sunlight can overheat orchid leaves, making them curl or develop dry patches. Use sheer curtains or light diffusers to protect the plant. Maintaining this balance ensures healthy photosynthesis while preventing deformation caused by temperature spikes or light stress on sensitive orchid leaves.
7. Maintain a Consistent Temperature Range
Orchids prefer stable temperatures between 18°C and 28°C. Frequent fluctuations can shock the plant and result in orchid leaf deformation. Keep orchids away from cold drafts, heaters, and air conditioners. A consistent temperature range supports smooth leaf formation and enhances the orchid’s overall strength and resilience.
8. Use Grow Lights When Needed
If your home lacks sufficient sunlight, install full-spectrum grow lights to support orchid health. These lights mimic natural daylight and encourage strong, uniform leaf growth. Consistent light exposure ensures your orchid avoids deformation and produces evenly colored leaves that are firm, vibrant, and lush.
🌱 Nutrient & Soil Tips
9. Feed Orchids Monthly with Balanced Fertilizer
A nutrient deficiency often leads to orchid leaf deformation. Use a balanced fertilizer (20-20-20) once a month to promote even leaf development. Always dilute the fertilizer to half-strength to avoid chemical burns. Regular feeding ensures the leaves stay strong, glossy, and well-shaped throughout the growing season.
10. Flush the Potting Mix to Remove Mineral Buildup
Over time, fertilizer salts and minerals accumulate in the soil, blocking nutrient absorption. Flush the pot thoroughly with clean water every few weeks to prevent buildup. This keeps the roots healthy and prevents orchid leaf deformation caused by excess salts and poor nutrient circulation.
11. Repot Every 1–2 Years Using Fresh Bark Mix
Old potting mix compacts over time, limiting airflow and moisture movement. Repotting your orchid every 1–2 years using a fresh orchid bark mix helps the roots breathe better. Healthy roots mean healthier leaves, minimizing deformation and supporting vibrant, strong growth throughout the plant’s life.
12. Ensure Good Aeration Around Roots
Orchids naturally grow on trees, so their roots need airflow. Use airy potting materials like bark, charcoal, and perlite. Proper aeration prevents root suffocation and orchid leaf deformation caused by oxygen deprivation. It also reduces fungal risks, allowing the plant to absorb nutrients efficiently and grow evenly.
🦠 Pest & Disease Control Tips
13. Inspect Leaves Regularly for Pests
Pests like aphids, mites, and mealybugs can suck sap and distort leaf growth. Check under the leaves and near the base weekly. Early detection allows quick treatment with neem oil or insecticidal soap. Regular inspection prevents long-term deformation and helps orchids maintain their natural shape and vitality.
14. Use Neem Oil as a Natural Preventive Spray
Neem oil is a safe, natural remedy against most orchid pests. Spray diluted neem oil on the leaves once every two weeks. It prevents infestations and protects orchids from fungal attacks that cause orchid leaf deformation. Consistent use keeps your orchids pest-free and looking lush year-round.
15. Isolate Infected Orchids Immediately
If one of your orchids shows signs of pest damage or leaf distortion, isolate it from the rest immediately. This prevents the spread of infection and gives the affected plant time to heal. Keep the isolated orchid under observation until its leaves return to normal shape.
16. Sterilize Tools Before and After Use
Always sterilize scissors, knives, or pruning tools before touching any orchid. Unsterilized tools can spread bacteria or fungus, leading to orchid leaf deformation and infections. Wipe tools with alcohol before and after each use to keep your plants safe and free from disease.
🌿 Care & Maintenance Tips
17. Prune Damaged or Old Leaves Carefully
Removing damaged or deformed leaves helps redirect the plant’s energy toward new growth. Always use sterilized scissors and trim close to the base without cutting healthy tissue. Regular pruning minimizes disease risks and encourages smooth, uniform new leaves on your orchid.
18. Remove Dead Roots During Repotting
Dead or rotting roots prevent proper nutrient absorption, which leads to orchid leaf deformation. During repotting, carefully remove soft, dark, or mushy roots with sterilized scissors. Healthy roots are white or green and firm to the touch. Keeping only healthy roots supports strong, upright leaf growth.
19. Mist Orchids to Maintain Humidity
Orchids thrive in humidity between 50–70%. Light misting increases moisture around the leaves, preventing dryness and curling. However, avoid over-misting to prevent fungus. Regular, gentle misting improves leaf texture and helps prevent orchid leaf deformation caused by excessively dry indoor air.
20. Avoid Overfertilizing the Plant
Too much fertilizer can burn roots and distort new leaves. Always dilute fertilizer to half-strength and use it once a month. Overfeeding adds stress, leading to orchid leaf deformation and yellow tips. Balanced feeding ensures strong leaf formation and steady, natural growth.
21. Rotate the Pot Weekly for Even Growth
Turning your orchid’s pot once a week helps all sides receive equal light. Without rotation, one side may grow faster, causing uneven or twisted leaves. Rotating regularly prevents deformation, keeps growth symmetrical, and gives the orchid a naturally balanced appearance.
🪴 Environmental Balance Tips
22. Keep Humidity Levels Between 50–70%
Maintaining humidity in this range ensures that orchids do not lose moisture too quickly. Dry air can cause curling and orchid leaf deformation, while too much humidity can lead to mold. Use a hygrometer to monitor humidity and keep it consistent throughout the year.
23. Use a Humidity Tray or Humidifier
If your indoor air is dry, place your orchid pot on a humidity tray or use a humidifier. This adds gentle moisture to the surrounding air. Consistent humidity prevents wrinkling and improves the leaf’s natural flexibility and shine.
24. Maintain Good Air Circulation Around Orchids
Orchids love fresh air, which keeps the foliage dry and reduces fungal growth. Place them in an area with soft airflow, like near an open window or fan. Good circulation minimizes orchid leaf deformation and keeps the plant environment healthy and disease-free.
25. Keep Orchids Away from Air Vents and Heaters
Cold or hot air blowing directly on orchids can cause leaf cracking or distortion. Keep them away from vents, air conditioners, and heaters. Stable air conditions protect delicate leaves from drying out and developing orchid leaf deformation due to environmental stress.
🌼 Long-Term Growth & Prevention Tips
26. Observe Leaf Changes Regularly
Early observation is the best prevention. Regularly inspect your orchid for small twists, discolorations, or uneven patterns. Detecting orchid leaf deformation early allows you to act quickly with proper adjustments in light, watering, or nutrition, ensuring healthier growth overall.
27. Maintain a Consistent Watering and Feeding Routine
Consistency is key to preventing orchid stress. Set a weekly schedule for watering and monthly feeding. Irregular care routines often trigger orchid leaf deformation due to fluctuating conditions. A steady routine keeps orchids strong, balanced, and visually stunning all year round.
28. Use Organic Compost Occasionally
Adding a small amount of organic compost or worm castings improves soil nutrition naturally. It strengthens the orchid’s immune system and prevents orchid leaf deformation caused by deficiencies. Organic matter also promotes beneficial microbes that keep roots healthy and absorb nutrients efficiently.
29. Keep Orchids Stress-Free with Stable Conditions
Avoid moving your orchids too often between rooms or light levels. Frequent changes stress the plant, causing deformed or stunted leaves. Keeping your orchid in a stable environment with consistent temperature, humidity, and light will ensure long-lasting, flawless leaf growth.
Real Example: What Happened to This Orchid?
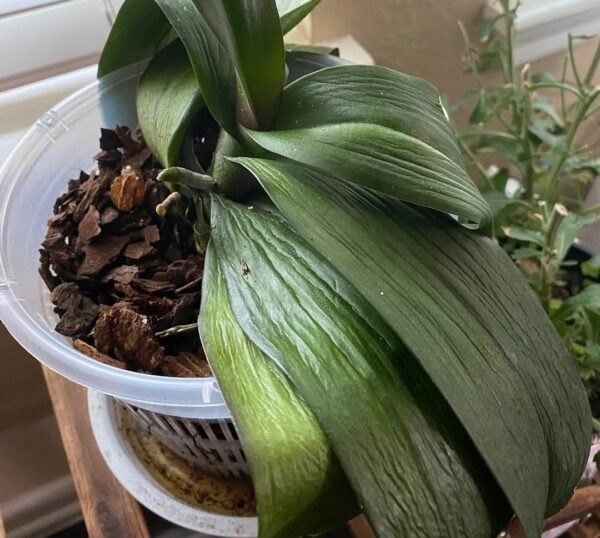
This photo shows an orchid suffering from leaf wrinkling and drooping, a common sign of orchid leaf deformation caused by dehydration or root damage. The leaves appear soft and leathery because the roots are unable to absorb water properly — even if the potting mix seems moist.
1. Root Rot or Damage
If the roots inside the pot look brown, mushy, or hollow, they are likely rotting from overwatering or poor drainage. When roots decay, the orchid cannot take up water, leading to deformed and wrinkled leaves.
✅ Fix:
Remove the orchid gently from its pot and trim away all soft or dark roots. Repot it in fresh, airy orchid bark that drains well. Always ensure proper airflow and avoid water sitting in the bottom tray.
2. Underwatering or Dry Roots
If the roots appear white, silvery, or brittle, your orchid is dehydrated. Sometimes, bark media becomes so dry it repels water, making it difficult for roots to rehydrate.
✅ Fix:
Soak the entire pot, including the bark and roots, in clean water for 15–20 minutes once a week. Before putting it back where it belongs, let it drain fully. This helps the roots recover and restores leaf plumpness naturally.
3. Low Humidity or Heat Stress
Orchid leaf deformation can also happen when the surrounding air is too dry or hot. Low humidity below 40% or exposure to heaters and sunlight can cause moisture loss through the leaves.
✅ Fix:
The orchid should not be near heating vents or direct sunshine. Increase humidity using a tray filled with water and pebbles or use a small humidifier. Consistent moisture in the air helps prevent leaf wrinkles and deformation.
4. Check the Crown and New Roots
Always inspect the crown (center of the plant) and roots. If the crown is black or mushy, it could be crown rot. But if you spot new green root tips, your orchid is still healthy enough to recover quickly with proper care.
🌸 Quick Recovery Plan
1. Unpot the orchid and inspect its roots carefully.
2. Trim away rotted or dead roots and repot in fresh orchid bark.
3. Water only when the bark feels dry (use the pencil test).
4. Improve humidity around the plant and provide indirect light.
5. Avoid fertilizer for two weeks until new root growth begins.
By following these simple steps, you can save your orchid from leaf deformation and restore its natural strength, shape, and beauty within a few weeks.
Main Problem: Root Damage or Dehydration
Even if you’ve been watering regularly, the roots might not be absorbing water properly. When orchid roots rot or dry out, the plant can’t transport moisture to the leaves — causing them to become soft, leathery, and droopy.
💧 Common Causes
1. Overwatering – Roots suffocate and rot, turning brown or mushy.
2. Underwatering – Roots become brittle and dry, failing to absorb moisture.
3. Compact or old potting mix – Breaks down over time and blocks airflow.
4. Low humidity or high heat – Accelerates water loss from leaves.
🌸 How to Fix & Revive It
Examine the roots: Take the orchid out of its container.Healthy roots are firm and green/silver. Trim off all mushy or dry ones.
Repot into fresh, airy bark mix.
Water thoroughly when roots turn silvery white — then let excess drain completely.
Increase humidity (use a humidifier or tray with pebbles and water).
Avoid direct sunlight while it recovers.
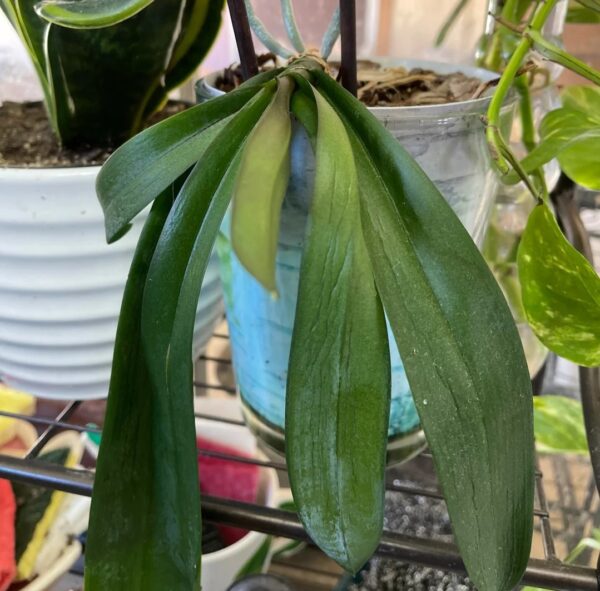
With proper care, new leaves will grow firm and upright, though existing wrinkled leaves may not recover fully.
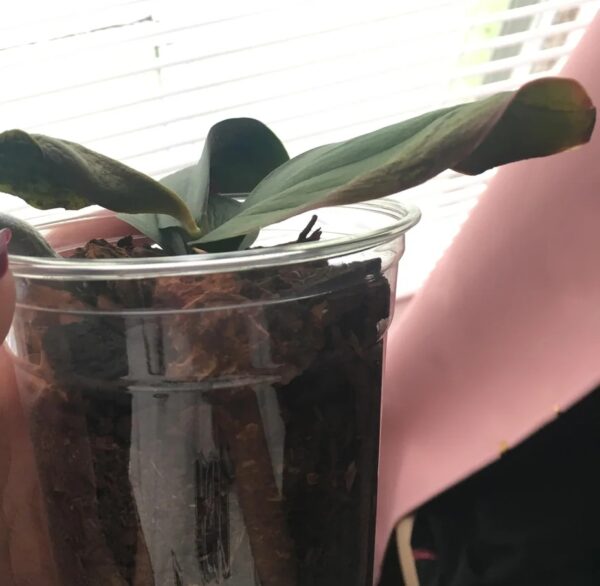
🌿 Main Problem: Root Rot and Severe Dehydration (Not Accordion Wrinkling)
In this orchid, the leaves are soft, droopy, and slightly curled under, not pleated. That means the issue is not uneven cell growth (like accordion leaves) but a lack of water absorption due to root damage. The potting medium also looks too wet and compacted, which prevents airflow and causes root rot.
💧 Likely Causes
1. Overwatering — roots have likely rotted and lost their ability to take up moisture.
2. Poor drainage — the clear cup may be holding excess water, suffocating roots.
3. Lack of air circulation — orchids need airy bark, not dense or waterlogged media.
4. Low humidity and weak roots — worsen leaf droop and dehydration.
🌸 How to Fix It
Unpot the orchid and check the roots — healthy ones are firm and silver-green.
Trim all brown, soft, or slimy roots.
Repot in a ventilated orchid pot with fresh bark or sphagnum mix.
Water only when roots turn silvery, and ensure full drainage.
Place in bright, indirect light and maintain 50–60% humidity.
Once repotted and stable, new leaves should grow firm and upright, while the existing soft leaves may not recover completely.
How to Check Water Requirement Using Pencil Test
To test if your orchid needs water, insert a clean pencil into the potting mix for a few minutes. If it comes out moist, skip watering. If dry, water gently until excess drains. This pencil test prevents overwatering, protecting roots and reducing orchid leaf deformation from root stress.
Following these 29 best tips will help you identify, fix, and prevent orchid leaf deformation naturally. With consistent care in watering, light, and feeding, your orchids will grow strong, vibrant leaves that reflect good health. Remember, patience and observation are the secret to thriving, graceful, and long-lived orchids.
FAQS
1. What causes Orchid Leaf Deform in healthy plants?
Orchid Leaf Deform often occurs due to inconsistent watering, temperature stress, or root damage. When orchids don’t receive even moisture or light, their new leaves may grow twisted or wrinkled. To prevent Orchid Leaf Deform, ensure proper watering routines, maintain humidity between 50–70%, and avoid placing orchids in harsh sunlight or cold drafts.
2. How can I fix Orchid Leaf Deform naturally?
To fix Orchid Leaf Deform naturally, check the roots for rot and repot your orchid in fresh bark mix. Provide stable humidity and indirect sunlight. Consistent care will allow new leaves to grow normally. While old leaves with Orchid Leaf Deform won’t change shape, healthy conditions encourage smooth and vibrant new leaf growth.
3. Is Orchid Leaf Deform a sign of disease or pests?
Orchid Leaf Deform can sometimes signal the presence of pests like mites or thrips, or fungal infections affecting leaf tissue. Regular inspection helps identify issues early. If Orchid Leaf Deform appears with spots or discoloration, isolate the plant, prune damaged leaves, and use gentle organic fungicides or insecticidal soap to restore the orchid’s health.
4. Can poor watering habits cause Orchid Leaf Deform?
Yes, uneven watering is a major reason behind Orchid Leaf Deform. Overwatering suffocates roots, while underwatering deprives them of moisture. Both conditions disrupt nutrient flow, causing distorted leaf growth. To prevent Orchid Leaf Deform, always water only when roots turn silvery and ensure your orchid medium drains efficiently to maintain healthy, hydrated roots.
5. Does sunlight affect Orchid Leaf Deform?
Excessive sunlight can lead to Orchid Leaf Deform, as hot, direct rays damage young leaves, causing curling or uneven growth. On the other hand, too little light makes orchids weak and leggy. For preventing Orchid Leaf Deform, keep orchids in bright, filtered light to ensure balanced growth and preserve the leaf’s natural structure and color.
6. How does humidity influence Orchid Leaf Deform?
Low humidity levels often lead to Orchid Leaf Deform, especially during new leaf development. Orchids prefer consistent moisture in the air to keep tissues flexible. If humidity drops below 40%, leaves may wrinkle or twist. To avoid Orchid Leaf Deform, use a humidifier or place a humidity tray near your orchid to maintain ideal conditions.
7. Can repotting help recover from Orchid Leaf Deform?
Repotting can definitely help your orchid recover from Orchid Leaf Deform, especially if the roots are damaged. Fresh, well-draining bark improves air circulation and moisture balance. While existing deformed leaves won’t straighten, new ones will grow smoother. Repotting every 1–2 years prevents root suffocation and supports healthy growth, reducing future chances of Orchid Leaf Deform.
8. Why do new leaves show Orchid Leaf Deform while older ones look fine?
Orchid Leaf Deform usually appears on newly growing leaves because that’s when the plant is most sensitive to environmental stress. Older leaves were formed under stable conditions, so they remain smooth. Uneven watering, sudden temperature changes, or weak roots often trigger Orchid Leaf Deform in new leaves during their delicate developmental stage.
9. Can Orchid Leaf Deform affect flowering?
Yes, Orchid Leaf Deform can indirectly affect flowering since deformed leaves reduce photosynthesis efficiency. When orchids can’t produce enough energy, they may delay or skip blooming. To avoid Orchid Leaf Deform and ensure healthy flower spikes, maintain proper humidity, temperature, and lighting. Healthy foliage supports strong bud formation and vibrant, long-lasting orchid blooms.
10. Is it safe to trim leaves with Orchid Leaf Deform?
It’s safe to trim leaves with severe Orchid Leaf Deform if they are discolored, diseased, or damaged. However, avoid cutting healthy, green parts. Removing only the affected areas helps redirect energy toward new growth. When trimming Orchid Leaf Deform leaves, use sterile scissors and apply a fungicidal powder on the cut to prevent infections.
11. How long does it take for orchids to recover from Orchid Leaf Deform?
Recovery from Orchid Leaf Deform depends on the plant’s health and care consistency. Usually, within 6–8 weeks, new growth begins to appear normal under proper humidity, light, and watering routines. Although deformed leaves won’t flatten again, consistent care ensures future leaves grow strong, preventing further Orchid Leaf Deform from recurring on your plant.
12. Can Orchid Leaf Deform spread to other orchids?
Orchid Leaf Deform itself isn’t contagious, but the underlying causes like pests, fungus, or bacteria can spread. If one orchid shows Orchid Leaf Deform, isolate it and inspect nearby plants. Cleaning your tools and keeping orchids spaced properly helps prevent infections that could trigger similar deformities in other orchids in your collection.
13. Does fertilizer play a role in Orchid Leaf Deform?
Yes, over-fertilizing or using the wrong nutrient ratio can lead to Orchid Leaf Deform. Excess salts in the growing medium can damage roots, reducing nutrient uptake and distorting leaf growth. To prevent Orchid Leaf Deform, use a balanced orchid fertilizer diluted to half strength every two weeks, and flush the potting mix monthly.
14. Can temperature changes cause Orchid Leaf Deform?
Sudden temperature fluctuations often cause Orchid Leaf Deform, especially in indoor orchids near heaters or air conditioners. Drastic shifts stress the plant, disrupting leaf cell development. To minimize Orchid Leaf Deform, keep temperatures steady between 18°C–28°C, avoid cold drafts, and maintain gentle airflow to mimic the orchid’s natural tropical growing conditions.
15. Will new leaves grow normally after Orchid Leaf Deform?
Yes, once the growing environment stabilizes, new leaves will grow normally even after a case of Orchid Leaf Deform. Focus on improving watering habits, humidity, and light exposure. While older deformed leaves remain unchanged, they still help photosynthesis. Future growth will reflect your improved care, showing smooth, strong, and vibrant new orchid leaves.