Orchids Air Roots: 10 Best Tips to Repot Orchids for Healthy Growth
Table of Contents 👈 Tap Here
Welcome to the world of orchid care, where the beauty of these exquisite plants takes center stage. Orchids, with their delicate blooms and graceful presence, have captivated the hearts of countless enthusiasts. Repotting orchids can be both a rewarding and necessary task to ensure their continued health and vitality. However, when it comes to orchids with air roots, a slight twist is added to the repotting process. These fascinating air roots, which absorb moisture and nutrients from the atmosphere, require special attention to ensure the orchid thrives in its new home.
In this guide, we will embark on a journey to demystify the art of repotting orchids with air roots, equipping you with the knowledge and confidence to successfully care for these extraordinary plants. So, let’s dive in and explore the fascinating world of orchid repotting, where air roots become a unique factor in nurturing these stunning botanical wonders.
Orchids Air Roots
Gather the necessary supplies:
Before starting on the repotting process for orchids with air roots, it is essential to gather the necessary supplies. Having the right tools and materials at hand will make the task smoother and more efficient.
New Pot: Select a pot appropriate for your orchid’s size and growth requirements. Opt for a pot with drainage holes to ensure proper water flow.
Orchid Potting Mix: Orchids have specific requirements when it comes to their growing medium. Look for a specialised orchid potting mix that provides excellent drainage and aeration while retaining some moisture.
Pruning Shears or Scissors: A sharp pair of pruning shears or scissors will be necessary to trim any damaged or overgrown roots during the repotting process.
Spray Bottle: Orchids with air roots benefit from regular misting to provide them with the necessary humidity. A spray bottle will help you achieve this.
Orchid Fertiliser: Orchids require specific nutrients for healthy growth. Choose a balanced orchid fertiliser formulated specifically for these plants.
Plastic or newspaper: To protect your work area from potential mess, place a sheet of plastic or newspaper on the surface.
Gloves: It’s a good idea to wear gloves to protect your hands during the repotting process, especially if you have sensitive skin or allergies.
Labels or tags: Keep track of the orchid’s name, repotting date, and any relevant notes by using labels or tags. This will help you monitor its progress and care.
By gathering these supplies in advance, you will be well-prepared to begin the repotting process and provide your orchid with the best possible care.
Choose the right pot:
Choosing the right pot for repotting orchids with air roots is crucial to their well-being and growth. Here are some considerations to keep in mind when selecting the appropriate pot:
Size: Orchids prefer snug pots that provide a little room for growth. Avoid pots that are too large, as excessive space can lead to waterlogging and root rot. Choose a pot that allows for about an inch or two of space around the roots.
Material: Opt for pots made of porous materials such as clay or terracotta. These materials allow for better airflow and help prevent water from accumulating around the roots. Avoid plastic pots, as they can retain moisture and create a humid environment that may lead to root issues.
Drainage Holes: Ensure that the pot has adequate drainage holes to prevent water from pooling at the bottom. Good drainage is crucial for orchids, as their air roots require oxygen and dislike being constantly saturated.
Clear or opaque: Transparent or clear pots can be beneficial for orchids with air roots as they allow you to monitor root health and growth. However, if you choose an opaque pot, ensure it has sufficient drainage and ventilation.
Basket or Slotted Pot: An alternative option for orchids with air roots is to use a basket or slotted pot. These types of containers provide ample airflow and allow the air roots to extend outside the pot, mimicking their natural growth habit. This can be particularly suitable for orchid species with abundant air roots.
Ultimately, the goal is to select a pot that balances the orchid’s needs for proper drainage, airflow, and space for root growth. Observing the specific requirements of your orchid species will guide you in making the best choice. Remember, choosing the right pot is an essential step towards providing a healthy and thriving environment for your orchid with air roots.
Prepare the new pot.
Preparing the new pot for repotting your orchid with air roots is an important step in ensuring its successful transition. Here’s how you can prepare the new pot:
Clean the Pot: If you’re using a new pot, wash it thoroughly with mild soap and warm water to remove any dust, dirt, or debris. This helps create a clean environment for your orchid’s roots.
Soak the Pot: Before potting, soak the new pot in water for about 30 minutes. This allows the porous material to absorb some moisture, which can help maintain humidity around the air roots.
Add Orchid Potting Mix: Fill the pot about halfway with the appropriate orchid potting mix. Gently tap the pot on a solid surface to help settle the mix and remove any air pockets.
Create a Mound: Create a small mound of potting mix in the centre of the pot. The mound will act as a support for the orchid and help position its air roots correctly.
Position the Orchid: Carefully place the orchid in the pot, ensuring that the air roots are spread evenly around the mound of potting mix. Take note of the orientation of the plant to ensure its best side is facing forward.
Fill the Pot: Gradually fill the pot with more orchid potting mix, gently pressing it around the roots to provide stability. Avoid compacting the mix too tightly, as orchids require good airflow.
Adjust the Position: As you fill the pot, you may need to adjust the position of the orchid to ensure it stands upright and the air roots are positioned properly. Make any necessary adjustments before finishing potting.
Leave Some Space: Leave a small gap between the top of the potting mix and the rim of the pot. This space allows for easier watering and helps prevent overflow.
you will have a well-prepared pot ready to receive your orchid with air roots. Remember to handle the roots gently and avoid any excessive manipulation to prevent damage. The preparation process sets the stage for a smooth and successful repotting experience, giving your orchid a fresh start in its new home.
Soak the potting mix:
Soaking the potting mix before repotting your orchid with air roots can help ensure proper hydration and improve its water-retention capacity. Here’s how you can soak the potting mix:
Take the required amount of orchid potting mix and place it in a clean container or bucket.
Pour water into the container slowly, using just enough to completely hydrate the potting mix. Water should be added gradually as needed, starting with a tiny amount. The objective is to dampen the mixture without going overboard with the water saturation.
Allow the potting mix to absorb the water and become evenly moist. You can gently stir the mix to distribute the moisture evenly throughout.
Let the potting mix soak for approximately 30 minutes to an hour. This duration allows the mix to fully absorb the water and reach the desired moisture level.
After soaking, check the consistency of the potting mix. It should be evenly damp throughout, but not dripping wet. Squeeze a handful of the mix gently—if it holds together without releasing excess water, it’s ready for use.
If the potting mix feels too wet or soggy, you can gently squeeze out any excess water by applying light pressure with your hands. Be careful not to compact the mix too much during this process.
Once the potting mix is adequately soaked and at the right moisture level, it’s ready to be used for repotting your orchid with air roots. Remember that orchids prefer a well-draining growing medium, so ensure that the potting mix is damp but not overly saturated. This will provide a suitable environment for your orchid’s roots to thrive.
Remove the orchid from its current pot.
Removing your orchid from its current pot is a delicate process that requires care to avoid damaging the plant’s roots. Here’s a step-by-step guide on how to safely remove the orchid from its current pot:
Prepare your workspace: Place a clean towel or a sheet of newspaper on your working surface to catch any debris or loose soil. This will make cleanup easier.
Water the orchid: It’s beneficial to water your orchid a day or two before repotting. Moistening the potting mix slightly helps prevent it from crumbling excessively during the removal process.
Hold the orchid stem: Grasp the base of the orchid’s stem firmly but gently between your thumb and fingers. This will provide stability while avoiding excessive pressure on the delicate stem.
Tap or tilt the pot: Tap the sides of the current pot gently or tilt it to loosen the potting mix. This loosening action helps separate the root ball from the pot’s inner walls.
Slide the orchid out: Once the potting mix has loosened, carefully and slowly slide the orchid out of its current pot. Apply gentle pressure if needed, but avoid pulling forcefully to prevent damaging the roots.
Inspect the roots: Take a moment to inspect the root system. Look for any signs of damage, disease, or rot. If you notice any unhealthy roots, you can trim them later during the repotting process.
Gently remove old potting mix. Gently remove any old potting mix that clings to the roots. Be careful not to damage the delicate air roots or break healthy roots.
Shake off excess potting mix. Lightly shake the orchid to remove any loose or excess potting mix. This step helps reveal the true condition of the roots and allows for better observation and potential root trimming if necessary.
Inspect the roots:
After removing your orchid from its current pot, it’s important to take a moment to inspect the roots. Root health is crucial for the overall well-being of the plant. Here’s how you can inspect the roots of your orchid:
Gently untangle the roots: Carefully separate the roots, gently untangling them with your fingers. This allows you to have a clear view of the entire root system and assess its condition.
Look for healthy roots. Healthy orchid roots should be firm, plump, and green or silvery-white in colour. These roots indicate that your orchid is receiving proper nutrition and hydration.
Check for damaged or unhealthy roots. Look for any signs of damaged ko or unhealthy roots. These can include roots that are soft, mushy, brown, black, or shrivelled. These signs may indicate root rot, a fungal infection, or dehydration.
Trim damaged or dead roots: If you spot any damaged or dead roots, use a pair of sterilised pruning shears or scissors to carefully trim them off. Make clean cuts, removing only the affected portions while leaving healthy roots intact.
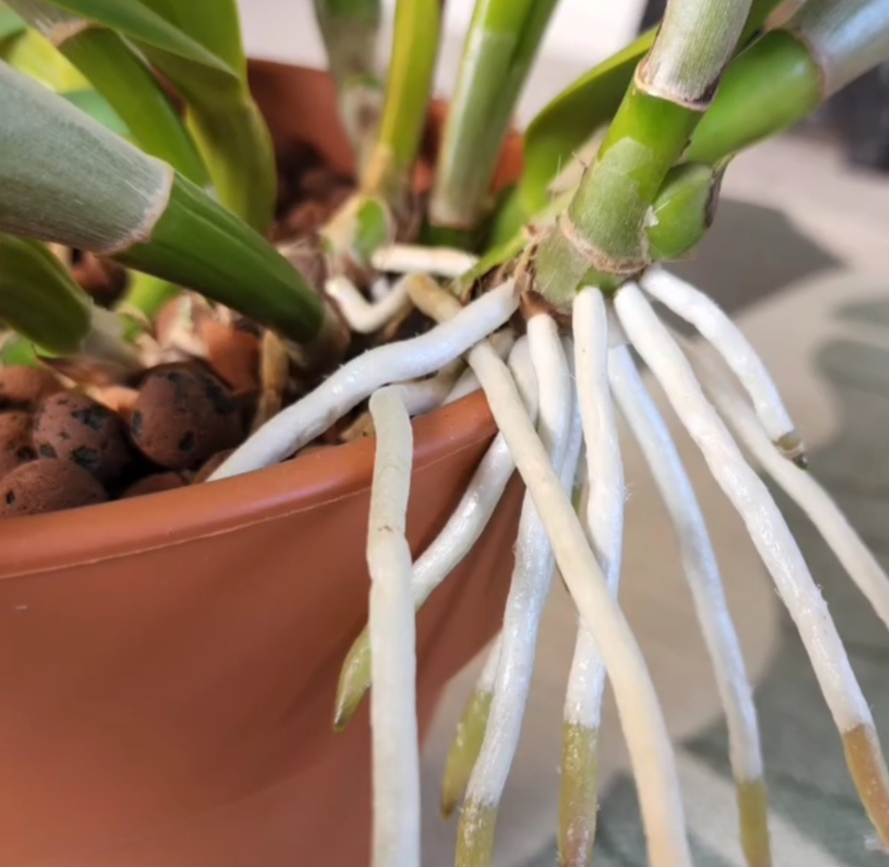
Pay attention to air roots. Orchids with air roots often have exposed roots that may be growing outside the potting mix. These air roots should be firm, pliable, and have a healthy green or silvery-white appearance.
Assess the overall root condition: Take a step back and evaluate the overall health and density of the root system. A healthy root system should have a good number of plump, vibrant roots.
Position the orchid in the new pot.
Positioning the orchid properly in the new pot is crucial to ensuring its stability, allowing for optimal growth, and accommodating the air roots. Here’s how you can position your orchid in the new pot:
Hold the orchid: Gently hold the orchid by the base of the stem or pseudobulbs, taking care not to damage any flowers or new growths. Keep your fingers away from the air roots.
Centre the orchid: Position the orchid in the centre of the new pot, ensuring that the air roots are spread out evenly around the mound of potting mix created earlier. The mound will provide support for the orchid while accommodating the air roots.
Adjust the orientation: Observe the orchid from different angles to determine its best side or the side you want to showcase. Rotate the orchid, if needed, to ensure the best side is facing forward.
Check the depth: Make sure the base of the orchid’s stem or pseudobulbs is level with the top of the potting mix. Avoid burying the base too deep, as this can lead to moisture retention and potential rotting.
Gently press the mix: Hold the orchid steady and use your free hand to gently press the potting mix around the roots. Ensure that the mix makes good contact with the roots, providing stability while maintaining proper airflow.
Adjust the position if necessary. If the orchid is not standing upright or if any air roots are positioned awkwardly, gently adjust them by carefully repositioning the orchid or manipulating the roots. Take your time to achieve the desired placement.
Step back and assess: Once the orchid is positioned in the new pot, step back and assess the overall appearance. Ensure the orchid is stable and balanced, and the air roots have ample space to grow and access the surrounding air.
By carefully positioning your orchid in the new pot, you provide a stable and suitable environment for its growth. Remember to handle the orchid with care throughout the process, avoiding any excessive pressure or rough handling that may damage the delicate roots or foliage.
Fill the pot with the potting mix.
Now that the orchid is properly positioned in the new pot, it’s time to fill the pot with the potting mix. Here’s how you can do it:
Take your prepared potting mix. Using a scoop or your hands, take the orchid potting mix that you soaked earlier.
Start filling the pot: Begin by gently pouring the potting mix into the pot, around the orchid’s roots. Start from one side and work your way around, ensuring even distribution of the mix.
Fill the gaps: As you fill the pot, use your fingers or a small tool to gently press the potting mix around the roots, filling any gaps or spaces. Take care not to compact the mix too tightly, as orchids require good airflow around their roots.
Continue filling and pressing: Gradually add more potting mix and continue pressing it gently around the roots until the pot is filled to the desired level. Maintain the level so that the base of the orchid’s stem or pseudobulbs is slightly above the mix.
Avoid covering the air roots. Be mindful of the air roots while adding the potting mix. Ensure they remain exposed or lightly covered, allowing them to access the surrounding air. Avoid burying the air roots too deeply.
Shake or tap the pot: lightly tap or shake the pot to help settle the potting mix and remove any air pockets. This ensures that the roots make good contact with the mix and provides stability to the plant.
Assess the potting mix level: Check that the potting mix level is appropriate, leaving a small gap between the mix and the rim of the pot. This space allows for easier watering without overflow.
Clean up: Use a brush or your hands to gently remove any potting mix that may have spilled onto the foliage or around the pot. Wipe the pot’s exterior if needed.
By carefully filling the pot with the potting mix, you provide a suitable growing medium for your orchid’s roots. Take your time to ensure even distribution and proper coverage while being mindful of the air roots. Once the potting mix is in place, your orchid is one step closer to thriving in its new pot.
Secure the orchid:
Securing the orchid in its new pot is important to ensure stability and prevent the plant from shifting or toppling over. Here’s how you can secure your orchid:
Assess the stability: Gently hold the orchid at the base of the stem or pseudobulbs and assess its stability in the pot. Ensure that it stands upright without leaning or wobbling.
Add more potting mix if needed. If you find that the orchid is not securely positioned or there is too much space around the roots, you can add more potting mix to fill in the gaps. Press the mix gently to provide additional support.
Use stakes or clips (if necessary): If your orchid requires additional support, such as for tall or heavy flower spikes, you can insert stakes or clips into the potting mix. Carefully position the stake or clip near the base of the stem or pseudobulbs and secure it without damaging the plant.
Tie or attach the orchid (if necessary): In some cases, orchids with large pseudobulbs or spreading growth habits may benefit from being tied or attached to a support. Use soft plant ties, twine, or clips to secure the orchid’s stem or pseudobulbs to a stake or support structure. Make sure to tie them loosely to avoid constricting growth.
Check for stability: After securing the orchid, gently give it a slight shake or tap the pot to ensure that it remains stable. If needed, make any necessary adjustments to enhance stability.
Observe and adjust over time: As your orchid grows, you may need to periodically assess its stability and make adjustments. Over time, you may need to reposition stakes, retie the orchid, or provide additional support as required.
By properly securing your orchid in the pot, you promote healthy growth and minimise the risk of damage from tipping or shifting. Remember to handle the plant with care and avoid putting excessive pressure on the stems, leaves, or flowers. With the orchid secured, you can now look forward to enjoying its beauty and growth in its new pot.
Water the orchid.
Watering your orchid after repotting is an essential step to provide hydration and encourage root establishment in the new pot. Here’s how you can water your orchid:
Choose the right water. Use room-temperature or slightly warm water for watering your orchid. Avoid using water that is too hot or too cold, as extreme temperatures can shock the plant.
Pour water gently: Slowly pour water onto the potting mix, avoiding direct contact with the orchid’s foliage. Aim to moisten the potting mix evenly without creating standing water in the pot.
Water until it drains: Continue pouring water until it starts to drain out of the pot’s drainage holes. This ensures thorough hydration and helps flush out any accumulated salts or residue from fertilisers.
Allow drainage: Let the excess water drain completely from the pot. After a few minutes, carefully empty the saucer or tray under the pot to prevent the orchid from sitting in standing water, which can lead to root rot.
Assess moisture levels: After watering, assess the moisture levels in the potting mix. Orchids generally prefer slightly drying out between watering sessions. Stick your finger about an inch into the mix to check if it feels slightly damp but not overly wet.
Follow a watering schedule: orchids have different watering needs depending on factors such as species, pot size, and environmental conditions. Generally, it’s recommended to water orchids when the potting mix is mostly dry but not completely dry.
Consider humidity: Orchids appreciate humidity, so you can create a more humid environment by placing a tray of water near the orchid or using a humidifier. However, avoid misting the orchid’s foliage directly, as it can encourage fungal growth.
Observe the plant: Monitor your orchid’s response to watering. If the leaves become overly wrinkled or the roots appear shrivelled, it may indicate underwatering. If the leaves turn yellow or the roots appear mushy, it may indicate overwatering.
Remember that individual orchids may have specific watering requirements based on their species and growing conditions. It’s essential to observe your orchid closely and adjust the watering frequency accordingly. With proper watering, your orchid will have the moisture it needs to thrive in its new pot.
Provide appropriate care.
To ensure your repotted orchid’s continuing health and growth, it is crucial to provide it the proper care. Following are some general care recommendations:
Light: In general, orchids prefer direct, bright light. To give your orchid the correct amount of light, place it in a position with filtered sunlight or close to a window with sheer curtains. Avoid the sun’s direct rays since they can burn the foliage.
Temperature and humidity: Most orchids thrive in temperatures between 60°F (15°C) and 80°F (27°C). Maintain a moderate to high humidity level around your orchid, ideally between 50% and 70%. You can increase humidity by using a humidifier, placing a tray of water nearby, or grouping orchids together.
Watering:When the potting soil is nearly but not quite dry, water your orchid. To check for moisture, insert your finger approximately an inch into the mixture. Refrain from overwatering to prevent root rot. Overwatering orchids is preferable to submerging them.
Air Circulation: Orchids benefit from good air circulation around their roots and foliage. Ensure proper ventilation by avoiding crowded spaces and allowing for some airflow. However, protect them from draughts and excessively dry air.
Fertilisation: Orchids require regular fertilisation to provide essential nutrients. Use a balanced orchid fertiliser or a specially formulated orchid food. Follow the instructions on the fertiliser package and apply it at a diluted strength every 2-4 weeks during the active growing season.
Pruning and Maintenance: Remove any dead or damaged foliage or flowers using sterilised pruning tools. Trim any overgrown or unruly air roots if necessary. Monitor the orchid for signs of pests or diseases and take appropriate action if needed.
Repotting: Orchids generally benefit from repotting every 1-2 years or when the potting mix breaks down. Repotting provides a fresh growing medium and allows for root health and growth. Follow the repotting process for orchids with air roots, as mentioned earlier.
Observation and Adjustment: Regularly observe your orchid for any changes in its appearance or growth. Adjust your care routine based on its specific needs, as different orchid species may have unique requirements.
Remember that individual orchids may have specific care requirements based on their species and unique conditions. It’s important to research and understand the specific needs of your orchid to provide the best care possible. With proper care, your repotted orchid with air roots will flourish and reward you with beautiful blooms and healthy growth.
Monitor the orchid’s progress.
Monitoring the progress of your repotted orchid with air roots is essential to ensuring its well-being and making any necessary adjustments to your care routine. Here’s how you can effectively monitor your orchid’s progress:
Visual observation: regularly examine your orchid for any changes in its appearance. Observe the foliage, flowers, and roots for signs of health or potential issues. Look for new growth, vibrant leaves, and healthy roots.
Growth and development: Monitor the growth and development of your orchid. Keep track of the emergence of new leaves, spikes, or flower buds. Note any changes in size, colour, or texture of existing foliage or pseudobulbs.
Root health: Pay attention to the condition of the roots. Check for signs of root growth, such as the appearance of new root tips or extensions. Ensure that the roots remain firm, plump, and healthy in colour. Look for any signs of root rot or dehydration, such as mushy or shrivelled roots.
Watering needs: Observe how your orchid responds to your watering routine. Note how quickly the potting mix dries out after watering, and adjust your watering frequency accordingly. Watch for signs of overwatering or underwatering, such as yellowing leaves or wilted foliage.
Environmental factors: Keep an eye on the environmental conditions surrounding your orchid. Monitor the temperature, humidity levels, and light exposure in its location. Make adjustments as needed to provide optimal conditions for your orchid’s specific requirements.
Pests and diseases: Regularly inspect your orchid for any signs of pests, such as aphids, mealybugs, or scale insects. Look for symptoms of diseases like fungal infections or bacterial rot. If you notice any issues, take appropriate measures for pest control or disease management.
Note-taking: Maintain a gardening journal or record to document your observations and any changes in your orchid’s progress. Note the dates of repotting, fertilising, and other significant events. This record can help you track the orchid’s growth patterns and identify any patterns or trends over time.
Seek expert advice if needed. If you encounter any specific concerns or difficulties with your orchid, consider consulting with an experienced orchid grower or horticulturist. They can provide guidance based on their expertise and help you address any challenges you may face.
By actively monitoring your orchid’s progress, you can identify early signs of issues, make timely adjustments to your care routine, and ensure that your orchid remains healthy and thriving. Remember that each orchid is unique, and understanding its individual needs will enable you to provide tailored care for its optimal growth and beauty.
FAQ
What to do with orchid air roots when repotting?
When repotting an orchid, you have a few options regarding what to do with the air roots:
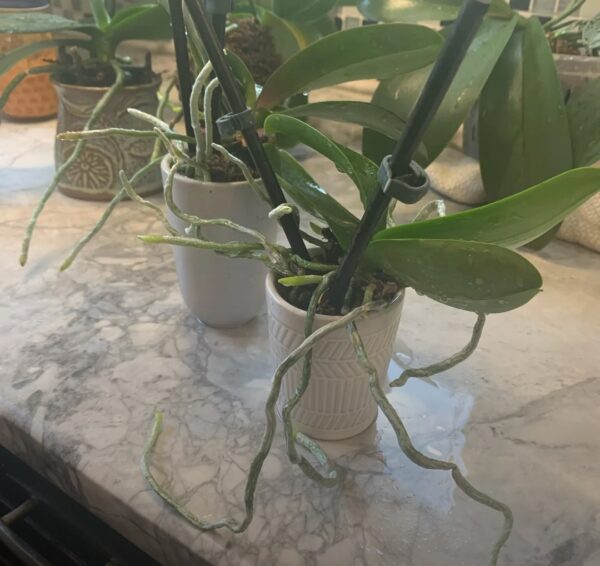
Leave them exposed: Orchids naturally have air roots that absorb moisture and nutrients from the air. If the air roots are healthy and functioning well, you can leave them exposed when repotting. This is particularly true for epiphytic orchids, which typically have aerial roots that help them cling to trees and absorb moisture from the surrounding environment.
Tuck them into the potting medium: If the air roots are long and abundant, you can gently tuck them into the potting medium when repotting. This can help provide additional stability to the plant and ensure the roots receive moisture and nutrients from the potting mix.
Trim them if necessary: If the air roots are damaged, dried out, or excessively long, it may be necessary to trim them before repotting. Use clean and sterilized scissors or shears to carefully trim any unhealthy or overly long roots. It’s important to avoid cutting healthy roots.
Can an orchid survive with just air roots?
While orchids are known for their air roots, they generally require a combination of air roots and traditional roots that grow within a potting medium. Air roots are important for absorbing moisture and nutrients from the surrounding environment, but they are typically supplemented by roots that grow into the potting mix. Orchids that are solely reliant on air roots may struggle to get sufficient nutrients and moisture to sustain healthy growth.
How do you water an orchid with air roots?
Watering orchids with air roots can be a bit different from watering plants with traditional roots. Here’s what you can do:
Mist or humidify the air: Orchids with air roots appreciate higher humidity levels. You can mist the air around the plant using a spray bottle or use a humidifier to maintain a suitable level of humidity.
Soak or dunk the roots: One method to water orchids with air roots is to soak or dunk the roots in water. Fill a container with room temperature water and submerge the roots for a few minutes, allowing them to absorb moisture. Afterward, remove the orchid from the water and let the excess water drain away.
Use a humidity tray: Placing the orchid pot on a humidity tray filled with water and pebbles can create a humid microclimate around the plant, benefiting the air roots.
Should you soak orchid roots before repotting?
It is generally not necessary to soak orchid roots before repotting. In fact, it’s generally recommended to allow the roots to dry out slightly before repotting an orchid. This helps to prevent root rot and allows the roots to better adapt to the new potting medium. If the roots are excessively wet or waterlogged, it’s best to let them dry out for a day or two before repotting. However, if the roots are completely dry, it can be helpful to hydrate them by soaking them in room temperature water for a short time to prevent dehydration during the repotting process.
Hi, I’m Steve, an orchid grower with 30+ years of hands-on experience caring for indoor and outdoor plants. I share practical, tested tips and beginner-friendly guides to help plant enthusiasts nurture healthy, thriving plants.