
Feel free to share!
Bonsai trees often captivate the eye with their rugged beauty and sense of timelessness. The aged, twisted appearance that makes them look hundreds of years old is achieved through meticulous techniques rather than time alone. Among these, deadwood styling, featuring Shari and Jin, stands out as an advanced and artistic process that reveals both patience and skill.
Table of Contents 👈 Tap Here
Creating realistic Shari and Jin features gives your bonsai a natural sense of struggle and endurance, evoking the feeling of trees shaped by wind, lightning, and age. Whether you’re a beginner eager to learn or an experienced bonsai artist looking to refine your techniques, mastering deadwood artistry will help you transform ordinary trees into breathtaking miniature masterpieces.
🌿 What Is Bonsai Deadwood?
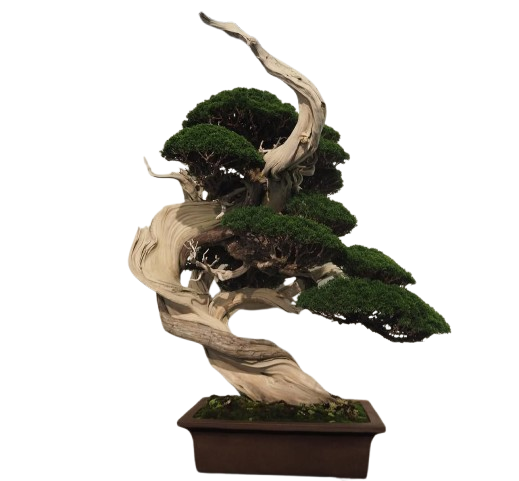
Bonsai deadwood refers to the carefully carved, bleached, or aged sections of a bonsai tree designed to resemble damage caused by nature. The goal is to make your bonsai appear aged, resilient, and full of character. These areas tell a story — of years of endurance, growth, and beauty shaped by time and harsh natural conditions.
There are two main types of deadwood work in bonsai. Shari involves removing bark from the trunk to reveal the underlying wood, giving a striking contrast between living and aged sections. Jin, on the other hand, focuses on dead or broken branches, refined into artistic forms that highlight the passage of time and the beauty of imperfection.
🌳 Tools and Materials You’ll Need
To achieve professional-quality results, it’s essential to use the right bonsai tools and materials. The main tools include carving knives, chisels, and rotary tools like a Dremel, which allow you to shape and texture the wood precisely. Protective materials such as raffia or grafting tape are used to safeguard live branches during bending or carving.
You’ll also need copper or aluminum wire for shaping, lime sulfur to bleach and preserve the deadwood, and proper safety gear including gloves, masks, and eye protection. Each tool serves a unique purpose, and using them correctly ensures both your safety and your bonsai’s long-term health.
🌱 Preparation Before Carving
Before you begin carving, you must carefully prepare your tree. Start by choosing a suitable species — Juniper, Pine, and Sabina varieties respond exceptionally well to deadwood styling because their wood hardens naturally over time. Examine your bonsai’s structure closely and identify areas with natural bends, scars, or dead patches to guide your design plan.
Planning ahead helps prevent unnecessary damage to living tissue. Sketch your desired Shari or Jin design, marking which areas will remain alive and which will be carved. Remember, removing too much bark or cutting too deep can harm the tree’s vascular system, so proceed slowly, ensuring both beauty and health are maintained in balance.
🌿 20 Best Ways to Create Shari and Jin
Here are the 20 expert-approved techniques to help you carve, shape, and perfect bonsai deadwood features with precision and artistry. Each method combines traditional bonsai wisdom with modern care to help your tree develop natural beauty, depth, and character — ensuring that every curve, twist, and scar tells a story of age and endurance.
1. Start with Naturally Dead Branches
Always begin your Shari or Jin work using naturally dead branches rather than cutting live ones. This reduces stress on the tree and ensures realistic results. Natural deadwood already carries the authentic texture and shape you want. By enhancing it with minimal carving, you preserve the tree’s health while creating an ancient, timeworn effect.
2. Wrap Raffia Before Bending
Before attempting major bends, wrap the trunk or branch with wet raffia. Raffia acts like a protective cushion, keeping the bark and cambium layer from cracking. It distributes bending pressure evenly and allows you to make sharper curves safely. Professionals always use raffia when shaping strong or thick branches to ensure long-term success.
3. Combine Bending and Carving Gradually
When creating dramatic shapes, combine bending and carving techniques slowly over time. This approach allows the tree to adjust naturally to each change. Start by slightly carving one side, then gently bend and secure it with wire. Repeat after healing periods. Gradual work keeps the tree healthy and helps you achieve smooth, lifelike curves.
4. Peel Bark Carefully with a Sharp Knife
For clean, detailed Shari creation, use a sharp bonsai knife to carefully peel away bark in thin layers. Avoid deep cuts that damage live tissue. Follow the natural grain of the wood for a realistic pattern. Patience is crucial — rushing may cause uneven textures or harm live veins that supply nutrients to the tree.
5. Shape Slowly Over Time
Never attempt to finish your Shari or Jin in one session. Shaping slowly, allowing the wood to dry and harden between stages, creates stronger and more natural-looking results. Over time, wood develops beautiful cracks and weathering. This slow process mimics nature’s aging and ensures your bonsai maintains both health and artistic integrity.
6. Contrast Live Bark with Deadwood
Creating visual contrast between live bark and deadwood highlights the beauty of both. Keep the live bark healthy and vibrant while carefully maintaining the pale, aged appearance of the dead areas. The balance between living and dead tissue creates stunning depth, making your bonsai appear older, stronger, and more realistic in presentation.
7. Add Spiral Carving Patterns
A spiral carving pattern gives your bonsai trunk a natural, wind-sculpted look. Use small chisels or rotary tools to carve the spiral slowly, following the natural flow of the trunk. This style is common in junipers found in harsh mountain environments. The movement adds life and energy, making your bonsai appear more dynamic and ancient.
8. Smooth Rough Edges with Sandpaper
After carving, gently smooth the wood using fine-grit sandpaper. This removes harsh lines, giving your Shari and Jin a refined finish. Smooth transitions between carved and uncarved areas make the design more professional. It also reduces the risk of rot by eliminating rough fibers that can trap moisture or harbor fungal infections.
9. Apply Lime Sulfur Evenly
Once carving is complete and the wood is dry, apply lime sulfur evenly across all deadwood areas. This step bleaches the wood, giving it a classic white, aged look while killing fungi and bacteria. Use a fine brush and work in thin layers. Always apply lime sulfur outdoors or in a well-ventilated area for safety.
10. Create Jin from Broken Branches
Instead of cutting live branches, transform broken or old ones into beautiful Jin features. Peel off bark gradually and shape the exposed wood into natural-looking points. This gives the impression of a tree that has survived storms or lightning. Keeping the texture slightly irregular adds authenticity and tells a story of natural resilience.
11. Slightly Burn Wood for Texture
Controlled burning is an advanced method to give deadwood deep texture. Lightly scorch the surface using a small torch or candle, then brush off the charred layer. The result is a naturally aged, rugged appearance that mimics decades of sun exposure. Always perform this technique carefully and protect nearby live areas from heat damage.
12. Use Dremel Bits for Depth and Detail
A Dremel rotary tool with varied bit sizes allows precise carving of fine lines and deep grooves. Use round, cone, and ball-shaped bits to achieve different effects. Carve in short bursts and follow the natural flow of the trunk. This method is ideal for creating intricate Jin or hollow trunk designs with realistic depth.
13. Follow the Wood Grain Carefully
When carving, always follow the natural direction of the wood grain. Working against it can cause cracks, splinters, or unnatural lines that ruin the texture. Observing the grain helps you mimic the way weather and time shape trees in nature. Smooth, flowing cuts along the grain create harmony and visual authenticity in your work.
14. Soak or Moisten Wood Before Carving
If your wood is too hard or dry, moisten it slightly before carving. Damp wood becomes softer and easier to shape without splintering. This is especially useful for older, brittle branches. However, don’t soak it too long — just mist lightly and wait a few minutes. Softened wood allows precise, clean cuts with better control.
15. Use Concave Cutters for Fine Shaping
Concave cutters are essential for shaping smooth transitions and edges in bonsai deadwood. Their curved design removes wood cleanly without leaving deep scars or flat spots. Use them to refine Jin tips, hollow sections, and curved areas of Shari. Proper use of these tools ensures your work looks seamless and professionally sculpted.
16. Preserve Live Veins for Health
Always identify and protect the live veins — the narrow lines of living tissue carrying nutrients and water. These veins sustain the tree’s growth and vitality. Carving too close can cut off essential sap flow, weakening or killing parts of the bonsai. Work carefully around these areas and mark them clearly before starting any carving.
17. Allow New Carvings to Dry Fully
After carving, let the exposed wood dry completely before applying lime sulfur or any sealant. Dry wood absorbs treatments better and prevents fungal growth. Place your bonsai in a shaded, breezy location for a few days to air-dry naturally. This ensures long-lasting preservation and prevents discoloration or uneven whitening in the deadwood areas.
18. Use Lighting Strategically
Proper lighting enhances your bonsai’s visual impact. Position your tree where natural light highlights the contrast between the live bark and carved deadwood. Subtle shadows reveal depth and detail, making your work stand out. Indoors, you can use adjustable grow lights to emphasize specific angles and textures for photography or display purposes.
19. Shield Fresh Carvings from Rain and Humidity
Freshly carved areas are vulnerable to moisture, which can cause rot or mold. Protect them by placing your bonsai under partial cover or using a breathable shelter during rainy or humid conditions. Adequate air circulation helps the wood dry naturally without cracking. This step preserves the strength and color of your freshly created Shari or Jin.
20. Reapply Lime Sulfur Annually
To maintain your bonsai’s deadwood over time, reapply lime sulfur once a year. This keeps the surface clean, white, and free from pests or decay. Annual treatment strengthens the wood fibers and prevents discoloration from weathering. Consistent care ensures your Shari and Jin remain striking features that reflect the beauty of age and endurance.
🌳 Common Mistakes to Avoid
Many bonsai enthusiasts, even experienced ones, sometimes make mistakes that compromise their work. The most common is over-carving live wood, which can disrupt the sap flow and kill parts of the tree. Always focus on controlled, gradual removal of wood and bark to preserve the live veins essential for growth and recovery.
Another frequent error is skipping proper aftercare. Without applying lime sulfur or using the correct sealant, your deadwood may absorb moisture and rot. Avoid carving during dormant seasons, as the tree’s healing ability is slower. Patience, precision, and timing are key to ensuring both beauty and long-term survival.
🌸 Aftercare and Preservation
After you finish carving Shari or Jin, it’s vital to provide the right aftercare. Begin by gently cleaning the exposed wood with a soft brush to remove dust or debris. Once the area is completely dry, apply a thin layer of lime sulfur to sterilize and bleach the wood, enhancing its white, aged appearance and preventing decay.
Keep your bonsai in partial shade for a few weeks to minimize stress. Avoid fertilizing or wiring during this period, allowing the tree to heal naturally. Monitor for signs of rot, fungal infection, or excessive moisture. With regular care and annual lime sulfur treatments, your bonsai’s deadwood will remain healthy and visually stunning for years.
🌿 Inspiring Bonsai Examples
Many world-renowned bonsai artists, such as Masahiko Kimura and Kunio Kobayashi, have mastered the art of deadwood design. Their trees display an extraordinary sense of balance, where living veins intertwine with carved, bleached sections to evoke the spirit of endurance and time. Studying their techniques provides valuable insights into proportion, depth, and emotional impact.
When observing professional bonsai displays, note how Shari and Jin are used sparingly and purposefully. The live and dead elements never compete but instead enhance each other’s presence. This balance is what separates a good bonsai from a truly remarkable one — a living sculpture that tells a timeless story.
🌸 Conclusion
Mastering bonsai deadwood techniques requires a steady hand, creative vision, and immense patience. Whether you are shaping your first Shari or refining an old Jin, the key is to move slowly and respect your tree’s natural limits. Each carved curve and weathered texture adds authenticity, transforming your bonsai into a miniature symbol of resilience.
As you gain confidence, experiment with new methods and species. Bonsai artistry is a lifelong learning process, where every mistake becomes a lesson and every success a story. Remember — the best bonsai are not just trees; they are reflections of nature’s endurance, sculpted with your care, imagination, and passion.
FAQ
Q1: What are Bonsai Deadwood Techniques?
A1: Bonsai Deadwood Techniques are specialized methods used to create natural-looking deadwood on bonsai trees. By carefully stripping bark, carving, and shaping wood, Bonsai Deadwood Techniques allow artists to simulate age, weathering, and natural decay. Mastering Bonsai Deadwood Techniques enhances the beauty and realism of a bonsai, giving it the appearance of an ancient, weathered tree with unique character.
Q2: Why are Bonsai Deadwood Techniques important for bonsai art?
A2: Bonsai Deadwood Techniques are crucial because they add drama, depth, and authenticity to bonsai trees. Using Bonsai Deadwood Techniques, bonsai enthusiasts can recreate the effects of storms, lightning, or old age. Proper Bonsai Deadwood Techniques transform a simple bonsai into a visually captivating masterpiece, making the tree appear timeless, resilient, and full of natural history.
Q3: Which tools are necessary for Bonsai Deadwood Techniques?
A3: The most common tools for Bonsai Deadwood Techniques include concave cutters, chisels, knives, and wire brushes. Each tool plays a vital role in carving, shaping, or refining deadwood. Using the right tools is essential when practicing Bonsai Deadwood Techniques, ensuring precision and avoiding accidental damage, while producing realistic textures and patterns on trunks, branches, and exposed wood areas.
Q4: How can I preserve deadwood when practicing Bonsai Deadwood Techniques?
A4: Preservation is a key step in Bonsai Deadwood Techniques. After carving or stripping bark, artists apply lime sulfur or wood sealers to protect the deadwood from decay and insects. Proper preservation techniques in Bonsai Deadwood Techniques not only maintain tree health but also highlight the intricate details of the deadwood, enhancing the aged, weathered, and artistic appearance of the bonsai.
Q5: Can Bonsai Deadwood Techniques be used on all bonsai species?
A5: While Bonsai Deadwood Techniques can be applied to many species, they work best on harder wood trees like pine, juniper, or cedar. Softer species require extra care to avoid breakage when applying Bonsai Deadwood Techniques. Understanding species-specific limitations is crucial for successful Bonsai Deadwood Techniques, helping artists achieve realistic deadwood effects while preserving the bonsai’s health.
Q6: What are the different types of Bonsai Deadwood Techniques?
A6: Bonsai Deadwood Techniques include Shari, Jin, and Uro methods. Shari involves removing bark along the trunk, Jin focuses on creating dead branches, and Uro forms hollow sections. Each method has a unique purpose in Bonsai Deadwood Techniques, allowing artists to mimic natural aging, environmental stress, or wildlife damage. Using a combination of Bonsai Deadwood Techniques creates visually striking and authentic bonsai trees.
Q7: How long does it take to master Bonsai Deadwood Techniques?
A7: Mastery of Bonsai Deadwood Techniques varies by skill and practice, often taking years of experience. Consistently applying Bonsai Deadwood Techniques, experimenting with different carving styles, and observing natural tree aging helps refine your skills. Patience and dedication in Bonsai Deadwood Techniques lead to highly realistic, visually appealing bonsai trees with aged textures and beautiful deadwood formations.
Q8: Can Bonsai Deadwood Techniques damage the tree?
A8: If performed incorrectly, Bonsai Deadwood Techniques can harm the tree. Over-carving, improper preservation, or lack of species knowledge may lead to decay or breakage. Following proper Bonsai Deadwood Techniques, using suitable tools, and applying preservatives ensures that deadwood enhances the tree’s aesthetic without compromising its health, resulting in a safe, artistic, and visually impressive bonsai tree.
Q9: Are Bonsai Deadwood Techniques suitable for beginners?
A9: Beginners can practice Bonsai Deadwood Techniques with guidance, starting on small branches or older bonsai. Simplified Bonsai Deadwood Techniques allow newcomers to experiment safely while learning carving, shaping, and preservation. Over time, regular practice of Bonsai Deadwood Techniques develops confidence, precision, and an eye for detail, helping beginners gradually master more advanced methods like Shari, Jin, and Uro.
Q10: How do Bonsai Deadwood Techniques enhance a bonsai’s visual appeal?
A10: Bonsai Deadwood Techniques dramatically enhance a tree’s aesthetics by simulating natural aging, damage, and weathering. By applying Bonsai Deadwood Techniques, artists create contrast between live growth and deadwood, adding depth, realism, and storytelling to the bonsai. Proper Bonsai Deadwood Techniques make each bonsai unique, visually striking, and a testament to skillful artistry and patient craftsmanship.