Feel free to share!
Table of Contents 👈 Tap Here
Orchids are stunning, exotic plants that thrive in specific conditions, and one of the most overlooked yet critical factors in their health is airflow. Proper airflow prevents fungal infections, improves nutrient uptake, and ensures your orchid stays vibrant and disease-free. In this comprehensive guide, we’ll cover the 10 best steps for orchid airflow improvement, providing solutions to common problems and expert tips for maintaining a perfect environment.

Why Airflow is Crucial for Orchid Health
Airflow is an essential factor in an orchid’s growth because it mimics its natural habitat. Orchids, especially epiphytic varieties like Phalaenopsis, Cattleya, and Vanda, grow on trees in the wild, where they receive constant fresh air circulation. Poor airflow can lead to issues like pseudobulb rot, mold, and bacterial infections, which can ultimately kill your orchid.
When air movement is restricted, moisture lingers on leaves and roots, creating an ideal environment for pathogens. Good airflow also strengthens orchid stems, promotes efficient transpiration, and improves CO₂ exchange, which enhances photosynthesis.
Tip: If you notice condensation on leaves, a musty smell, or yellowing, it’s a sign your orchid needs better airflow.
Step 1: Use a Well-Ventilated Growing Space
Choosing the right location for your orchid is the first step in orchid airflow improvement. Whether you’re growing orchids indoors or in a greenhouse, ensuring good ventilation is key. Placing orchids near an open window, door, or air vent can promote better airflow. However, avoid direct exposure to strong drafts, which can cause dehydration.
If your growing area is enclosed, consider installing ventilation fans or an exhaust system to create consistent air movement. Small oscillating fans are excellent for indoor setups, as they provide gentle airflow without being too harsh on the plants.
Tip: Keep your orchid at least 1-2 feet away from a fan to avoid excessive drying of leaves and roots.
Step 2: Increase Air Circulation with Fans
Using fans is one of the most effective ways to enhance orchid airflow improvement. Fans help prevent stagnant air, which is a breeding ground for mold and pests. When setting up a fan, aim for a low to medium speed to mimic the gentle breezes found in an orchid’s natural habitat.
If you’re growing multiple orchids, position the fans strategically to ensure all plants receive adequate airflow. Ceiling fans, box fans, or clip-on fans work well for this purpose.
Tip: Avoid pointing the fan directly at the orchid. Instead, let the air circulate around it to create a balanced environment.
Step 3: Maintain Proper Humidity Levels
Airflow and humidity go hand in hand. If humidity is too high, stagnant moisture can lead to fungal infections. If it’s too low, orchids may suffer from dehydration. The ideal humidity level for most orchids is between 50-70%.
To maintain this balance, use a hygrometer to monitor humidity. If humidity is too high, increasing airflow with fans or opening windows can help. If it’s too low, placing a humidity tray or using a humidifier can add moisture without making the air stagnant.
Tip: Avoid misting orchids frequently in high humidity areas, as excess moisture without airflow increases the risk of rot.
Step 4: Space Orchids Properly
Crowding orchids together limits airflow and encourages fungal infections and pest infestations. Proper spacing allows fresh air to circulate freely around each plant. Aim to keep at least 2-3 inches of space between orchids.
If you’re growing orchids on a shelf or in a greenhouse, avoid stacking them too closely. Elevated orchid stands or hanging mounts can help create better airflow while making efficient use of space.
Tip: If you see mold or mildew forming between orchid pots, it’s a sign that they need better spacing.
Step 5: Prune Leaves and Roots Regularly
Old or damaged leaves and roots can block airflow and trap moisture. Trimming yellowing or dead leaves helps improve ventilation within the plant. Similarly, cutting away rotting or overgrown roots ensures better aeration in the potting medium.
Use sterilized pruning shears to remove unwanted growth, and always disinfect tools between cuts to prevent disease spread.
Tip: After pruning, apply a cinnamon powder or antifungal treatment to prevent infections.
Step 6: Choose the Right Pot and Potting Medium
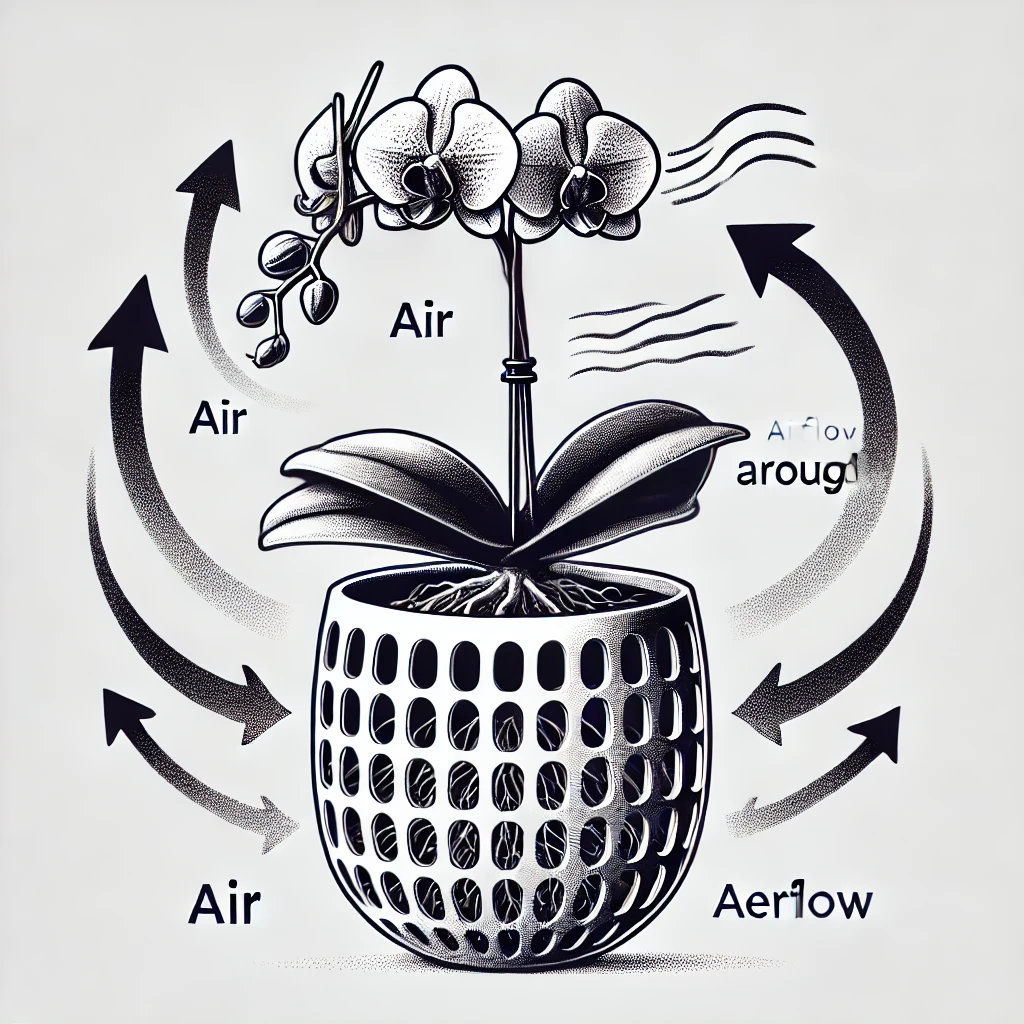
The pot and medium you choose significantly impact orchid airflow improvement. Orchids prefer breathable pots like those made of clay, slotted plastic, or wood. These allow air to reach the roots and prevent waterlogging.
The potting medium should also be well-draining. Orchid bark, sphagnum moss, perlite, or charcoal are excellent choices because they allow air to flow freely around the roots.
Tip: Avoid using dense or compacted soil, as it suffocates orchid roots and leads to root rot.
Step 7: Avoid Overwatering
Overwatering is a leading cause of poor airflow issues. Excess water clogs the potting medium, reducing oxygen availability for the roots. Water orchids only when the medium is almost dry, using the soak and drain method to prevent water stagnation.
A simple trick is to stick your finger or a wooden skewer into the potting mix—if it comes out dry, it’s time to water.
Tip: Always empty saucers or trays under the pot to prevent water from accumulating and creating a humid, stagnant environment.
Step 8: Use Airflow-Enhancing Accessories
Some accessories can significantly boost orchid airflow improvement. Using humidity domes with vents, breathable pot liners, or slotted pot designs allows for better air movement.
For mounted orchids, consider using wire baskets instead of solid pots. These provide 360-degree airflow while keeping the roots aerated and healthy.
Tip: Repot orchids every 1-2 years to refresh the medium and ensure continuous airflow around the roots.
Step 9: Keep the Surrounding Area Clean
A cluttered growing space can trap humidity and restrict airflow. Regularly clean the area around your orchids by removing fallen leaves, dead plant material, and dust.
A clean environment reduces the risk of pests like spider mites and fungus gnats, which thrive in still, humid conditions.
Tip: Wipe orchid leaves with a damp cloth to remove dust, allowing better transpiration and air exchange.
Step 10: Monitor Air Quality and Adjust Accordingly
Indoor air quality affects orchid airflow improvement. If the air is too stagnant, opening a window or using an air purifier can help. Conversely, if the air is too dry due to heating or air conditioning, using a humidifier or placing orchids in a terrarium can help maintain balance.
Tip: Rotate your orchids every few weeks to expose all sides to airflow and prevent one side from becoming too damp or too dry.
Orchid Airflow Improvement Timetable
| Step | Task | Frequency |
|---|---|---|
| Ventilation Check | Open windows or adjust fan settings | Daily |
| Fan Adjustment | Ensure gentle, indirect airflow | Weekly |
| Humidity Monitoring | Check hygrometer readings | Weekly |
| Pruning | Remove dead leaves and roots | Monthly |
| Repotting | Refresh potting mix | Every 1-2 years |
| Cleaning | Clear debris around orchids | Monthly |
My Personal Experience with Orchid Temperature & Air Circulation
Over the years, I’ve experimented with different ways to regulate my orchids’ temperature and airflow, and one of the most effective solutions I’ve found is choosing the right type of pot.
For me, plastic vases with holes have been a game-changer, especially when it comes to improving air circulation. These pots allow air to flow freely around the roots, preventing excess moisture buildup and reducing the risk of root rot. I’ve found that using them is especially beneficial in colder climates, where excess moisture can linger and cause fungal issues. The plastic also helps retain some warmth, which is crucial when temperatures drop.
However, if you live in a warmer climate, clay pots are often the better choice. Clay is porous, which means it helps wick away excess moisture while keeping the roots cool. I noticed that my orchids grown in clay pots during hot months had healthier, more resilient root systems compared to those in plastic containers. The natural evaporation from the clay surface also helped regulate temperature, preventing my orchids from overheating.
This small but important adjustment has made a significant difference in my orchid care routine. Whether you’re battling cold winters or intense summer heat, selecting the right pot for your climate can make a big difference in maintaining optimal conditions for your orchids.
Improving orchid airflow is essential for keeping your plants healthy, disease-free, and thriving. By following these 10 steps, you can create an environment that closely mimics an orchid’s natural habitat, ensuring proper growth and longevity. Consistent orchid airflow improvement will lead to stronger roots, vibrant flowers, and fewer disease problems.
FAQS
Why is orchid airflow important?
Orchid airflow is crucial for preventing fungal and bacterial infections. Good ventilation helps keep the leaves and roots dry, reducing the risk of rot and disease.
How can I improve orchid airflow indoors?
You can improve orchid airflow indoors by using fans, opening windows, and spacing out your orchids to allow air to circulate freely.
Does orchid airflow affect blooming?
Yes, orchid airflow plays a significant role in blooming. Proper ventilation helps regulate humidity and temperature, creating the right conditions for flower spikes to develop.
What happens if orchid airflow is poor?
Poor orchid airflow can lead to stagnant air, increasing the chances of mold, mildew, and bacterial infections. It can also slow down plant growth.
Can I use a fan for orchid airflow?
Yes, using a small oscillating fan can greatly enhance orchid airflow, especially in indoor environments where natural air movement is limited.
How does orchid airflow impact root health?
Orchid airflow helps keep the roots from staying overly damp, preventing root rot. Good ventilation ensures proper drying between waterings.
Is orchid airflow necessary in a greenhouse?
Absolutely! In a greenhouse, orchid airflow is essential to maintain a healthy growing environment, reducing excessive humidity buildup and preventing fungal diseases.
Should I increase orchid airflow during summer?
Yes, during hot and humid months, increasing orchid airflow helps cool the plants and prevents overheating or dehydration.
What is the best way to ensure orchid airflow in a terrarium?
To maintain orchid airflow in a terrarium, use small vents, fans, or regularly open the enclosure to refresh the air and prevent excess humidity buildup.
Can poor orchid airflow cause pests?
Yes, poor orchid airflow can create a damp environment that attracts pests like fungus gnats and spider mites, leading to infestations.
Do orchids in hanging baskets need special orchid airflow considerations?
Yes, orchids in hanging baskets benefit from better airflow, but they should still be placed in a well-ventilated area to avoid stagnant air.
How does orchid airflow affect humidity levels?
Orchid airflow helps balance humidity, ensuring that moisture does not accumulate excessively around the leaves and roots, reducing the risk of rot.
Should I adjust orchid airflow in winter?
Yes, in winter, reduce direct drafts from heaters but ensure orchid airflow remains adequate to prevent condensation and fungal growth.
