Why Your First Orchid Died: 12 Best Lessons Learned
You saw it sitting on the shelf at the grocery store — cascading white blooms, elegant arching stems, a quiet kind of beauty that stopped you mid-aisle. You bought it, brought it home, set it proudly on your windowsill, and thought: this time, I’ll keep a plant alive.
Table of Contents 👈 Tap Here
And then, slowly, it didn’t.
The flowers dropped. The leaves turned yellow. The roots went brown and soft. And eventually you did what most first-time orchid owners do — you quietly threw it away and told yourself orchids just weren’t for you.
Why Your First Orchid Died

Here’s the truth: orchids are not difficult plants. They are specific plants. They don’t ask for a lot, but they ask for the right things. And the right things are almost always the opposite of what our plant-watering instincts tell us to do. If your first orchid died, it almost certainly wasn’t bad luck — it was one (or several) of these 12 very common, very fixable mistakes.
1. you Watered It Too Much
Overwatering kills more orchids than anything else combined. It doesn’t happen all at once — it’s a slow rot, invisible until it’s too late. Orchid roots need to breathe. In their natural habitat, most orchids grow attached to tree bark, exposed to rain and then to open air and drying breezes. Sitting in soggy medium is completely foreign to them.
When roots stay wet for too long, they suffocate and rot. Rotting roots can’t absorb water or nutrients, which means the plant slowly starves even while sitting in moisture.
The fix: Water once a week at most — and even less in winter. Before you water, push a finger an inch into the bark. Still damp? Wait two more days. The goal is to let the medium dry out almost completely between waterings.
2. You Kept It in a Decorative Pot With No Drainage
That beautiful ceramic pot it came in looks lovely. It is also, for an orchid, a slow death sentence. No drainage hole means water collects at the bottom, keeping roots perpetually wet even when the top of the medium feels dry. You think you’re doing fine. The roots disagree.
Many stores sell orchids already placed inside decorative outer pots to look attractive on the shelf. It’s a display strategy, not a growing strategy.
The fix: Always use a clear plastic nursery pot with drainage holes as the actual growing container. Slip that inside any decorative pot you like for aesthetics. When it’s time to water, remove the orchid, water it thoroughly over a sink, let it drain completely for 10–15 minutes, and then return it. Never let it sit in standing water.
3. You Used Regular Potting Soil
Regular potting mix is too dense and holds too much moisture for orchid roots. It packs down, blocks airflow, and keeps roots permanently wet — see lesson one for how that ends.
Orchid roots are not like typical plant roots. They are thick, spongy, and designed to absorb water quickly from rain and then release it just as fast. They need a chunky, airy medium with large gaps that allow oxygen to circulate.
The fix: Use a dedicated orchid mix. For most Phalaenopsis (the common moth orchid), a blend of coarse fir bark, perlite, and horticultural charcoal works beautifully. If your plant came in regular soil, repot it as soon as possible into proper orchid medium.
4. You Put It in Direct Sunlight
Orchids are not cacti. They don’t want to bake in the afternoon sun. In the wild, most orchids grow under a canopy of trees — they get bright, filtered, dappled light, never direct rays beating down on their leaves for hours.
Too much direct sun scorches orchid leaves, creating pale, papery yellow patches. The plant spends so much energy recovering from sun stress that it can’t sustain blooms or healthy growth.
The fix: Give your orchid bright, indirect light. A spot near an east-facing window is often ideal. If your window faces south or west, hang a sheer curtain or step the plant back a few feet. Healthy Phalaenopsis leaves should be a medium, grass green. Yellow-green means too much sun. Deep, dark green means too little.
5. You Kept It Too Cold or Too Hot — or Near a Vent
Most Phalaenopsis orchids are comfortable in the same temperature range as most people: between 16°C and 29°C (60°F–85°F). What they cannot handle is sudden shifts or constant blasts of forced air — from heating vents, air conditioning units, or drafty winter windows.
Cold drafts trigger rapid flower drop. Hot, dry air from heaters desiccates leaves and stresses roots. Many a windowsill orchid has quietly died in January when cold air seeped through the glass it was pressed against.
The fix: Find a stable, draft-free spot. Check that your orchid isn’t sitting directly above or beside a vent. If your windowsill gets very cold in winter, move the plant a foot or two back during those months.
6. You Panicked When the Flowers Dropped
This might be the most heartbreaking moment in first-time orchid ownership. You come home, and petals are on the shelf. By the next morning, the spike is completely bare. You think it’s dying. It isn’t.
Flower drop after a full bloom cycle is entirely normal and expected. Orchids bloom for 6–12 weeks, sometimes longer, and then they rest. The plant is conserving energy. Leaves stay green and healthy. The roots continue quietly doing their thing. The plant is simply done with this cycle and preparing for the next.
The fix: Do not throw it away. Once the flowers drop, examine the spike. If it’s still green, cut it back to just above a visible node — that small brownish bump along the stem. This sometimes encourages a secondary spike and more blooms. If the spike turns brown and papery, cut it all the way to the base. Then keep caring for your orchid as usual. With patience and proper conditions, it will rebloom in 6–12 months.
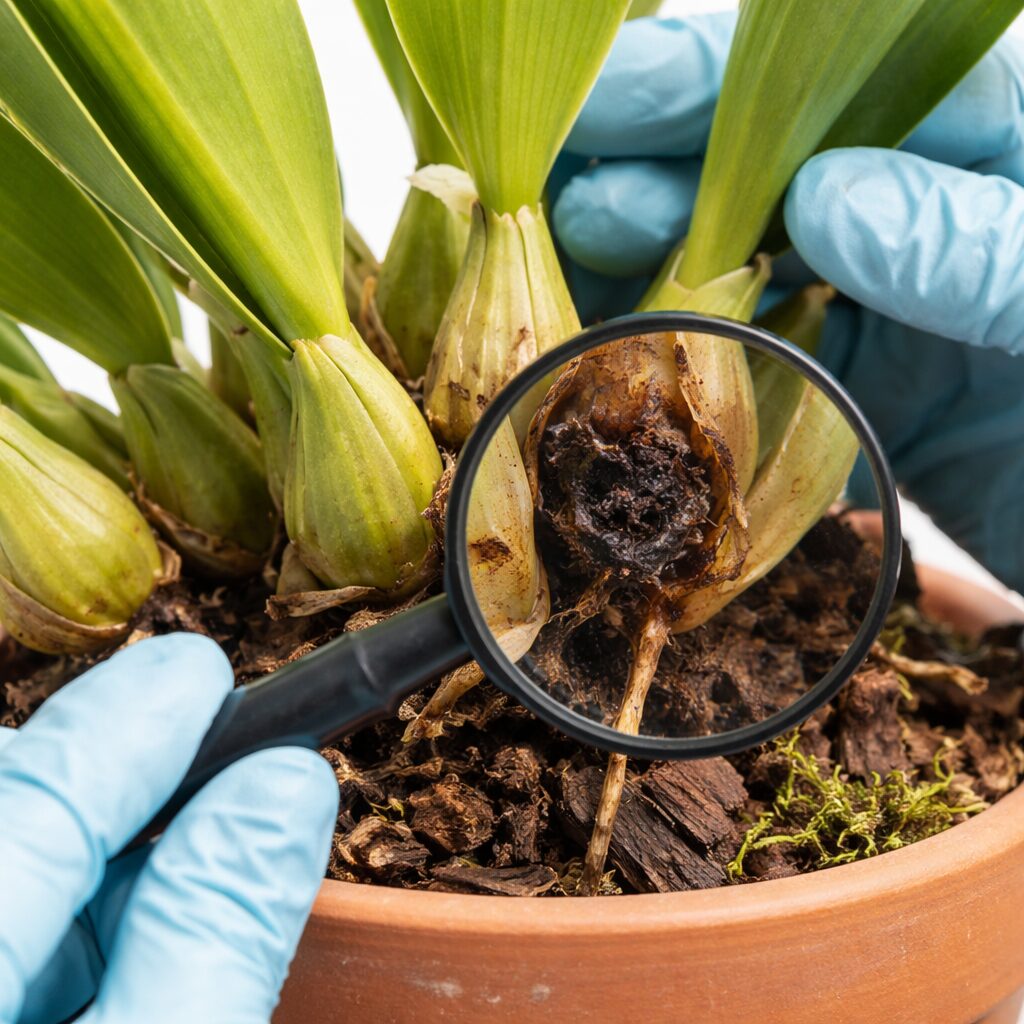
7. You Ignored the Roots
Most people focus on leaves and flowers and completely overlook the roots — which are arguably the most important part of an orchid to monitor. Orchid roots are a live health report.
Green roots mean the plant has recently been watered and is content. Silvery-white roots mean they’re dry and ready for water. Brown, mushy, hollow roots mean rot has set in and action is needed immediately.
The fix: Use a clear plastic pot so you can check root health at a glance without disturbing the plant. Every month or so, give the roots a proper look. If you spot brown, soft roots, take the plant out, trim away the dead tissue with sterilized scissors or shears, let it air dry for a few hours, and repot in fresh medium.
8. You Fertilized Too Much — or Not at All
Fertilizer mistakes go both ways with orchids. Too much causes fertilizer burn — mineral salts build up in the medium and actually damage the roots, causing browning at the tips and weakening the plant. Too little and the orchid runs out of the nutrients it needs to push out new leaves and build energy for reblooming.
The fix: Feed your orchid with a balanced, water-soluble orchid fertilizer (look for something close to a 20-20-20 ratio) at half the recommended strength, once every two weeks during the spring and summer growing season. In winter, scale back to once a month. The golden rule passed around among orchid growers is: fertilize weakly, weekly — though in practice, every two weeks at half strength achieves the same gentle, consistent feeding without the risk of overdoing it.
9. You Didn’t Give It Enough Humidity
Orchids are tropical by nature. They evolved in environments with consistent humidity, often 60–80%. The average centrally heated or air-conditioned home sits at around 30–40% humidity — noticeably drier than what orchids prefer.
Low humidity causes leaf edges to brown and crisp, slows root activity, and can stress a plant that is already coping with imperfect conditions.
The fix: You don’t need to turn your home into a greenhouse. A few simple strategies help significantly. Group several houseplants together — they collectively raise humidity around each other. Place a shallow tray filled with pebbles and water beneath the pot, ensuring the base of the pot sits on the pebbles above the waterline, not in the water. Or run a small humidifier nearby, especially in winter.
10. You Misted the Leaves and Crown
Misting seems caring and intentional. It also causes crown rot, which is one of the fastest ways to kill an orchid. When water pools in the crown — the tight centre where new leaves emerge — and doesn’t dry out quickly, fungal rot sets in. The crown turns soft and brown and the plant rarely recovers from a severe infection.
The fix: Water at the root level, not from above. If you enjoy misting, do it early in the morning so everything dries before nightfall, and never let water sit in the crown. Good air circulation is your best defence against rot.
11. You Repotted While It Was Blooming
Repotting is sometimes necessary — but timing matters enormously. Disturbing an orchid’s roots while it is actively blooming almost always causes immediate flower drop. The plant redirects its energy from sustaining flowers to recovering from the stress of having its root system disturbed.
The fix: Always wait until after the blooming cycle is completely over before repotting. Then, repot every one to two years — or sooner if you notice the bark breaking down into fine, soggy particles, or if roots are pushing wildly out of every drainage hole.
12. You Gave Up Too Soon
The single biggest mistake. An orchid without flowers, or with yellowing leaves, or with a few shrivelled roots is not a dead orchid. It is a struggling orchid — and struggling plants respond to better care.
Countless orchids have been thrown away days or weeks before they would have bounced back. The rest phase after blooming looks alarming if you don’t know what you’re looking for. A couple of yellow leaves at the base is normal ageing. Even a plant that looks almost completely spent can sometimes be nursed back with a proper root trim, fresh medium, and consistent care.
The fix: Before you discard it, do a proper assessment. Unpot the plant. Trim rotting roots. Repot in fresh bark mix. Adjust your watering routine. Place it somewhere with better light. Give it six weeks of proper care before making any final decisions. You may be surprised what survives.
The Bottom Line
Orchids are not difficult. They are misunderstood. They don’t want to be fussed over, watered constantly, or kept in conditions that suit other houseplants. They want bright filtered light, excellent drainage, occasional fertilising, a bit of humidity, and — above everything else — the patience to let them rest between their spectacular blooms.
Your first orchid may not have made it. But now you know exactly why it didn’t, and you know exactly what to do differently. Your second orchid is going to thrive.
FAQS
1. Why did my orchid die shortly after I brought it home?
Why Your First Orchid Died: Many orchids experience stress when moved from a greenhouse to a home environment. Sudden changes in temperature, humidity, airflow, and lighting can shock the plant. Providing stable conditions and avoiding drastic environmental changes can help orchids adjust and thrive after purchase.
2. Can overwatering kill an orchid?
Why Your First Orchid Died: Overwatering is one of the most common reasons orchids fail. Excess moisture suffocates roots and encourages rot, preventing the plant from absorbing water and nutrients properly. Orchids prefer drying slightly between waterings rather than remaining constantly wet.
3. What happens if I underwater my orchid?
Why Your First Orchid Died: Underwatering causes roots to dry out and become unable to absorb moisture efficiently. Leaves may wrinkle, flowers can drop early, and overall growth slows. Maintaining a consistent watering schedule helps orchids stay healthy without becoming stressed.
4. Does poor lighting affect orchid survival?
Why Your First Orchid Died: Orchids need bright, indirect light to grow properly. Insufficient light weakens the plant and reduces flowering, while excessive direct sunlight can scorch leaves. Finding the right balance is essential for long-term orchid health and successful blooming.
5. Can root rot destroy an orchid?
Why Your First Orchid Died: Root rot develops when orchid roots remain wet for extended periods. Healthy roots are firm and green or silvery, while rotten roots become dark and mushy. Early detection and improved drainage can often save the plant.
6. Is the wrong potting mix harmful to orchids?
Why Your First Orchid Died: Traditional garden soil retains too much moisture for orchids. Most orchids require specialized bark-based mixes that allow airflow around roots. Using the proper growing medium significantly improves root health and reduces disease problems.
7. Can low humidity cause orchid problems?
Why Your First Orchid Died: Orchids naturally grow in humid environments. Dry indoor air can cause buds to drop, leaves to wrinkle, and growth to slow. Increasing humidity through trays, humidifiers, or grouping plants together often improves plant performance.
8. Why did my orchid flowers fall off suddenly?
Why Your First Orchid Died: Flower drop can occur due to stress from temperature changes, improper watering, relocation, or low humidity. While losing blooms is disappointing, correcting environmental conditions often helps the orchid recover and bloom again later.
9. Can fertilizer mistakes kill an orchid?
What Killed Your First Orchid? Excessive fertilizer application might harm the plant by burning the roots. Regular use of diluted fertilizer during active growth is beneficial to orchids. It is possible to prevent nutrient-related stress and root damage by carefully following label directions.
10. Does temperature matter for orchids?
Why Your First Orchid Died: Orchids are sensitive to extreme temperatures. Exposure to cold drafts, heating vents, or sudden temperature swings can weaken the plant. Stable temperatures within the recommended range encourage healthy growth and flowering.
__
11. Can pests be responsible for orchid death?
Why Your First Orchid Died: Over time, common pests like scale insects, mealybugs, and spider mites damage orchids by feeding on their tissues. Infestations can be kept from getting serious enough to endanger survival by timely treatment and routine examinations.
12. Why are my orchid leaves turning yellow?
Why Your First Orchid Died: Yellow leaves can result from overwatering, aging foliage, excessive sunlight, nutrient issues, or stress. Identifying the underlying cause is important because different problems require different solutions to restore plant health.
13. Is repotting stress dangerous for orchids?
Why Your First Orchid Died: Repotting can temporarily stress orchids, especially if roots are damaged during the process. Using fresh orchid mix, handling roots gently, and repotting at the proper time helps minimize recovery problems.
14. Can poor drainage kill an orchid?
Why Your First Orchid Died: Without adequate drainage, water accumulates around roots and encourages fungal diseases. Pots with drainage holes and well-aerated orchid mixes allow excess water to escape and keep roots healthy.
15. Why did my orchid stop growing?
Why Your First Orchid Died: Growth may slow due to insufficient light, poor nutrition, root problems, or seasonal dormancy. Evaluating care conditions and making adjustments can often restart healthy development and encourage stronger growth.
16. Can tap water harm orchids?
Why Your First Orchid Died: In some areas, tap water contains high levels of minerals, salts, or chemicals that accumulate in orchid roots over time. Using filtered, distilled, or rainwater may improve orchid health where water quality is poor.
17. Why are my orchid roots shriveled?
Why Your First Orchid Died: Shriveled roots often indicate dehydration, root damage, or environmental stress. Examining root health and adjusting watering practices can help restore moisture balance and improve the plant’s ability to absorb nutrients.
18. How often should orchids be repotted?
Why Your First Orchid Died: Most orchids benefit from repotting every one to two years. Over time, potting materials break down and retain excess moisture. Fresh media improves drainage, airflow, and overall root health.
19. Can moving an orchid frequently cause problems?
Why Your First Orchid Died: Orchids prefer stable environments. Frequent relocation exposes them to changing light levels, temperatures, and humidity conditions. Keeping the plant in a suitable permanent location reduces stress and supports consistent growth.
20. How can I prevent future orchid losses?
Why Your First Orchid Died: Success comes from understanding orchid needs, including proper watering, bright indirect light, humidity, airflow, and regular monitoring. Learning from previous mistakes and maintaining consistent care greatly increases the chances of growing healthy orchids.
Hi, I’m Steve, an orchid grower with 30+ years of hands-on experience caring for indoor and outdoor plants. I share practical, tested tips and beginner-friendly guides to help plant enthusiasts nurture healthy, thriving plants.