Best top 10 Orchid Varieties: Winter Care Guide for Beginners”
Table of Contents 👈 Tap Here
Orchids, with their delicate and exotic blooms, are a favourite among plant enthusiasts. However, caring for these beautiful flowers, especially during the winter months, requires a bit of knowledge and attention. In this step-by-step guide, we’ll explore the top 10 orchid varieties and provide beginners with essential tips for winter care
Winter Care Tips for Orchids
Adjust Light Levels: Position your orchids to receive the appropriate amount of winter sunlight based on their specific needs.
Temperature Control: Keep your orchids in a suitable temperature range, protecting them from drafts and extreme cold.
Proper Watering: Adjust your watering frequency according to the orchid variety and the specific conditions in your home during the winter months.
Humidity Maintenance: Orchids thrive in high humidity. Consider using a humidifier or placing trays of water near your plants to maintain optimal moisture levels.
Protect from cold drafts: Avoid placing orchids near windows or doors where they might be exposed to cold drafts.
By following this step-by-step guide and tailoring your care routine to each orchid variety, you’ll be well-equipped to nurture these stunning plants throughout the winter, ensuring they bloom vibrantly year after year. Happy orchid growing!
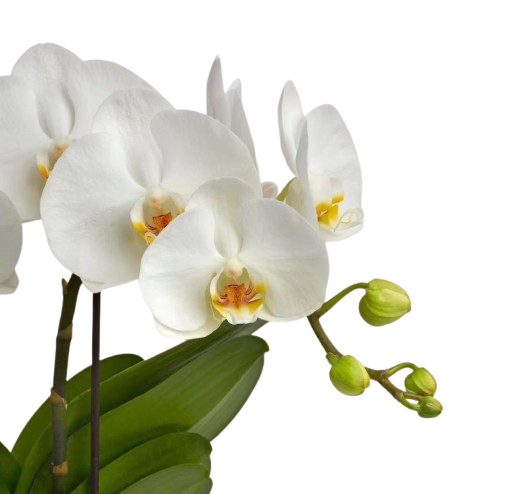
Phalaenopsis orchid (moth orchid)

Phalaenopsis orchids, commonly known as moth orchids, are among the most popular and widely cultivated orchids, cherished for their elegant, butterfly-like blooms. Ideal for beginners, these orchids are relatively easy to care for. Here’s a concise guide to help you nurture your Phalaenopsis orchid:
Light:
Preference: Indirect sunlight is best for Phalaenopsis orchids. They thrive in bright, filtered light but should be shielded from direct sun, especially during the intense afternoon hours.
Temperature:
Range: Aim for a consistent temperature between 65 and 75°F (18 and 24°C). Avoid exposing them to sudden temperature drops, as they are sensitive to cold.
Watering:
Frequency: Allow the top inch of the potting mix to dry out before watering. This usually entails watering once every one to two weeks.
Method: Water the orchid thoroughly, ensuring water drains freely from the pot. The orchid’s roots may decay if it is left to stand in standing water.
Potting Medium:
Type: Use a well-draining orchid mix that allows air to circulate around the roots. Orchids are often epiphytic, meaning they naturally grow on trees, and their roots need adequate aeration.
Humidity:
Preference: Phalaenopsis orchids appreciate higher humidity levels. If your home is dry, consider placing a humidity tray or using a humidifier to maintain the right moisture levels.
Fertilisation:
Schedule: During the growing season (spring and summer), feed your orchid with a balanced orchid fertiliser every 2–4 weeks. Reduce or stop fertilising during the dormant period in the fall and winter.
Pruning:
Flower Spikes: Once the orchid has finished blooming, you can trim the flower spike just above a node. In some cases, a Phalaenopsis orchid may produce side shoots, leading to additional blooms.
Common Issues:
Yellowing leaves: This may indicate overwatering or poor drainage.
No Blooms: Insufficient light can be a common cause. Adjust the orchid’s location to provide more indirect light.
By following these care tips, you’ll create an optimal environment for your Phalaenopsis orchid to flourish. Remember that each orchid is unique, so observe its behaviour and adjust care accordingly. Happy growing!
Cattleya Orchid Winter Care

Cattleya orchids, known for their vibrant and fragrant blooms, require special attention during the winter months to ensure they thrive. Here’s a concise guide for caring for your Cattleya orchid during the winter:
Light:
Intensity: Cattleyas enjoy bright, indirect light. During the winter, provide ample light but shield them from direct sunlight, which can scorch their leaves.
Temperature:
Range: Maintain a temperature between 55 and 70°F (13 and 21°C). Cattleyas appreciate a slight drop in nighttime temperatures, mimicking their natural habitat.
Watering:
Frequency: Adjust the watering frequency during the winter. Allow the top layer of the potting mix to dry slightly before watering. Water sparingly in cooler conditions.
Humidity:
Humid Environment: Cattleyas prefer higher humidity. If your home is dry, consider increasing humidity by using a humidity tray or placing a humidifier nearby.
Potting Medium:
Well-Draining Mix: Use a well-draining orchid mix with bark or sphagnum moss. This aids in avoiding wet circumstances, which can cause rot in the roots.
Fertilisation:
Reduced Frequency: During the winter, reduce fertilisation to once every 4–6 weeks. Use a balanced orchid fertiliser, and ensure the orchid is actively growing before applying.
Rest Period:
Dormancy: Some Cattleya varieties experience a natural dormancy period during the winter. Reduce the watering and allow the plant to rest. Resume normal care when new growth appears.
Air Circulation:
Importance: Ensure good air circulation around the orchid. Proper ventilation helps prevent fungal issues and promotes overall plant health.
Pruning:
Remove Spent Blooms: Once flowers fade, carefully trim the flower spike just above a node. This encourages the plant to redirect energy towards new growth.
Monitoring for Pests and Diseases:
Vigilance: Keep an eye out for pests like scales or spider mites, especially in indoor conditions. Treat promptly if detected.
Protecting from Drafts:
Avoid cold drafts. Cattleyas are sensitive to sudden temperature changes. Protect them from drafts, especially during the winter when heaters are in use.
By providing proper care, you’ll help your Cattleya orchid navigate the winter months successfully. Remember to tailor your care routine based on the specific conditions in your home and the unique needs of your orchid. Happy cultivating!
Dendrobium orchid care

Dendrobium orchids are a diverse group of orchids known for their unique shapes and vibrant colors. To ensure the well-being of your Dendrobium orchid, here’s a concise care guide:
Light:
Light Requirements: Dendrobiums generally thrive in bright, indirect light. Provide filtered sunlight, shielding them from the direct sun in the warmest hour of the day.
Temperature:
Temperature Range: Maintain temperatures between 60 and 70°F (15 and 24°C). Some varieties may tolerate slightly cooler temperatures, but be cautious of frost.
Watering:
Watering Frequency: Allow the top layer of the potting mix to dry before watering. Water more sparingly during the dormant period or cooler months.
Humidity:
Humidity Preference: Dendrobiums appreciate moderate to high humidity. If your environment is dry, consider using a humidity tray or a room humidifier.
Potting Medium:
Well-Draining Mix: Use a well-draining orchid mix that allows for good aeration. Dendrobiums are epiphytic, and their roots require airflow.
Fertilisation:
Fertilising Schedule: During the growing season (spring and summer), feed your Dendrobium orchid with a balanced orchid fertiliser every 2–3 weeks. Reduce or stop fertilising during the dormant period.
Rest Period:
Dormancy: Some dendrobiums go through a natural rest period. During this time, reduce watering and cease fertilisation until new growth emerges.
Pruning:
Trimming Old Canes: After a cane has finished flowering and starts to yellow, you can prune it back to encourage new growth. Be cautious not to cut into healthy, green tissue.
Air Circulation:
Importance: Good air circulation is crucial for preventing fungal issues. Ensure that your Dendrobium has ample airflow around its leaves and pseudobulbs.
Mounting:
Epiphytic Habit: Some Dendrobiums are epiphytic, meaning they naturally grow on trees. Consider mounting these orchids on a piece of wood or tree fern to simulate their natural habitat.
Monitoring for pests:
Vigilance: Regularly inspect your orchid for pests like aphids or mealybugs. If detected, treat promptly to prevent infestations.
By following these care guidelines, you’ll provide your Dendrobium orchid with an environment that encourages healthy growth and stunning blooms. Remember to adapt your care routine based on the specific variety of Dendrobium you have and the conditions in your home. Happy orchid growing!
Oncidium orchid winter care
Oncidium orchids, often referred to as “Dancing Lady Orchids” due to their distinctive flowers, require special attention during the winter months to ensure their continued vibrancy. Here’s a brief guide on how to care for your Oncidium orchid during the winter:
Light:
Bright, Filtered Light: Provide your oncidium with bright, indirect light. They thrive in conditions with filtered sunlight, but be cautious of intense, direct sun exposure.
Temperature:
Temperature Range: Maintain temperatures between 60 and 75°F (15 and 24°C). Oncidiums generally appreciate slightly warmer conditions, but avoid exposing them to extreme cold.
Watering:
Allow Drying Between Waterings: Oncidiums prefer to dry out slightly between waterings. Water when the top layer of the potting mix feels dry to the touch. Adapt the frequency to your home’s unique circumstances.
Humidity:
Moderate to High Humidity: Oncidiums thrive in moderate to high humidity. If your indoor environment is dry, consider using a humidity tray or a room humidifier to maintain optimal moisture levels.
Potting Medium:
Well-Draining Mix: Use a well-draining orchid mix that allows for good aeration. Oncidiums are epiphytic, and their roots need to breathe.
Fertilisation:
Regular Feeding: During the growing season (spring and summer), feed your Oncidium orchid with a balanced orchid fertiliser every 2–3 weeks. Reduce fertilisation during the dormant period in the fall and winter.
Rest Period:
Dormancy: Some Oncidium varieties may experience a dormant period. During this time, reduce watering and cease fertilisation until new growth emerges.
Pruning:
Remove Spent Flower Stalks: Once the flowers have faded, trim the flower stalk just above a node. This encourages the orchid to redirect energy into new growth.
Air Circulation:
Prevent Fungal Issues: Good air circulation is essential. Ensure proper ventilation around the leaves and pseudobulbs to minimise the risk of fungal problems.
Protect from cold drafts:
Avoid Exposure to Cold Drafts: Oncidiums are sensitive to sudden temperature drops. Protect them from cold drafts, especially during the winter.
Monitoring for pests:
Regular Inspection: Keep an eye out for pests such as spider mites or scales. Early detection and treatment are crucial to preventing infestations.
By following these winter care tips, you’ll help your Oncidium orchid thrive during the colder months and set the stage for a beautiful display of their characteristic “Dancing Lady” blooms. Adjust your care routine based on the specific needs of your orchid and the conditions in your home. Happy orchid growing!
Miltonia orchid care

Miltonia Orchid Care
Miltonia orchids, also known as “Pansy Orchids,” captivate with their showy and often fragrant flowers. Providing proper care, especially during the winter, is essential for their well-being. Here’s a concise guide on how to care for your Miltonia orchid:
Light:
Bright, indirect light: Miltonia orchids thrive in bright, indirect light. Protect them from the harsh afternoon sun, but ensure they receive sufficient illumination.
Temperature:
Temperature Range: Maintain temperatures between 55 and 70°F (13 and 21°C). Miltonias appreciate a slight drop in temperature at night, mimicking their natural habitat.
Watering:
Keep Mix Moist: Unlike some orchids, Miltonias prefer consistently moist potting mixes. Water when the top layer feels slightly dry, typically every 1–2 weeks. Adjust the frequency based on your home’s conditions.
Humidity:
High Humidity Preferred: Miltonia orchids enjoy higher humidity levels. Consider using a humidity tray or a room humidifier, especially in dry indoor environments.
Potting Medium:
Well-Draining Mix: Use a well-draining orchid mix, such as a blend of bark and perlite. This promotes proper aeration for the roots.
Fertilisation:
Regular Feeding: During the growing season (spring and summer), feed your Miltonia orchid with a balanced orchid fertiliser every 2–3 weeks. Reduce fertilisation during the dormant period in the fall and winter.
Rest Period:
Dormancy: Some Miltonia varieties may experience a short rest period in the winter. During this time, reduce watering and avoid fertilising until new growth emerges.
Pruning:
Trimming Faded Blooms: Once the flowers have faded, carefully trim the flower spike just above a node. This encourages the orchid to direct energy into new growth.
Air Circulation:
Prevent Fungal Issues: Ensure good air circulation around the leaves and pseudobulbs to reduce the risk of fungal problems.
Protect from cold drafts:
Avoid Exposure to Cold Drafts: Miltonias are sensitive to cold drafts. Shield them from sudden temperature changes during the winter.
Monitoring for pests:
Regular Inspection: Keep an eye out for pests like aphids or mealybugs. Early detection and treatment are crucial to preventing infestations.
By following these care guidelines, you’ll provide your Miltonia orchid with an environment that supports healthy growth and abundant blooms, even during the winter months. Remember to tailor your care routine based on the specific variety of Miltonia you have and the conditions in your home. Happy cultivating!
Vanda Orchid Winter Care

Vanda Orchid Winter Care
Vanda orchids, renowned for their striking, colourful blooms, require special attention during the winter months to thrive. Here’s a concise guide on how to care for your Vanda orchid during the winter:
Light:
High Light Levels: Vandas thrive in bright, indirect light. Provide ample sunlight, ideally with some direct morning or filtered sunlight, ensuring they receive at least 4-6 hours of light each day.
Temperature:
Warm Temperatures: Maintain temperatures between 65 and 70°F (18 and 21°C) during the day. Vandas are tropical orchids and prefer consistently warm conditions. Protect them from cold drafts and temperatures below 60°F (15°C).
Watering:
Frequent Watering: Vandas typically enjoy frequent watering. Water them thoroughly when the aerial roots turn silvery-grey, which may be every 2–3 days. Adapt the frequency to your own circumstances.
Humidity:
High Humidity Preferred: Vandas prefer high humidity. In drier indoor environments, use a humidity tray or a room humidifier to maintain optimal moisture levels.
Potting Medium:
Bare-Root or Mounted Culture: Vandas are often grown bare-root or mounted on slabs. Ensure good aeration around the roots and provide a well-ventilated environment.
Fertilisation:
Regular Feeding: During the growing season (spring and summer), feed your Vanda orchid with a balanced orchid fertiliser every 2 weeks. Reduce fertilisation during the winter months.
Rest Period:
Reduced Watering: Some Vanda varieties may experience a slight rest period in the winter. During this time, reduce watering but avoid letting the roots completely dry out.
Air Circulation:
Good Ventilation: Ensure excellent air circulation around the orchid. Vandas benefit from good airflow to prevent fungal issues.
Protect from cold drafts:
Avoid Exposure to Cold Drafts: Vandals are sensitive to sudden temperature drops. Shield them from cold drafts and ensure a consistently warm environment.
Monitoring for pests:
Regular Inspection: Keep an eye out for pests like scales or spider mites. Regularly inspect both sides of leaves and treat promptly if pests are detected.
By following these care guidelines, you’ll provide your Vanda orchid with an environment conducive to healthy growth and stunning blooms, even during the winter season. Adjust your care routine based on the specific variety of Vanda you have and the conditions in your home. Happy orchid growing!
Cymbidium orchid winter care

Cymbidium orchids are prized for their elegant and long-lasting blooms. Providing proper winter care is crucial for the health and flowering of these orchids. Here’s a concise guide on how to care for your Cymbidium orchid during the winter:
Light:
Bright, indirect light: Cymbidiums prefer bright, indirect light. During winter, position them in a location where they receive ample sunlight, but protect them from intense, direct sun.
Temperature:
Cooler Temperature Range: Cymbidiums appreciate cooler temperatures during the winter. Maintain a range of 50–70°F (10–21°C) during the day and allow a slight drop in temperature at night.
Watering:
Reduced Watering Frequency: In winter, reduce the watering frequency. Before you water the potting mix, let the top inch dry. To avoid wet circumstances, make sure that the drainage is adequate.
Humidity:
Moderate to High Humidity: Cymbidiums thrive in moderate to high humidity. If your indoor environment is dry, consider using a humidity tray or a room humidifier to maintain optimal moisture levels.
Potting Medium:
Well-Draining Mix: Use a well-draining orchid mix, such as a blend of bark and perlite. This allows for good aeration and prevents waterlogged roots.
Fertilisation:
Limited Fertilisation: During winter, reduce fertilisation to once a month using a balanced orchid fertilizer. Resume regular feeding when new growth begins in the spring.
Rest Period:
Natural Dormancy: Some Cymbidium varieties experience a natural dormancy period during the winter. During this time, growth may slow down. Continue to provide care, but expect less active growth.
Air Circulation:
Good Ventilation: Ensure proper air circulation around the orchid to prevent fungal issues. Good airflow is especially important in preventing issues like crown rot.
Protect from cold drafts:
Avoid Exposure to Cold Drafts: Cymbidiums are sensitive to cold drafts. Protect them from sudden temperature drops and position them away from drafts during the winter.
Monitoring for pests:
Regular Inspection: Keep an eye out for pests like mealybugs or scales. Regularly inspect both sides of leaves and treat promptly if pests are detected.
By following these care tips, you’ll provide your Cymbidium orchid with the necessary conditions for a healthy winter period and encourage robust flowering when spring arrives. Tailor your care routine based on the specific variety of Cymbidium and the conditions in your home. Happy orchid growing!
Lady Slipper Orchid (Paphiopedilum)

Lady Slipper Orchid (Paphiopedilum) Care
Lady Slipper Orchids, scientifically known as Paphiopedilum, are characterised by their unique slipper-shaped lip, which sets them apart in the orchid world. Here’s a concise guide on how to care for your Lady Slipper Orchid:
Light:
Low to Medium Light: Paphiopedilums prefer lower light levels compared to some other orchid varieties. Provide filtered or indirect light, avoiding direct sunlight, to prevent leaf burn.
Temperature:
Cool to Intermediate Temperatures: Maintain temperatures between 65 and 75°F (18 and 24°C). Lady Slippers generally prefer cooler conditions, and they can tolerate a slight drop in temperature at night.
Watering:
Consistent Moisture: Keep the potting mix consistently moist, but not waterlogged. Water when the top layer of the mix feels slightly dry, usually every 7–10 days.
Humidity:
Moderate Humidity: Lady Slippers appreciates moderate humidity levels. If your home is dry, consider using a humidity tray or placing a humidifier nearby.
Potting Medium:
Well-Draining Mix: Use a well-draining orchid mix, such as a blend of bark and perlite. Sufficient drainage is essential to avoiding root rot.
Fertilisation:
Regular Feeding: During the growing season (spring and summer), feed your Lady Slipper Orchid with a balanced orchid fertiliser every 2–3 weeks. Reduce fertilisation during the dormant period in the fall and winter.
Rest Period:
Dormancy: Some Paphiopedilum varieties may experience a short dormancy period in the winter. During this time, growth may slow down. Reduce watering and avoid fertilising until new growth appears.
Air Circulation:
Gentle Airflow: Ensure gentle air circulation around the orchid. Avoid strong drafts, as Lady Slippers prefer more still air compared to some orchid species.
Protect from cold drafts:
Avoid Exposure to Cold Drafts: Lady Slipper Orchids are sensitive to cold drafts. Protect them from sudden temperature drops and position them away from draughty areas.
Pot size and repotting:
Stable Environment: Lady slippers prefer stability. Repot only when necessary, usually when the potting mix breaks down or the plant outgrows its container.
Monitoring for pests:
Regular Inspection: Keep an eye out for pests like aphids or mealybugs. Lady Slipper Orchids are generally more resistant to pests, but inspect regularly for early detection.
By following these care guidelines, you’ll provide your Lady Slipper Orchid with the optimal conditions for healthy growth and blooming. Tailor your care routine based on the specific variety of paphiopedilum you have and the conditions in your home. Happy orchid growing!
Epidendrum Orchid
Epidendrum Orchid Care
Light:
Bright, Indirect Light: Epidendrums prefer bright, indirect light. Provide filtered sunlight or morning sun, shielding them from the intense afternoon sun.
Temperature:
Intermediate Temperatures: Maintain temperatures between 60 and 75°F (15 and 24°C). Epidendrums generally tolerate a range of temperatures, but avoid exposing them to extremes.
Watering:
Allow Drying Between Watering: Epidendrums appreciate slightly drying out between watering. When the potting mix seems dry on top, add water. Adapt the frequency to the circumstances in your house.
Humidity:
Moderate Humidity: Epidendrums thrive in moderate humidity. Use a room humidifier or a humidity tray if your house is dry.
Potting Medium:
Well-Draining Mix: Use a well-draining orchid mix with bark or sphagnum moss. Good drainage is essential for the epidendrums to prevent root rot.
Fertilisation:
Regular Feeding: During the growing season (spring and summer), feed your Epidendrum orchid with a balanced orchid fertiliser every 2–3 weeks. Reduce fertilisation during the dormant period in the fall and winter.
Rest Period:
Seasonal Adjustments: Some Epidendrum varieties may experience a slight rest period. During the winter, reduce watering and avoid fertilising until new growth appears.
Air Circulation:
Good Ventilation: Ensure good air circulation around the orchid. Proper ventilation helps prevent fungal issues and promotes overall plant health.
Protect from cold drafts:
Avoid Exposure to Cold Drafts: Epidendrums are sensitive to sudden temperature drops. Protect them from cold drafts, and position them away from draughty areas.
Pruning:
Remove Old Canes: After a cane has finished flowering and starts to yellow, you can trim it back to encourage new growth. Take care not to cut into green, healthy tissue.
Monitoring for pests:
Regular Inspection: Keep an eye out for pests like scales or spider mites. Regularly inspect both sides of leaves and treat promptly if pests are detected.
By following these care guidelines, you’ll provide your Epidendrum orchid with an environment that encourages healthy growth and vibrant flowering. Tailor your care routine based on the specific variety of epidendrum you have and the conditions in your home. Happy orchid growing!
Cambria Orchid (Orchid Hybrid)

Cambria Orchid (Orchid Hybrid) Care
Cambria orchids, a popular orchid hybrid, are a stunning combination of various orchid genera. Known for their vibrant and diverse blooms, caring for Cambria orchids involves attention to specific needs. Here’s a concise guide on how to care for your Cambria orchid:
Light:
Bright, indirect light: Cambria orchids thrive in bright, indirect light. Provide filtered sunlight or morning sun, avoiding intense afternoon sun exposure.
Temperature:
Intermediate Temperatures: Maintain temperatures between 60 and 75°F (15 and 24°C). Cambria orchids generally prefer stable conditions, avoiding extreme temperature fluctuations.
Watering:
Even Moisture: Keep the potting mix consistently moist but not waterlogged. Water when the top layer of the mix feels slightly dry. Adapt the frequency to the circumstances in your house.
Humidity:
Moderate Humidity: Cambria orchids appreciate moderate humidity levels. Use a room humidifier or a humidity tray if your house is dry.
Potting Medium:
Well-Draining Mix: Use a well-draining orchid mix with bark or sphagnum moss. Good drainage is crucial for Cambria orchids to prevent root rot.
Fertilisation:
Regular Feeding: During the growing season (spring and summer), feed your Cambria orchid with a balanced orchid fertiliser every 2–3 weeks. Reduce fertilisation during the dormant period in the fall and winter.
Rest Period:
Adjustments in Winter: Cambria orchids may experience a slight rest period. During the winter, reduce watering and avoid fertilising until new growth appears.
Air Circulation:
Good Ventilation: Ensure good air circulation around the orchid. Proper ventilation helps prevent fungal issues and promotes overall plant health.
Protect from cold drafts:
Avoid Exposure to Cold Drafts: Cambria orchids are sensitive to sudden temperature drops. Protect them from cold drafts, and position them away from draughty areas.
Pruning:
Trimming Faded Blooms: Once the flowers have faded, carefully trim the flower spike just above a node. This encourages the orchid to direct energy into new growth.
Monitoring for pests:
Regular Inspection: Keep an eye out for pests like scales or spider mites. Regularly inspect both sides of leaves and treat promptly if pests are detected.
By following these care guidelines, you’ll provide your Cambria orchid with an environment that encourages healthy growth and vibrant, long-lasting blooms. Tailor your care routine based on the specific hybrid and the conditions in your home. Happy orchid growing!
Hi, I’m Steve, an orchid grower with 30+ years of hands-on experience caring for indoor and outdoor plants. I share practical, tested tips and beginner-friendly guides to help plant enthusiasts nurture healthy, thriving plants.