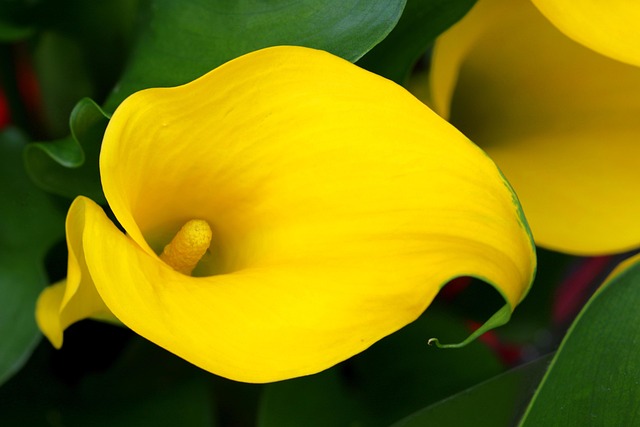
Calla lily Lovers, Beware! Avoid These 14 Mistakes
Table of Contents 👈 Tap Here
Calla lily are a gardener’s favourite, known for their graceful, trumpet-shaped blooms and lush, green foliage. However, even the most devoted calla lily lovers can make mistakes that harm their plants. Whether you’re new to calla lilies or a seasoned grower, it’s essential to understand what not to do to keep these beauties thriving. In this post, we’ll cover the 14 most common mistakes and how to avoid them.
Calla lily Avoid These 14 Mistakes

Mistake #1: Overwatering Your Calla Lilies
Overwatering is one of the most common issues gardeners face with calla lilies. While these plants love moist soil, too much water can quickly turn into a disaster. Overwatering often leads to root rot, a condition that suffocates the roots and causes the plant to wilt or die. Many gardeners mistakenly assume their plant needs more water when they see wilting, which only exacerbates the problem.
How to Avoid It:
Make sure that your garden bed or container has good drainage at all times to avoid overwatering.Use a pot with drainage holes and never let the plant sit in standing water. Test the soil by touching the top inch—if it feels dry, it’s time to water. Remember, consistent but moderate moisture is the key to happy calla lilies.
Mistake #2: Planting in the Wrong Location
Sunlight plays a crucial role in the health of your calla lilies. Too much direct sunlight can scorch the leaves, turning them brown and crispy, while too little light results in stunted growth and fewer blooms. Striking the right balance can be tricky, especially if you’re growing calla lilies outdoors or in varying climates.
How to Avoid It:
For outdoor plants, select a location with partial shade where the lilies receive filtered sunlight. Indoors, place your plant near a bright window, but avoid direct sunlight exposure. If your calla lilies appear stressed—such as yellowing leaves or slow growth—try adjusting their light conditions to find the sweet spot.or climate were there is less sunlight.
Mistake #3: Ignoring Soil Quality
The type of soil you use has a profound effect on the growth of your calla lilies. Planting them in heavy, compacted clay can suffocate their roots, while overly sandy soil drains too quickly, depriving them of much-needed moisture. Poor soil quality often leads to weak plants with fewer flowers.
How to Avoid It:
Always use well-draining, nutrient-rich soil for your calla lilies. If you’re planting in the garden, mix in compost or organic matter to improve the soil’s texture and fertility. For potted plants, a high-quality potting mix designed for flowering plants works best. Regularly check the soil’s condition and amend it as needed to provide optimal growing conditions.
Mistake #4: Forgetting the Dormancy Period
Calla lilies naturally go dormant after their blooming season, and many gardeners mistake this phase for plant death. They may discard their plants prematurely, missing out on future blooms. Dormancy is a crucial part of the calla lily’s lifecycle, allowing the plant to conserve energy for the next growing season.
How to Avoid It:
After your calla lilies finish blooming, reduce watering and let the leaves die back naturally. Once the foliage has withered, store the dormant bulbs in a cool, dry place. When the growing season returns, replant the bulbs or refresh the soil to give your lilies a fresh start. Patience during this phase ensures a thriving plant year after year.
Mistake #5: Overlooking Fertilisation Needs
Calla lilies are heavy feeders, and neglecting their nutrient requirements can lead to poor blooms or weak growth. Without proper feeding, your lilies might produce plenty of leaves but struggle to generate vibrant flowers. On the other hand, over-fertilising can cause more harm than good, burning the roots and affecting growth.
How to Avoid It:
Feed your calla lilies with a balanced, water-soluble fertiliser every two to three weeks during their active growing season. Look for fertilisers with equal parts nitrogen, phosphorus, and potassium to support healthy blooms and foliage. Be cautious not to overdo it—stop fertilising when your plant enters dormancy.
Mistake #6: Planting at the Wrong Depth
Planting depth is often overlooked but plays a significant role in your calla lilies’ success. Bulbs planted too deep may struggle to emerge, while those planted too shallow risk exposure to drying or freezing.
How to Avoid It:
When planting calla lily bulbs, bury them about 2-3 inches deep in the soil with the pointed end facing upward. This depth allows the bulb to establish roots securely while providing enough coverage to protect it from environmental stressors.
Mistake #7: Neglecting Pest and Disease Management
Pests like aphids and spider mites can wreak havoc on calla lilies, feeding on their leaves and stems. Additionally, fungal diseases such as powdery mildew and root rot can weaken your plant, reducing its ability to thrive.
How to Avoid It:
Regularly inspect your calla lilies for signs of pests or diseases. Use insecticidal soap or neem oil to control pests and prune affected areas to prevent fungal spread. Ensure proper spacing and avoid overhead watering to reduce the risk of fungal infections.
Mistake #8: Skipping Deadheading
Once calla lily flowers fade, many gardeners leave the spent blooms on the plant. This not only detracts from the plant’s appearance but also diverts energy away from producing new flowers.
How to Avoid It:
Deadhead calla lily flowers as soon as they fade. Use clean, sharp scissors to cut the spent blooms at their base. This encourages the plant to focus its energy on producing new flowers rather than seeds.
Mistake #9: Exposing Bulbs to Extreme Temperatures
Calla lily bulbs are sensitive to extreme cold or heat. Leaving them exposed to frost or direct sunlight during dormancy can damage the bulbs, leading to poor growth in the next season.
How to Avoid It:
Keep the bulbs in a dry, cold, and dark place when they are dormant. Steer clear of frigid temperatures and direct sunlight. Consider extracting the calla lily bulbs before winter and keeping them indoors if you’re growing them in a colder climate.
Mistake #10: Failing to Rotate Indoor Plants
Indoor calla lilies can suffer from uneven growth if they always face the same direction. Over time, this can cause the plant to lean toward the light source, creating an unbalanced appearance.
How to Avoid It:
Rotate your indoor calla lilies every few days to ensure even light exposure. This encourages symmetrical growth and a healthier plant overall.
Calla lilies are stunning plants that reward proper care with dazzling blooms and lush greenery. By avoiding these 14 common mistakes, you can enjoy healthy, thriving calla lilies year after year. Whether you’re growing them indoors or outdoors, remember that attention to detail and a little patience go a long way.
FAQs About Calla Lily
What are the ideal growing conditions for Calla Lilies?
Calla Lilies thrive in well-drained, moist soil and prefer a sunny or partially shaded location. They do well in temperatures ranging from 60°F to 75°F.
How do I care for Calla Lilies indoors?
To care for Calla Lilies indoors:
Place them in bright, indirect light.
Water them regularly but avoid waterlogging.
Use a pot with good drainage
Can Calla Lilies grow in water?
Yes, Calla Lilies can grow in water as they are semi-aquatic plants. However, ensure their roots are submerged while keeping the leaves and flowers above water.
How do I propagate Calla Lilies?
Calla Lilies can be propagated by dividing rhizomes. Separate healthy rhizomes from the parent plant and replant them in suitable soil.
Why are my Calla Lilies not blooming?
Common reasons include:
Insufficient sunlight.
Overwatering or poor drainage.
Lack of nutrients.
Consider adjusting these factors to encourage blooms.
Can I grow Calla Lilies in cold climates?
Calla Lilies are not frost-tolerant. In colder climates, grow them as annuals or dig up the rhizomes before the first frost and store them indoors until spring.
.
Hi, I’m Steve, an orchid grower with 30+ years of hands-on experience caring for indoor and outdoor plants. I share practical, tested tips and beginner-friendly guides to help plant enthusiasts nurture healthy, thriving plants.