
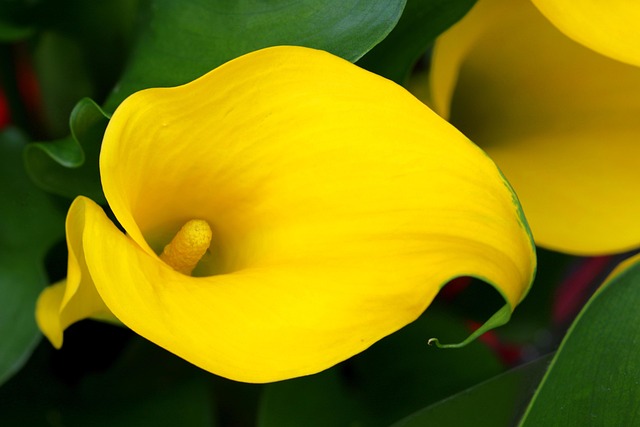
Calla lilies, with their elegant trumpet-shaped blooms and smooth, rich green foliage, are more than just garden favorites—they’re symbols of purity, beauty, and timeless charm. Whether you’re growing them indoors in containers or outdoors in garden beds, mastering Calla lily care is key to achieving those striking, long-lasting flowers that turn heads and uplift any space.
In this comprehensive guide, we’ll reveal 20 expert secrets that help you avoid common mistakes, boost bloom size, and extend flowering. Whether you’re a beginner or an experienced plant lover, these tried-and-true tips will take your Calla lily care game to the next level.

- 1 🌟 1. Choose Healthy Rhizomes to Start Strong
- 2 🌟 2. Use Well-Draining, Rich Soil
- 3 🌟 3. Find the Perfect Light Balance
- 4 🌟 4. Maintain Consistent Moisture (But Don’t Overwater)
- 5 🌟 5. Feed Monthly with a Balanced Fertilizer
- 6 🌟 6. Don’t Skip the Dormant Period
- 7 🌟 7. Plant at the Right Depth
- 8 🌟 8. Choose the Right Pot Size
- 9 🌟 9. Control Pests Early
- 10 🌟 10. Prevent Fungal Issues
- 11 🌟 11. Mulch Outdoor Beds Wisely
- 12 🌟 12. Support Tall Stem
- 13 🌟 13. Divide Rhizomes Every 2–3 Years
- 14 🌟 14. Don’t Panic If Leaves Turn Yellow
- 15 🌟 15. Overwintering in Cold Zones
- 16 🌟 16. Use Them as Cut Flowers
- 17 🌟 17. Try Different Varieties
- 18 🌟 18. Grow Them Indoors for Style
- 19 🌟 19. Repot Every Season for Best Results
- 20 🌟 20. Observe and Adjust
- 21 Calla Lily Care – FAQs
🌟 1. Choose Healthy Rhizomes to Start Strong
The journey to stunning Calla lilies begins with selecting the right planting material. Always inspect the rhizomes before buying or planting. Look for plump, firm, and blemish-free pieces with visible eyes or growth points. Avoid any that are mushy, discolored, or show signs of mold—these are indicators of rot or disease. The more robust the rhizome, the more effectively your plant will develop and bloom. Starting with a weak rhizome means stunted growth, poor flowering, or even complete failure.
Tip: Soak the rhizomes in lukewarm water for 2–3 hours before planting to speed up sprouting.
🌟 2. Use Well-Draining, Rich Soil
Calla lilies thrive in soil that holds moisture without becoming soggy. Make use of a loamy mixture enhanced with well-rotted manure or organic compost. If you’re growing them in containers, choose a high-quality potting mix and amend it with perlite or coco coir for added drainage. Heavy clay soils should be avoided as they can lead to rhizome rot. The soil should feel moist but not sticky to the touch, ensuring roots can breathe and develop properly.
Tip: Add compost every few months to naturally boost soil nutrients and structure.
🌟 3. Find the Perfect Light Balance
Calla lilies need plenty of light but too much direct sun can scorch the leaves, especially in hot climates. Outdoors, plant them in a location that gets morning sunlight and afternoon shade. Indoors, place the pot near a bright window but avoid harsh midday rays.Continuous blooms and vivid green foliage are guaranteed by this equilibrium. Lean stems and less flowering can result from inadequate sunlight.
Tip: Rotate your pots weekly for even growth if you’re growing them indoors.
🌟 4. Maintain Consistent Moisture (But Don’t Overwater)
An essential part of caring for calla lilies is watering. They want thoroughly damp soil that is neither soggy nor dry. The soil should be kept moist during the growing season (spring through summer), but any surplus water should be let to drain away. While withering and flower drop result from underwatering, overwatering suffocates the roots. Dormant or inactive lilies require less water.
Tip: Test the moisture content of the soil with your finger. Only water when the top inch feels completely dry.
🌟 5. Feed Monthly with a Balanced Fertilizer
Regular fertilisation promotes lush foliage and larger flowers, and calla lilies are moderate feeders. During the active growing season, apply a balanced liquid fertiliser once a month, such as 10-10-10 or 12-12-12. Steer clear of high-nitrogen fertilisers since they encourage the growth of leaves rather than blossoms. Compost tea and fish emulsion are excellent examples of organic alternatives.
Tip:To avoid root burn, water the plant both before and after fertilising.
🌟 6. Don’t Skip the Dormant Period
Calla lilies go into a rest phase after flowering. The leaves begin to turn yellow and eventually wither away. This is not an indication of failure; rather, it is a natural period of dormancy. During this period, cut back on watering and cease fertilising. If the soil is a little dry, store the rhizomes; if it’s cold, let the plant rest; if it’s warm, let it rest.
.
Tip: If growing in pots, move dormant plants to a cool, dark spot for 8–10 weeks.
🌟 7. Plant at the Right Depth
Rhizome planting requires depth. Plant them with the growth points facing up, about 3 to 4 inches deep. Too deep of a plant can result in rot or delayed sprouting. They risk drying out soon or being exposed to temperature changes if they are too shallow.
Tip: Gently firm the soil above the rhizome but don’t compact it—roots need air to grow.
🌟 8. Choose the Right Pot Size
If you’re growing Calla lilies in containers, pot size plays a huge role. Select a pot with drainage holes and at least 10 to 12 inches in width.Crowded rhizomes will compete for nutrients, and roots without room to spread will stunt plant growth. Larger pots also reduce how often you need to water.
Tip: Add a layer of small stones at the bottom of the pot to improve drainage.
🌟 9. Control Pests Early
Aphids, fungus gnats, and spider mites are common pests of calla lilies, particularly under humid conditions. Examine the undersides of the leaves and the area surrounding the plant’s base on a regular basis. Webbing or sticky residue frequently indicates an infestation. Manage problems early before they spread by using DIY sprays, neem oil, or insecticidal soap.
Tip: A monthly neem oil spray keeps pests away and adds shine to the leaves.
🌟 10. Prevent Fungal Issues
Root rot, botrytis, and powdery mildew are examples of fungal infections that can be brought on by high humidity and inadequate air circulation. Don’t spray the leaves; always water at the base. Whether the plant is indoors or outside, make sure there is adequate ventilation around it. Treat the plant right away if you see any spots or discolouration.
Tip: Use cinnamon powder on the soil surface to prevent fungal growth naturally.
🌟 11. Mulch Outdoor Beds Wisely
A thin layer of mulch helps retain soil moisture, suppress weeds, and regulate soil temperature. However, too much mulch or direct contact with the stem can cause rot. Use straw, bark chips, or shredded leaves—but always leave space around the plant base.
Tip: Apply mulch after the soil has warmed in spring to avoid delaying growth.
🌟 12. Support Tall Stem
Some Calla lily varieties grow tall and can become top-heavy, especially in windy or crowded spots. Support them using thin bamboo stakes or small rings to keep stems upright and flowers proudly displayed. Flopping blooms can bend or break easily, reducing overall plant appeal.
Tip: Use green garden ties or twist ties to blend in with the foliage for a natural look.
🌟 13. Divide Rhizomes Every 2–3 Years
Over time, rhizomes multiply and become crowded. Every 2–3 years, dig them up during dormancy and divide them using a clean knife. There should be a minimum of one growth eye every division.This not only revitalizes blooming but also gives you more plants to share or replant.
Tip: Dust the cut sections with cinnamon or sulfur powder to prevent rot before replanting.
🌟 14. Don’t Panic If Leaves Turn Yellow
Yellow leaves often appear at the end of the growing season or due to overwatering. It doesn’t always mean your Calla is dying. Check the roots—if they’re mushy, it’s rot; if firm, it’s probably just going dormant. Cut back on watering and let nature do its thing.
Tip: Trim off dying leaves to keep the plant tidy and allow energy to focus on the rhizome.
🌟 15. Overwintering in Cold Zones
In USDA zones colder than 8, Calla lilies can’t survive frost. After the first light frost, dig up the rhizomes, dry them for a few days, and store them in paper bags filled with peat moss or sawdust.Until spring, store them in a cool, dry location.
Tip: Label your stored rhizomes by color or variety to stay organized for next year.
🌟 16. Use Them as Cut Flowers
In a vase, calla lilies can last up to two weeks and make great cut flowers. When the stems are solid in the morning, cut them and put them in water right away. Keep them fresh by changing the water every two to three days and avoiding damaging the stem base.
Tip: To improve water absorption and prevent the stems from flattening out on the vase bottom, cut at an angle.
🌟 17. Try Different Varieties
There are dozens of Calla lily varieties—from classic white Zantedeschia aethiopica to vibrant hybrids in gold, magenta, or almost black. Experiment with different colors and forms to create a dramatic garden display or floral arrangement.
Tip: Plant a mix of early and late-blooming varieties for extended flower time.
🌟 18. Grow Them Indoors for Style
With their sculptural look, Calla lilies make great houseplants. Grow them in decorative containers near windows, balconies, or entryways. As long as they get enough light and you manage watering, they’ll add elegance to your space year-round.
Tip: Indoor plants may need supplemental light in winter—use a grow light to maintain blooms.
🌟 19. Repot Every Season for Best Results
Potted Calla lilies benefit from being repotted annually or every two years. This refreshes the soil, provides room for growing rhizomes, and prevents root-bound conditions. Always use clean tools and containers when repotting to avoid contamination.
Tip: Repot right after the dormancy period for a jump-start to the growing season.
🌟 20. Observe and Adjust
No two environments are exactly alike. Watch how your Calla lilies respond to light, watering, and temperature. Adjust care accordingly—more sun or less water might be needed depending on your location. Personal attention makes the biggest difference in getting stunning blooms.
Tip: Keep a simple plant journal to note changes in bloom time, watering habits, or pest problems.
Calla Lily Care – FAQs
1. What is the best soil for Calla Lily Care?
For successful Calla Lily Care, use well-draining, nutrient-rich soil with a slightly acidic to neutral pH. A mix of peat moss, compost, and perlite helps prevent root rot and promotes healthy growth. Proper soil is the foundation of effective Calla Lily Care in pots or gardens.
2. How much sunlight do Calla Lilies need?
Calla Lily Care requires full sun to partial shade. In hot climates, partial shade helps prevent leaf scorch. Ideally, they should receive 6 hours of morning sun. Light plays a vital role in promoting blooms and maintaining healthy foliage in proper Calla Lily Care routines.
3. How often should I water Calla Lilies?
Consistent watering is part of Calla Lily Care, which keeps the soil damp but not waterlogged. Depending on the climate, water once or twice a week. The plant shouldn’t be left in standing water. In order to prevent rot and dryness, calla lily care requires balanced watering.
4. Should I fertilize Calla Lilies during the growing season?
Yes, fertilizing is essential in Calla Lily Care. Use a balanced liquid fertilizer every 2 to 4 weeks during active growth. Choose a formula low in nitrogen to encourage blooms rather than just foliage. This step ensures your Calla Lily Care promotes vibrant and continuous flowering.
5. Can I grow Calla Lilies indoors?
Indoor Calla Lily Care is absolutely possible with bright, indirect light and good air circulation. Keep the soil evenly moist and place the plant near a window with filtered sunlight. Indoor Calla Lily Care requires extra attention to humidity and watering schedules to mimic outdoor conditions.
6. What is the best temperature for Calla Lily Care?
The ideal temperature range for calla lily care is 60°F to 75°F (15°C to 24°C). Keep them out of the extremes of heat and cold. Growth can be stunted by abrupt temperature reductions. One of the most crucial elements of long-term Calla Lily Care success is maintaining a steady climate.
7. How do I overwinter Calla Lilies?
In colder zones, Calla Lily Care involves digging up rhizomes before the first frost. Clean and dry them, then store in a cool, dry place around 50°F (10°C). Replant in spring. This seasonal step is essential for year-round Calla Lily Care and continued blooming.
8. Why are my Calla Lily leaves turning yellow?
Yellowing leaves often indicate overwatering or poor drainage—two common problems in Calla Lily Care. Check for root rot and improve soil aeration. In between waterings, let the top layer of soil dry a little. Monitoring water habits is vital to prevent stress in Calla Lily Care.
9. How do I get more blooms on my Calla Lily?
To improve blooms, focus on light, nutrients, and proper watering as part of your Calla Lily Care. Remove faded flowers to direct energy toward new ones. Use phosphorus-rich fertilizer. Regular deadheading and feeding can make a significant difference in your Calla Lily Care results.
10. Are Calla Lilies toxic to pets?
Yes, Calla Lily Care includes pet safety considerations. These plants are toxic to cats and dogs if ingested, causing drooling or vomiting. If you have pets, keep your Calla Lilies out of reach or grow them outdoors. Always factor safety into responsible Calla Lily Care.


