
Feel free to share!
Table of Contents 👈 Tap Here
Orchids are among the most captivating plants you can grow, admired for their exotic flowers and graceful beauty. When problems arise, learning about Orchid Nutrient Burn Fixes becomes crucial for keeping them healthy and radiant. These delicate plants can easily suffer from nutrient burn—a common issue that occurs when excess fertilizer harms their roots and leaves. With a little patience, care, and the right recovery steps, your orchid can regain its strength and bloom again with elegance.
Caring for orchids is both rewarding and challenging, especially when their vibrant leaves and delicate blooms start showing signs of stress. Many orchid enthusiasts panic at the sight of yellow or brown leaf tips, not realizing it could be caused by nutrient burn. That’s why understanding Orchid Nutrient Burn Fixes is essential. In this guide, we’ll share 20 expert solutions to help you identify, treat, and prevent nutrient burn, ensuring your orchids stay lush, healthy, and stunning year-round.
🌿 What Is Orchid Nutrient Burn?
Nutrient burn happens when an orchid receives more fertilizer than it can absorb. Excess minerals build up in the potting medium, drawing moisture away from delicate root cells and causing dehydration. The result is visible stress—brown leaf tips, limp growth, and damaged roots. Early diagnosis and careful treatment are essential to help your orchid bounce back to full health.
🔍 How to Identify Nutrient Burn
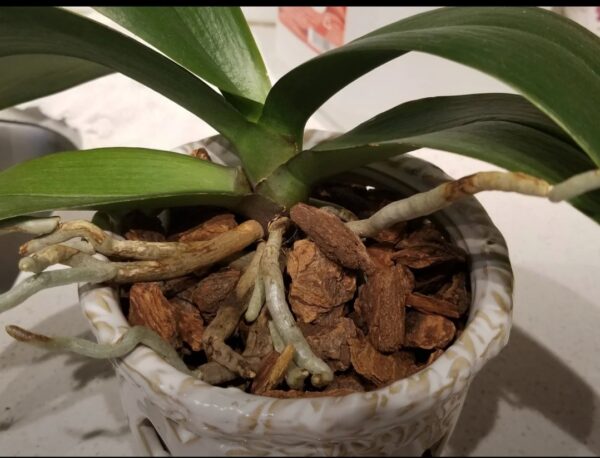
Recognizing the signs of nutrient burn early can save your orchid from serious harm. You might notice yellow or brown leaf tips, crispy edges, or wilting leaves that look dry even when watered. A white crust on the pot surface or blackened roots beneath the soil also indicate fertilizer salt buildup. Swift action helps prevent long-term damage to your orchid’s root system.
⚠️ Understanding the Root Causes
To solve the problem effectively, you must understand its causes. Overfertilizing is the most common culprit, especially when concentrated fertilizer isn’t diluted properly. Hard tap water with high mineral content can also lead to salt accumulation. Poor drainage, compact potting media, or infrequent flushing trap excess salts around roots. Identifying and correcting these issues ensures lasting orchid health.
🌱 20 Expert Solutions to Fix Orchid Nutrient Burn
Immediate Fixes (First Aid for Your Orchid)
1. Stop fertilizing immediately to prevent further damage. Orchids need time to recover from nutrient overload, and continuing to feed them worsens stress. Give your plant at least two weeks of rest before resuming any fertilizer routine, allowing roots to detoxify naturally. This pause gives your orchid the best chance of returning to balanced, healthy growth.
2. Flush the potting medium thoroughly using distilled or rainwater. Pour water gently through the pot several times to wash away built-up salts. Avoid using tap water if it contains high mineral content. This process rehydrates roots and helps reset the growing medium, removing the fertilizer residue that caused the nutrient burn in the first place.
3. Trim off damaged roots and leaves carefully using sterilized scissors. Removing dead or mushy roots prevents bacterial infections and encourages new growth. If leaves are severely scorched, cut back only the worst areas. Always disinfect your tools before and after trimming to protect your orchid from fungus or disease during its recovery period.
4. Repot in fresh orchid mix that provides excellent drainage and aeration. Old media can hold fertilizer salts, which continue harming roots even after flushing. Choose a blend of bark, perlite, or sphagnum moss designed specifically for orchids. Fresh media helps oxygen reach the roots and ensures a cleaner, healthier environment for regrowth and stability.
5. Reduce light exposure temporarily to lower your orchid’s stress level. Bright, direct sunlight can further dry out damaged leaves. Move the plant to a shaded spot with soft, filtered light until recovery begins. This change helps conserve the plant’s energy and allows it to focus on repairing roots and restoring internal balance.
6. Increase humidity levels around the orchid to support recovery. Orchids thrive in 50–70% humidity, which encourages root regrowth and prevents further dehydration. You can use a humidifier, place the pot on a pebble tray, or group plants together to boost moisture levels naturally. Stable humidity is one of the keys to effective orchid healing.
Restoration and Recovery
7. Soak the roots in a root tonic or seaweed extract diluted with clean water. This gentle treatment helps stimulate new root growth and strengthens weakened tissues. Leave the roots soaking for about 15–20 minutes, then repot. Seaweed extracts are rich in natural hormones that help orchids recover faster from nutrient stress and improve resilience over time.
8. After two weeks, resume feeding with a quarter-strength orchid fertilizer. Choose a balanced formula such as 20-20-20 or 30-10-10, but dilute it well to avoid relapse. Orchids prefer gentle nutrition delivered regularly rather than heavy doses. This controlled approach rebuilds strength gradually while protecting delicate roots still recovering from fertilizer damage.
9. Adopt the soak-and-dry watering method to maintain healthy roots. Water the orchid thoroughly until liquid drains from the pot’s bottom, then let the medium dry slightly before watering again. This prevents salt buildup and encourages proper oxygen circulation. Regular, balanced watering habits keep orchids hydrated while avoiding the stagnant conditions that worsen nutrient burn.
10. Ensure consistent air circulation using a small fan or open window. Good airflow prevents fungal issues that may arise during recovery. It also helps dry the potting medium evenly, reducing the risk of root rot. Orchids naturally grow in breezy environments, so maintaining steady air movement promotes healthier growth and overall plant resilience.
11. Watch for new roots or leaves — these are encouraging signs of recovery. New root tips usually appear green or white and feel firm to the touch. If your orchid starts producing fresh leaves or pseudobulbs, it’s successfully regaining strength. Celebrate these small milestones and continue gentle care to maintain steady improvement over time.
12. Avoid misting leaves directly during recovery, as moisture sitting on damaged tissues can invite fungal infections. Instead, focus on raising ambient humidity. You can mist the air around the plant or use a humidity tray instead. Keeping the leaves dry while maintaining a moist environment strikes the perfect balance for safe, effective recovery.
13. Replace the potting mix if it smells sour or feels compacted. Old, decomposed media traps salts and reduces oxygen flow to roots. Fresh bark-based mixes restore drainage and air circulation. When repotting, inspect the roots carefully and trim away any soft, dark areas. Healthy roots should appear firm, silvery, or green depending on moisture level.
14. Use purified water sources like rainwater or reverse osmosis (RO) water. These options contain fewer dissolved salts, making them gentler on sensitive orchid roots. Regularly alternating between purified and tap water can also reduce mineral accumulation. Clean water helps orchids absorb nutrients effectively without the excess residues that lead to nutrient burn over time.
15. Clean leaves regularly with a damp, soft cloth to remove dust and salt residues. A gentle wipe enhances photosynthesis and prevents buildup of harmful deposits on the leaf surface. Avoid using chemical cleaners or oil-based sprays that can clog pores. Healthy, clean leaves allow your orchid to breathe better and recover more efficiently after stress.
16. Space orchids apart to improve air movement and reduce disease risk. Overcrowded plants share moisture and pests easily, making recovery harder. Good spacing ensures better airflow around each plant, helping leaves and roots dry evenly after watering. This simple adjustment supports long-term health and minimizes the chance of repeated nutrient burn incidents.
17. Avoid bloom boosters or high-phosphorus fertilizers while your orchid is healing. These products can be too strong for stressed plants and may worsen root damage. Wait until new growth is visible before introducing them again. Focus on balanced feeding that encourages root recovery first—healthy roots are essential for future flowering success.
18. Reintroduce fertilizer gradually once your orchid shows visible improvement. Start at one-quarter strength for two feedings, then slowly increase to half strength. This cautious approach prevents shocking recovering roots. Always dilute the fertilizer properly and apply only after watering, ensuring that roots absorb nutrients safely and evenly without burning sensitive tissues again.
19. Keep a detailed care journal to record your fertilizing and watering habits. Note the fertilizer type, dilution ratio, and frequency of application. Tracking your care routine helps identify what works best and prevents future overfeeding mistakes. Over time, these records will guide you toward more consistent, confident orchid care based on real observation and results.
20. Be patient and consistent. Orchids recover slowly but steadily when given proper care. Resist the urge to overcorrect or feed heavily during recovery. Instead, maintain balanced conditions—good humidity, moderate light, and careful watering. With time and consistency, your orchid will rebuild strong roots, firm leaves, and eventually reward you with stunning blooms again.
💧 Preventing Future Nutrient Burn
The best way to fix nutrient burn is to avoid it in the first place. Always remember the golden orchid rule: feed weakly, weekly. Dilute your fertilizer to one-quarter strength, and never apply it to dry roots. Flush pots monthly with clean water to remove excess salts. Use organic or slow-release fertilizers for gentle, sustained nutrition year-round.
🌼 Expert Tips for Healthy Orchid Feeding
Always choose orchid-specific fertilizers containing essential micronutrients like calcium and magnesium. Maintain your water’s pH between 5.5 and 6.5 for optimal nutrient absorption. Rotate feeding formulas based on growth stages — nitrogen-rich for growth, phosphorus-rich for blooms. Observe your orchid closely after feeding to understand its unique responses and fine-tune your routine for long-term success.
🚫 Common Mistakes to Avoid
Avoid common pitfalls that worsen nutrient burn. Never mix multiple fertilizers together or apply strong doses to a stressed plant. Fertilizing dry or waterlogged roots also causes damage. Many growers assume more nutrients mean faster growth, but orchids thrive with moderation. Remember, balance and consistency create healthier plants and stronger, longer-lasting flowers over time.
🌺 Final Thoughts
Recovering an orchid from nutrient burn requires dedication, observation, and patience. Flushing salts, replacing old potting mix, and maintaining a gentle feeding schedule will gradually restore your plant’s health. Watch for new growth, as it signals recovery. With mindful care and steady attention, your orchid will regain its strength, showcasing beautiful blooms for many years to come.
🌿 FAQs on Orchid Nutrient Burn Fixes
1. What are the best Orchid Nutrient Burn Fixes for damaged leaves?
The best Orchid Nutrient Burn Fixes include flushing the growing medium with clean water, trimming burnt roots or leaves, and switching to a balanced orchid fertilizer. Allow your orchid to recover in moderate light and humidity. These Orchid Nutrient Burn Fixes help restore the plant’s nutrient balance and prevent further leaf damage.
2. How can I identify if I need Orchid Nutrient Burn Fixes?
You need Orchid Nutrient Burn Fixes if your orchid leaves show brown tips, yellow patches, or crispy edges. These are clear signs of excessive fertilizer salts. Applying the right Orchid Nutrient Burn Fixes, like reducing feeding frequency and rinsing the potting mix, can prevent the buildup of harmful minerals and help your orchid recover.
3. Are homemade Orchid Nutrient Burn Fixes effective?
Yes, homemade Orchid Nutrient Burn Fixes can work well if done carefully. Rinsing your orchid’s potting media with rainwater or distilled water and adding organic compost tea can gently cleanse salt deposits. Many growers prefer natural Orchid Nutrient Burn Fixes because they restore balance without harsh chemicals, ensuring healthier, long-term plant growth.
4. How long do Orchid Nutrient Burn Fixes take to work?
Depending on the damage, Orchid Nutrient Burn Fixes can take from a few days to several weeks. Early intervention—such as flushing and trimming affected areas—accelerates healing. Consistent care and correct watering make Orchid Nutrient Burn Fixes more effective, gradually improving leaf color, root health, and new growth within a short recovery period.
5. Can Orchid Nutrient Burn Fixes prevent future fertilizer burns?
Absolutely! Orchid Nutrient Burn Fixes not only heal current damage but also guide you to prevent future burns. By following proper feeding schedules, diluting fertilizers, and regularly flushing soil, you minimize excess salts. Using Orchid Nutrient Burn Fixes as preventive care ensures long-term orchid health and steady, vibrant blooms all year round.
6. What are common mistakes when applying Orchid Nutrient Burn Fixes?
A.
is over-flushing or using hard tap water, which can worsen salt buildup. Another issue is neglecting root inspection. The best Orchid Nutrient Burn Fixes involve patience, gentle cleaning, and precise watering. Avoid overcorrecting, as consistency and balance are essential for effective orchid recovery.
7. Do different orchid species need different Orchid Nutrient Burn Fixes?
Yes, different species respond differently to Orchid Nutrient Burn Fixes. For example, Phalaenopsis orchids require gentler rinsing than Cattleyas. Always research your orchid type before applying Orchid Nutrient Burn Fixes, since root sensitivity and nutrient needs vary. Tailoring the fix ensures better results, protecting your orchid from unnecessary stress or long-term nutrient damage.
8. Can Orchid Nutrient Burn Fixes be used on potted and mounted orchids?
Yes, both potted and mounted orchids benefit from Orchid Nutrient Burn Fixes. For potted orchids, flushing the medium works best, while mounted orchids may need gentle soaking. These Orchid Nutrient Burn Fixes remove excess salts and restore moisture balance, making them versatile solutions for any orchid-growing style or growing condition.
9. Should I repot my orchid after using Orchid Nutrient Burn Fixes?
In many cases, repotting after Orchid Nutrient Burn Fixes is beneficial, especially if the potting mix is old or salt-damaged. Fresh medium supports recovery by improving drainage and air circulation. Combining repotting with Orchid Nutrient Burn Fixes helps rejuvenate roots, promoting faster nutrient absorption and encouraging healthy new shoots over time.
10. Why are Orchid Nutrient Burn Fixes essential for orchid survival?
Orchid Nutrient Burn Fixes are essential because nutrient burns can kill roots, restrict water flow, and stunt growth. Applying timely Orchid Nutrient Burn Fixes restores balance, allowing orchids to recover strength and resilience. Without these fixes, over-fertilization may permanently damage delicate tissues, making long-term plant health difficult to sustain successfully.
11. Can overwatering affect the results of Orchid Nutrient Burn Fixes?
Yes, overwatering can reduce the effectiveness of Orchid Nutrient Burn Fixes by causing root rot. Always allow your orchid’s roots to breathe after flushing. When using Orchid Nutrient Burn Fixes, ensure the pot has proper drainage, and let excess water flow out. This prevents soggy conditions that could slow recovery or invite fungal infections.
12. What type of water should I use for Orchid Nutrient Burn Fixes?
For best results, use rainwater, distilled, or reverse-osmosis water when applying Orchid Nutrient Burn Fixes. These water types contain fewer salts and minerals, helping remove fertilizer residues effectively. Clean, mineral-free water ensures Orchid Nutrient Burn Fixes work efficiently by reducing stress on roots and maintaining balanced moisture levels during the healing process.
13. Can I mix fertilizers after applying Orchid Nutrient Burn Fixes?
It’s best to wait before reapplying fertilizers after Orchid Nutrient Burn Fixes. Allow your orchid to recover for at least one to two weeks. When resuming feeding, use a diluted fertilizer to avoid another burn. Gradually reintroducing nutrients after Orchid Nutrient Burn Fixes helps your plant rebuild strength without overwhelming the sensitive roots.
14. Are chemical Orchid Nutrient Burn Fixes safe for all orchid types?
Chemical-based Orchid Nutrient Burn Fixes should be used cautiously. While they can provide quick relief, some orchids—especially delicate species—may react negatively. It’s often safer to choose organic or water-based Orchid Nutrient Burn Fixes that gently cleanse roots and leaves. Always test a small area first before treating the entire plant to ensure safety.
15. How can I maintain healthy orchids after using Orchid Nutrient Burn Fixes?
After applying Orchid Nutrient Burn Fixes, maintain consistent watering, moderate light, and regular flushing to prevent salt buildup. Monitor your orchid’s leaves and roots for any stress signs. Continuing gentle care after Orchid Nutrient Burn Fixes encourages steady growth, strong blooms, and long-term resilience, helping your orchids stay lush and vibrant all year.